Difference between revisions of "Student Master program"
(→How-to) |
(→How-to) |
||
| Line 204: | Line 204: | ||
'''If a student has been marked absent from school, the student's name will appear in a light red color on the top left of the page'''. | '''If a student has been marked absent from school, the student's name will appear in a light red color on the top left of the page'''. | ||
| + | |||
'''Student Master: Entry Tasks''' | '''Student Master: Entry Tasks''' | ||
Revision as of 06:25, 5 October 2018
This will provide information about student's demographics, enrollment and vocational.
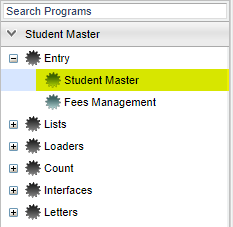
Menu Location
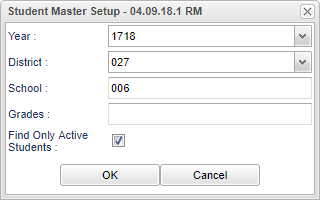
Setup Options
Year - Defaults to the current year. A prior year may be accessed by clicking in the field and making the appropriate selection from the drop down list.
District - Default value is based on your security settings. You will be limited to your district only.
School - Default value is based on your security settings. If you are assigned to a school, the school default value will be your school site code. You will not be able to change this value. If you are a supervisor or other district office employee with a 700 access to the Student Information System, the user will be able to run programs for all schools in your district by choosing 700.
Grades - Grade level of students whose records need to be edited or whose names are to be included on a report. Leave the field blank if all grade levels are to be included. Otherwise, click in the field to the right of Grade(s) to select the desired grade level(s) to be included.
Find Only Active Students - Check the box to find only currently enrolled students without a leave date.
To find definitions for standard setup values, follow this link: Standard Setup Options.
OK - Click to continue.
Cancel - Click to cancel.
Main
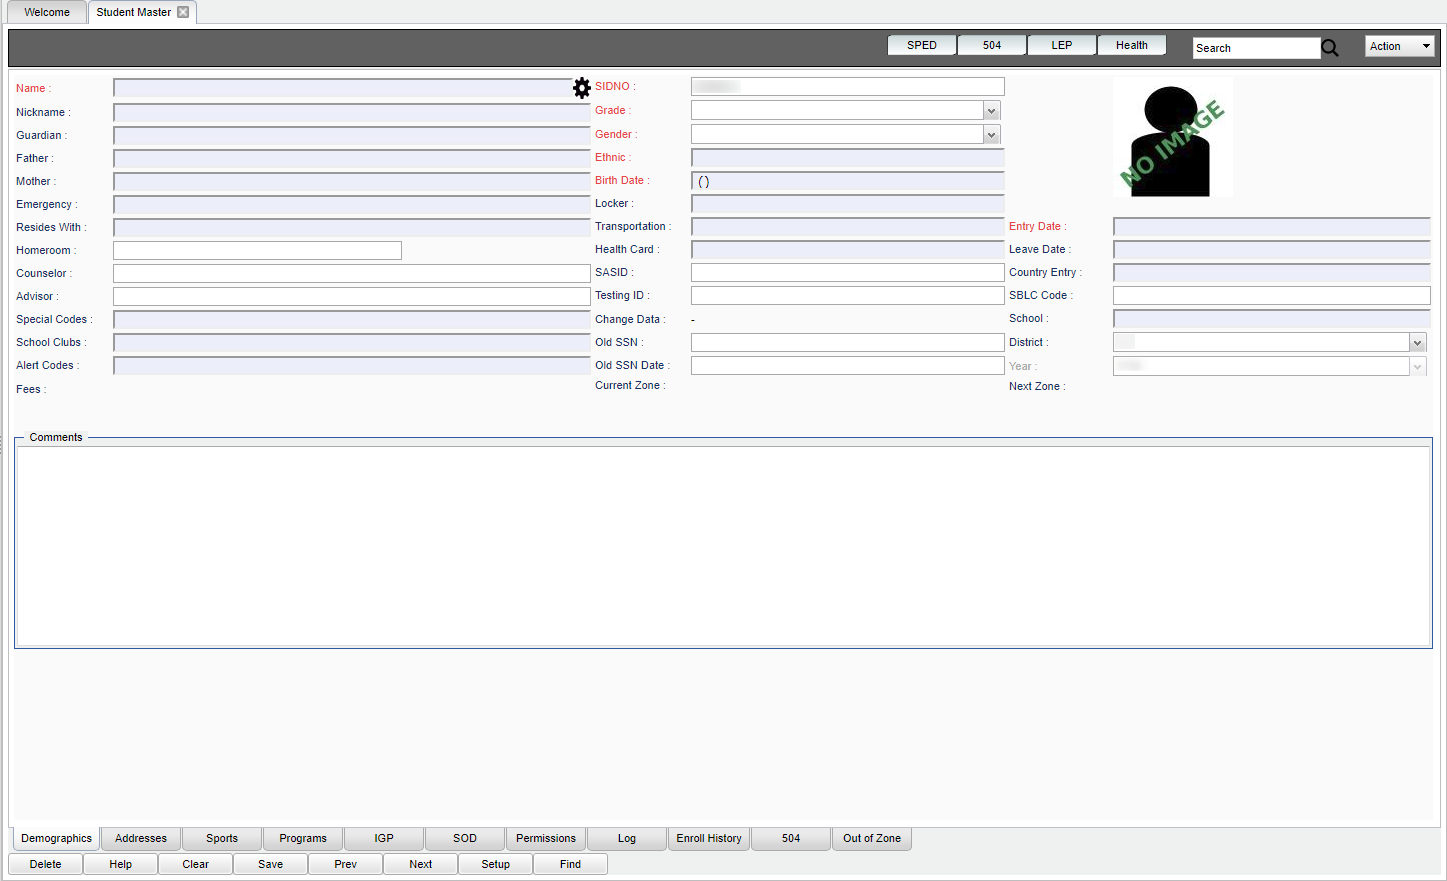
NOTE - All fields in red are required and must be completed in order to save the record.
Name - Click in the field to fill in information about the student.
Nickname - Click in the field to fill in information about the student.
Guardian - Click in the field to fill in information about the guardian.
Father - Click in the field to fill in information about the father.
Mother - Click in the field to fill in information about the mother.
Emergency - Click in the field to fill in information about the emergency contact.
Resides With - Click in the field to fill in information about the who student resides with.
Homeroom - Select the student's homeroom teacher from the pick list.
Counselor - Select the student's counselor from the pick list.
Advisor - Select the student's advisor from the pick list.
Special Codes - Click in the field to fill in all special codes relevant to the student.
School Clubs - Select the school club's the student is involved in from the pick list.
Alert Codes - Click in the field to fill in all alert codes relevant to the student.
Fees - If a student has any fees, it will show the total amount.
SIDNO - The student's local identification number.
Grade - Select the grade level that applies to the student.
Gender - Select the gender that applies to the student.
Ethnic - Select the ethnicity that applies to the student.
Birth Date - Select the student's date of birth.
Locker - Input the student's locker number and locker combination.
Transportation - Click in the field to fill in information about the transportation for the student.
Health Card - Fill in the student's card number, card date and validator. By entering information to the Health Card area of Student Master, you can see the data in the Alpha/Recruiter List.
SASID - The student's state identification number.
Testing ID - Fill in the student's testing ID number.
Change Data - This will show the staff members name, along with the date and time when any Student Master information changes made to it, such as add/edit/adjust.
Old SSN - If the student has a previous Social Security Number, it will display in this field.
Old SSN Date - If the student had a previous Social Security Number and it changed, this fill will display the date it was changed.
Current Zone - This is the student's current school zone.
Entry Date - Click in the field to fill in information about the entry of a student.
Leave Date - Click in the field to fill in information about the leave/drop of a student.
Country Entry - Click in the field to fill in LEP information.
SBLC Code - Select and SBLC code to either retained or promoted. If neither is selected then the student will pass.
School - This will show the school ID where the student is enrolled.
District - This will the district where the student is enrolled.
Year - This will show the school year, i.e. 1819.
Next Zone - This will show where the student will go to school in the next school year.
Comments - Type in any additional information/comment about the student.
Top
SPED - This displays SPED information about the student.
504 - This displays 504 information about the student.
LEP - This displays LEP information about the student.
Health - This displays Health information about the student.
Search - This allows the user to find a student using the Search Bar.
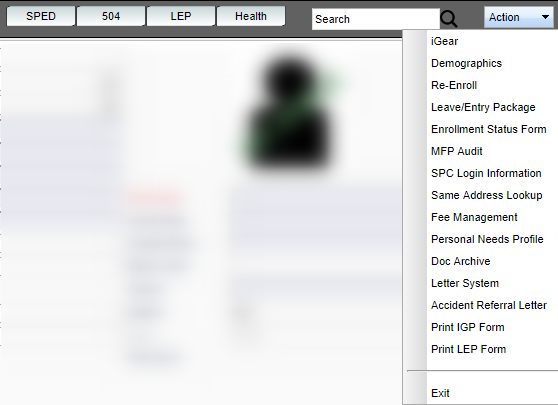
Action Tasks
iGear - Use the iGear to get a multitude of information about the student.
Demographics - This will provide demographic information about the student.
Enroll a Student (Basics) - This will provide instruction when enrolling a student for the first time in the district.
Enroll a Student Using Re-Enroll - This will provide instruction when re-enrolling a student in the district.
Entry/Leave Package - This will provide information needed when a student is leaving the school.
Enrollment Status Form - This will provide enrollment status information about a student.
MFP Audit - This will provide student counts for the school/district.
SPC Login Information - This will display the SPC Login Information for an individual student.
Same Address Lookup - This will display a list of students with the same addresses.
Fees Management - This allows the user to add, edit, and delete fees on individual students and update account receivable on fees.
Personal Needs Profile - This will allow the user to add PNP (Personal Needs Profile) information for individual students.
Doc Archive - This will allow the user the ability to upload personal documents.
Letter System - This will allow the user to print a letter for a student.
Accident Referral Letter - This will allow the user to access a report for accidents and incidents.
Print IGP Form - This will allow the user to print an IGP Form.
Print LEP Form -This action will allow the user to print the LEP Form.
Bottom
Demographics - See Demographics under the Main section above of this page.
Addresses - Select this tab to view all contact information on one page. You can edit this page by clicking on the pencil.
Sports - Select this tab to select any sports a student is involved in. This tab also has other miscellaneous information.
Programs - Select this tab to associate all programs relevant to the student.
IGP - Select this tab to view and input relevant information about the students credentials.
SOD - Select this tab to input extra enrollment and tracking information.
Permissions - Select this tab and enter all relevant information.
Log - The user must have the password to be able to see notes that have been entered by other staff members.
Enroll History - Select this tab to see the student's enrollment history.
504 - Select this tab to enter all relevant information on a student that is listed as 504.
Out of Zone - Select this bat to enter any Out of Zone information about a student.
Delete - The user must have security right in User Management to be able to delete a Student Master record.
Help - Takes you to the Help website for written instructions and instructional videos.
Clear - This option will clear any information that is displayed on the screen in Student Master.
Save - Select to save any information that has been entered in Student Master.
Prev - Select to see the previous student in Student Master.
Next - Select to see the next student listed in Student Master.
Setup - The user may change the settings previously selected for running the program.
Find - Select to find a student in Student Master.
How-to
If a student has been marked absent from school, the student's name will appear in a light red color on the top left of the page.
Student Master: Entry Tasks
Address Validation System (AVS)
Enter Alert Codes (Without Fast Loader)
Enter Country Information (LEP, ESL)
Enter Program Codes (Without Fast Loader)
Enter Out Of Zone (OOZ) information
Enter Special Codes (Without Fast Loader)
Find a Student with the Find Button
Find a Student with the Search Bar


