Report Card
The Report Card can generate two types of grade reports:
- Traditional Report Card
- Progress Report with grades only, no detailed assignments. Use the Detailed Progress Report to see detailed assignments.
Menu Location
Grades > Reports > Report Card
Setup Options
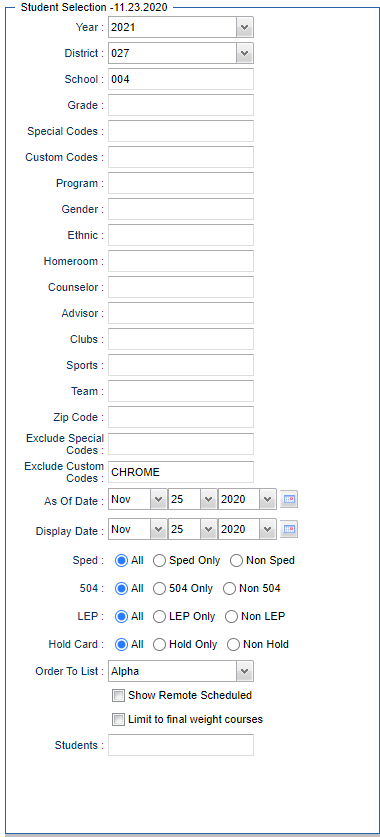
Year - Defaults to the current year. A prior year may be accessed by clicking in the field and making the appropriate selection from the drop down list.
District - Default value is based on the user's security settings. It will be limited to the user's district only.
School - Default value is based on the user’s security settings. If the user is assigned to a school, the school default value will be their school site code.
Grade - Leave blank or select all to include all grades. Otherwise, choose the desired grade.
Special Codes - Leave blank if all special codes are to be included into the report. Otherwise, choose the desired special code.
Custom Codes - Select Custom Codes created in the Custom Codes Management to filter the student list.
Program - Leave blank if all program codes are to be included into the report. Otherwise, choose the desired program code.
Gender - Leave blank or select all to include all genders. Otherwise, choose the desired gender.
Ethnic - Leave blank or select all to include all ethnicities. Otherwise, choose the desired ethnicity.
Homeroom - The teacher who is assigned a group of students in addition to the regular classes that they teach. Leave blank if all homerooms are to be included into the report. Otherwise click in the field to the right of Homeroom to select the desired homeroom(s) to view.
Counselor - Responsible for scheduling, testing, student grades and transcripts. Leave blank if all counselors are to be included into the report. Otherwise click in the field to the right of Counselor to select the desired counselor(s) to view.
Advisor - Selects students for this report based on the Advisor that have been assigned to individual students.
Clubs - Leave blank if all clubs are to be included into the report. Otherwise, choose the desired club code.
Sports - Leave blank if all sports are to be included into the report. Otherwise, choose the desired sport code.
Team - This selection should only be used if your school is using Team Scheduling. Leave blank if all team names are to be included into the report. Otherwise click in the field to the right of Teams to select the desired Teams(s) to view.
Zip Code - Click inside the box for a list of zip codes to choose from.
Exclude Special Codes - Click inside the box for a list of special codes to exclude on Report Card.
Exclude Custom Codes - Click inside the box for a list of custom codes to exclude on Report Card.
As of Date - This choice will list only those students who are actively enrolled as of the date selected in the date field.
Display Date: Date displayed on report card. Typically set for official date of report cards going home.
Sped:
All - Select this to show all students.
Sped Only - Select this to show Sped only students.
Non Sped - Select this to show Non Sped students
504:
All - Select this to show all students.
504 Only - Select this to show 504 only students.
Non 504 - Select this to show Non 504 students.
LEP:
All - Select this to show all students.
LEP Only - Select this to show LEP only students.
Non LEP - Select this to show Non LEP students.
Hold Card: For students with a special code of "HRC Hold Report Card" in Student Master, set to desired selection.
Order To List - Choose the order for which report cards need to be printed.
- For example, Class Period Order will order the report cards, first in class period order alphabetically by teacher`s last Name, then by student's last name, by whichever semester is chosen.
Show Remote Scheduled: Click to include students who are enrolled at other sites, but take classes at this school.
Limit to Final Weight Courses - This will limit the selection of student names in the pick list to only those scheduled in a course that has been marked with a FWGHT in the Course Catalog.
Students: Click to select specific students. There is a search field at the top of the list. It is already sorted alphabetically.
Setup Options - Continued
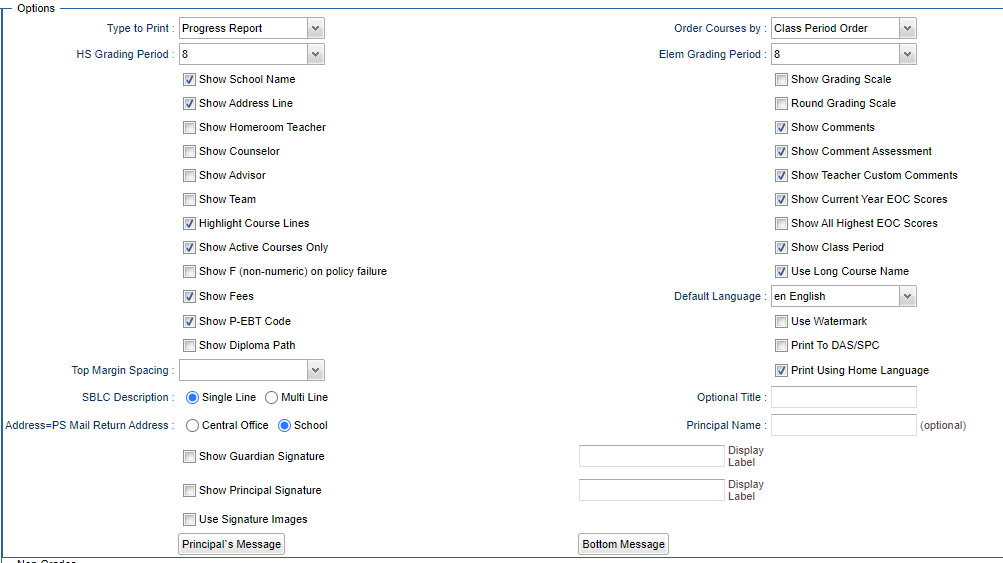
This is the upper right side of setup screen. This section deals with the print details of the report.
Type to Print - Select Report Card, Final Report Card, or Progress Report.
- Selecting Final Report Card will add any Student Master SBLC code to the report, as well as a Promoted or Retained indicator on the report card.
- If a first grade student has an active Special Code of TRA, the Final Report Card will print that the student has been promoted to the first grade.
- Also, any 9th grade student with an active Special Code of TRA and and SBLC code of 9 will show as Promoted to Grade 9 and any student with the TRA code and SBLC code of 10 will show as Promoted to Grade 10.
Order Courses By - Select either Class Period to list courses in order of the schedule or Course Name order to show courses in alpha order.
HS Grading Period (grades 9-12)/ Elem Grading Period (grades 1-8) - Set to the grading period the report card is being generated for. Also note that the Student Master iGear uses the settings that are set up here by the specific user.
Show School Name - Select to show school name on report.
Show Grading Scale - Select to show grading scale on the report.
Show Address Line - Select to show student address line.
Round Grading Scale -
Show Homeroom Teacher - Select to show Homeroom teacher on report.
Show Comments - Select to show Comments posted by teachers from Gradebook in Classroom.
Show Counselor - Select to show Counselor associated with student in Student Master on the report.
Show Comment Assessment - Select to show comment assessments posted by teachers from Gradebook. This will show as the third column in the comment section that is printed on the report card and contains information such as IMPROVEMENT NEEDED, etc.
Show Teacher Custom Comments - Select to print custom teacher comments from Classroom. Teacher would need permission in User Management. Student must have grade on appropriate assignment per Grading Period.
Show Advisor - Select to show Advisor associated with student in Student Master on the report.
Show Current Year EOC (now LEAP) Scores - Select to show LEAP (old EOC) scores student earned this year. If this option is selected, the weight of the exam will print on the report card.
- Note:
- Scores need to be imported into system by District Coordinator first.
- For the E2 column to display/not display, go to Sponsor Site Editor> PPP tab> Grade Posting settings> Course Exam Type. Select the option 'N No Final Exam' to not display for schools that do not use Semester/Final Exams. This will also remove the semester exams columns in the Classroom Gradebook, Report Card/Progress Report, and Detailed Progress Report. The exam columns will still show up in Post Grades By Student and Post Grades Master. If a staff member tries to input a grade, they will receive a warning note.
Show Team - Select to show Team associated with student in Scheduling system on the report.
Show All Highest EOC (now LEAP) Scores - Select to show all historical LEAP (old EOC) scores students earned in high school.
- Note:
- Scores need to be imported into system by District Coordinator first.
- For the E2 column to display/not display, go to Sponsor Site Editor> PPP tab> Grade Posting settings> Course Exam Type. Select the option 'N No Final Exam' to not display for schools that do not use Semester/Final Exams. This will also remove the semester exams columns in the Classroom Gradebook, Report Card/Progress Report, and Detailed Progress Report. The exam columns will still show up in Post Grades By Student and Post Grades Master. If a staff member tries to input a grade, they will receive a warning note.
Highlight Course Line - Simply puts a shaded green row on alternating rows to help read easier.
Show Class Period - Select to show class period of course.
Show Active Courses Only - Select to show only grades from currently scheduled classes. Dropped classes are filtered out. Note that if the course is still active in the one of the semesters and therefore not removed completely from the student's schedule, the course is still considered active.
Use Long Name Course - Select to use long name course.
Show F (non-numeric) on policy failure - With this option selected, the report card would not display the numeric value (e.g. 75C* or 75C#), but would display the alpha character of F (e.g. F* or F#).
Default Language - Select the default language for the long course names.
Show Fees - Select to display fees owed by the student on the report card.
Use Watermark - Prints any assigned Watermark on the report card. Watermarks are assigned in the Sponsor Site Editor.
Show P-EBT Code - Print student's P-EBT code on the report card.
Show Diploma Pathway - Check to show "Diploma Pathway" on report card.
Print to DAS - Will place a student report card in the report card area of DAS. This option replaced the previous run document there even from last year. This shows only the most recent print. Check to display the report card on the Student Progress Center> "Document" page.
Print Using Home Language - This will use a report card that is translated for the student's home language, if the report card has been uploaded.
- This uses a method called form replacement. A translated jasper form of the report card would need to be created and then uploaded to the district. It would involve printing out a report card and translating the labels into Spanish. So, someone with the district will need to translate the existing report card into the new language. Then, we would create the jasper form for all the possible labels and upload it to the district into form replacement and the report card would then use the translated form if it matches the student's home language.
Top Margin Spacing - If a blank header space is desired to make room for a letterhead on stock paper, click and select the number of rows to move the report card information down on the page.
Optional Title - Option title to print in place of report Type to print.
Principal Name - If the Principal Name is not blank, then print the name entered on the report card for the Principal.
SBLC Description - For Final Report Cards only – Will show Promoted or Retained information. NOTE: TRA special coded students will not have Promoted/Retained on their report cards as they are transitional.
Address=PS Mail Return Address - If using pressure sealed envelopes, (PS Mail Envelope Printing System), select either Central Office or School address to show on folded report card for mail out purposes.
Show Guardian Signature - Select to place a line for Guardian Signature. In the box on the right, fill in the label for the line such as “Parent / Guardian”.
Show Principal Signature - Select to place a line for Principal Signature: In the box on the right, fill in the label for the line such as “Principal”, “Acting Principal”, etc….
Use Signature Images - Select to use signature images on the report cards.
Principal’s Message - Click to enter a message that will appear under the grades.
Bottom Message - Click here to view/edit bottom message. The Set Default button will be set for all users once it is set. Use the same security as the Defaults button on Report Cards.
Setup continued - Non Grades
This is the middle right section of the setup screen. This section deals with attendance and discipline options for the report.
Display the below items: From / Thru: Set the date range to show attendance or discipline information.
Skip Absence Codes - For situations when using the Absentee Course option. Select the desired attendance codes to skip when displaying absences by course.
Absentee Detail - Shows 'Attendance by Day' records for the chosen date range below the courses and grades entitled Absentee Notes. NOTE that imported attendance, from another district, will not display on the Report Card.
- Does not check any skip codes
Absentee Course - Show counts of absences by course for the chosen date range at the end of the row for each course.
- Does check skip codes when presenting course absentee counts.
Absentee Summary - Show 'Attendance by Day' summary counts for the chosen date range in a box entitled Absentee Summary. NOTE that imported attendance, from another district, will not display on the Report Card.
- Does not check to any skip codes.
Discipline - Show discipline records for date range.
Setup continued - GPA options
This is the lower right section of the setup screen. This section deals with GPA display options for the report.
Display GPA Line - Click to display GPA information on the report card.
Display Current Year Cumm GPA - Click to show the current year cumulative GPA. After selecting, click the drop down arrow to the right to choose the desired type of cumulative GPA display. Choices are described below:
- Grading Periods - The average is calculated from each grade in all marking periods columns.
- Semesters - The average is calculated from each grade in the Semester columns.
- Finals - The average is calculated from each grade in the Final columns.
To find definitions for standard setup values, follow this link: Standard Setup Options.
Bottom
Defaults - This allows the district user to be able adjust settings that will default upon entry to this program to all users in the district.
Print - Click to create the report cards. If a large number of report cards are being created, give it some time. Print preview will be given in a pdf view.
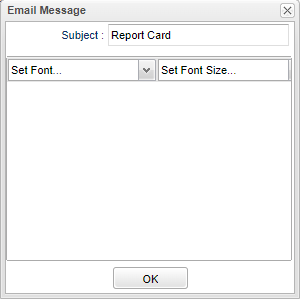
Email - This will allow the user to enter a message to send to the parent by Email or JText.
Mass Calc Sem/Final Grades - Click to get quick access to the program for calculating semester/final averages. NOTE User Management security access is Category> Grades, Program> Post Grades Master RW, Action> Mass Calc Sem/Final Grades> Read Write
Calculate Current Year GPA - Click to average the current school year`s GPAs.
Help - Click to view written instructions and/or videos.


