Student Master program
This will provide information about student's demographics, enrollment and vocational.
Security Permissions for Student Master
Menu Location
Student > Entry > Student Master
Setup Options
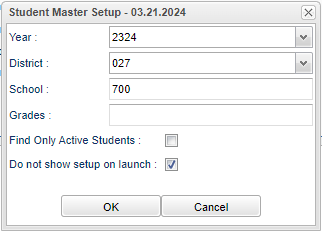
Year - Defaults to the current year. A prior year may be accessed by clicking in the field and making the appropriate selection from the drop down list.
District - Default value is based on the user's security settings. It will be limited to their district only.
School - Default value is based on the user's security settings. If the user is assigned to a school, the school default value will be their school site code.
Grade - Leave blank or select all to include all grade levels. Otherwise, choose the desired grade level
Find Only Active Students - Check the box to find only currently enrolled students without a leave date.
Do not show setup on launch - Check this box to not show setup when launching Student Master. The next time Student Master launches it goes to the current year, current school, all grades, and all students.
OK - Click to continue.
Cancel - Click to cancel.
To find definitions for standard setup values, follow this link: Standard Setup Options.
Top
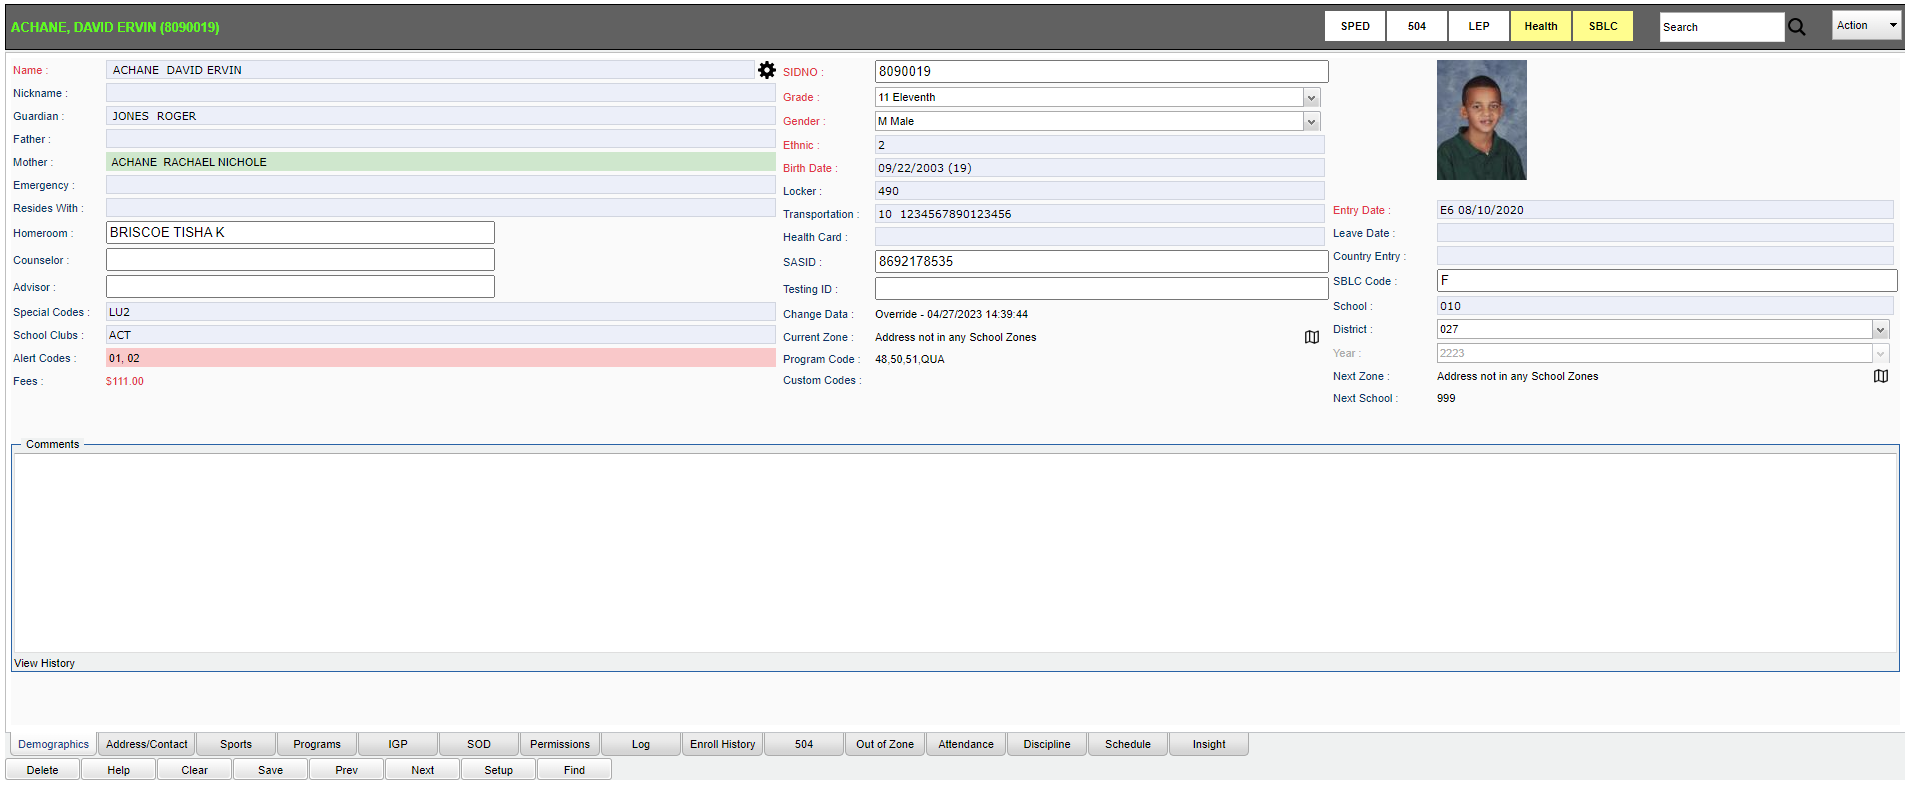
In the dark gray bar at the top after finding a student, the student's name will appear in:
- yellow when a student has been marked absent from school.
- red when the student is no longer active (has a leave date that is in the past).
- green when when the student has a Programs Code of QUA (Quarantine).
SPED - This displays SPED information about the student. UPDATE 2023: JCampus imports Sped data nightly from LDOE and eSER. The user will be able to see the Evals, IEPs and Services in JCampus. The student info bar will show the student Special Ed status. Note that the Special Ed accommodations data has never been part of the nightly files and still isn`t.
504 - This displays 504 information about the student.
LEP - This displays LEP information about the student.
Health - This displays Health information about the student.
SBLC 1 - This displays SBLC and RTI information about the student.
Search - Search for Student by Name, Physical Address, (using house number, street name, street suffix, and city), SIDNO, SASID, Birth Date, Phone Number, Parent Names, Guardian Names, and Emails.
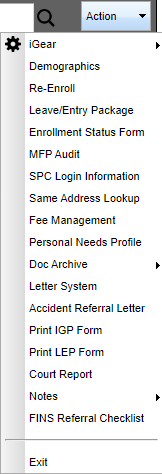
Action Tasks
iGear - Use the iGear to obtain a multitude of information about the student.
Demographics - This will provide demographic information about the student.
Enroll a Student (Basics) - This will provide instructions when enrolling a student for the first time in the district.
Enroll a Student Using Re-Enroll - This will provide instructions when re-enrolling a student in the district.
Leave/Entry Package - This will provide information needed when a student is leaving the school or for a meeting regarding the student.
Enrollment Status Form - This will provide enrollment status information about a student.
MFP Audit - This will provide student information required for MFP audits by the state department of education.
SPC Login Information - This will display the SPC Login Information for an individual student.
Same Address Lookup - This will display a list of students with the same addresses.
Fees Management - This allows the user to add, edit, and delete fees on individual students and update account receivable amounts on fees.
Personal Needs Profile - This will allow the user to add PNP (Personal Needs Profile) information for individual students.
Doc Archive - This will allow the user the ability to upload / view personal documents stored in the Document Archive system.
Letter System - This will allow the user to print a letter for a student.
Accident Referral Letter - This will allow the user to access a report to be used for accidents and incidents.
Print IGP Form - This will allow the user to print an IGP (Individual Graduation Plan) Form.
Print LEP Form - This action will allow the user to print the LEP Form.
Court Report - This action will allow the user to print any court related or parent meeting reports.
Notes - This action will provide the user a way to see any sticky notes that have already been created or click on New to create a new note.
FINS Referral Checklist - This will allow the user to print the FINS Referral Checklist for the student's records, (Referrals, Attendance, Discipline, etc.).
Main
Note: All fields in red are required and must be completed in order to save the record.
Name - Click in the field to fill in information about the student. To see initially entered data and/or edits to the fields under "Name", click on the title "Name" in the program to see information about the data.
Paperclip - Click to show student document archive records. (If ther is no paperclip then no documents have been uploaded.)
Nickname - Click in the field to fill in information about the student.
Guardian - Click in the field to fill in information about the guardian.
Father - Click in the field to fill in information about the father.
Mother - Click in the field to fill in information about the mother.
Emergency - Click in the field to fill in information about the emergency contact.
Resides With - Click in the field to fill in information about the who student resides with.
Homeroom - Select the student's homeroom teacher from the pick list.
Counselor - Select the student's counselor from the pick list.
Advisor - Select the student's advisor from the pick list.
Special Codes - Click in the field to fill in all special codes relevant to the student. You can use the search box at the top of the Special Codes
selection list. There is a security action in User Management for granting access to change a student's special codes.
School Clubs - Select the school club's the student is involved in from the pick list.
Alert Codes - Click in the field to fill in all alert codes relevant to the student.
Fees - If a student has any fees, it will show the total amount.
SIDNO - student's local identification number
- To see initially entered data and/or edits to the field "SIDNO", click on the title "SIDNO" to see information about the data.
- A student's local identification number will never be the same on more than one student in a district. But the numbers can be the same on students in other districts.
- Inside a district, once a number is used it is not used again. When a SID# is needed, there are three databases checked to see if the selected number is available. These databases include Student Master, Delete Log List>SID#, and Transcripts. Also, a consolidation is considered a delete, and saved in the delete log table, to prevent the id from being re-used.
Grade - Select the grade level that applies to the student. To see initially entered data and/or edits to the field "Grade", click on the title "Grade" to see information about the data.
Gender - Select the gender that applies to the student.
Ethnic - Select the ethnicity that applies to the student.
Birth Date - Select the student's date of birth. To see initially entered data and/or edits to the field "Birth Date", click on the title "Birth Date" to see information about the data.
Locker - Enter the student's locker number, locker combination, locker serial number, and lock number. This information can also be mass entered using a csv file with the Locker Import.
Transportation - Click in the field to fill in information about the transportation for the student.
Health Card - Fill in the student's card number, card date and validator. By entering information to the Health Card area of Student Master, you can see the data in the Alpha/Recruiter List.
SASID - Enter the student's state identification number. To see initially entered data and/or edits to the field "SASID", click on the title "SASID" to see information about the data.
Testing ID - Fill in the student's testing ID number.
Change Data - This will show the staff members name, along with the date and time, when all Student Master information has changes made to it, such as adds/edits/adjustments.
- It will also show parent/student usernames, if marked in the SPC tab in Communication Configuration to allow parents/students/SPC users to change their own emails, phone number or other information.
- If changes are made by Create New Year Student Master "Yearly Rollover" will show in front of the user name for changed data.
Current Zone - This is the student's current school zone. This will help a user identify the current school attendance zones a student belongs to based on the student`s physical address and the attendance zones drawn in the District Mapping System.
Program Codes - Displays the program codes assigned to the student. There is a security action in User Management for granting access to change a student's program codes.
Custom Codes - Displays the custom codes assigned to the student. There is a security action in User Management for granting access to change a student's custom codes.
Entry Date - Click in the field to fill in information about the entry of a student. To see initially entered data and/or edits to the field "Entry Date", click on the title "Entry Date" to see information about the data.
Leave Date - Click in the field to fill in information about the leave/drop of a student. To see initially entered data and/or edits to the field "Leave Date", click on the title "Leave Date" to see information about the data. Note that the program Discipline Posting can add expulsion leave dates to the Student Master Leave field.
Country Entry - Click in the field to fill in LEP information.
SBLC Code - Select an SBLC code of either retained or promoted. If nothing is selected then the student will pass.
School - This will show the school ID where the student is enrolled.
District - This will show the district where the student is enrolled.
Year - This will show the school year, i.e. 2122.
Next Zone - This will show where the student will go to school in the next school year.
Comments - The user can type in comments about the student. Also, comments will roll over from school year to school year unless they are cleared out for the next school year when rolling over in Create New Year Student Master using the Clear Out Comments Section checkbox.
View History - This shows which user and the date/time of edits made to the original posting.
Bottom
Demographics - See Demographics under the Main section above this page.
Addresses/Contacts - Select this tab to view all contact information on one page. You can edit this page by clicking on the pencil.
Sports - Select this tab to select any sports in which a student is involved. This tab also has other miscellaneous information. Access to this tab is controlled from User Management Category: Stu Master; Program: Student Master; Action: Sports: Allow/No Access.
Programs - Select this tab to associate all programs and custom codes relevant to the student.
IGP - Select this tab to view and input relevant information about the students credentials. Access to this tab is controlled from User Management Category: Stu Master; Program: Student Master; Action: IGP: Allow/No Access. Setting the Action to No Access will also disable the IGP checkbox on the Leave/Entry package and will keep the Print IGP Form option from being displayed in the Action>Menu.
SOD - Select this tab to input extra enrollment and tracking information.
Permissions - Select this tab and enter all relevant information.
- Access to this tab is controlled from User Management Category: Stu Master; Program: Student Master; Action: Custom Permissions: No Access, Read Only, Insert/Update/Delete.
- There is another setting for the Permission tab. Category: Stu Master; Program: Student Master; Action: Allow SIS School to Edit Permissions. Choose Yes and the user can save the permissions. Choose No, and the Save button will not be available so that the user can not save the permissions.
Log - The user must have the password to be able to see notes that have been entered by other staff members.
Enroll History - Select this tab to see the student's enrollment history.
504 - Select this tab to enter all relevant information on a student that is listed as 504.
Out of Zone - Select this tab to enter any Out of Zone information about a student.
Attendance - Select this tab to see the student's attendance records. It has an option for the user to see all years. This tab uses the same security as the iGear>Attendance. Access to this tab is controlled from User Management Category: Attendance> NA/RO/RW. If NA is chosen, it will gray out the tab.
Discipline - Select this tab to see the student's discipline records. It has an option for the user to see all years. This tab uses the same security as the iGear>Discipline. Access to this tab is controlled from User Management Category: Discipline> NA/RO/RW. If NA is chosen, it will gray out the tab.
Scheduling - Select this tab to see the student's schedule records in either Student Schedule Maintenance or Pattern Board Student Scheduler. Note that some of the placement of the buttons may be formatted differently. This tab uses the same security as the iGear>Schedule Maintenance or Pattern Board Student Scheduler. Access to this tab is controlled from User Management Category: Schedule Maintenance/Pattern Board Student Scheduler> NA/RO/RW. If NA is chosen, it will gray out the tab.
Insight - Select this tab to see the graphs for Student Logins, Student Attendance, Student Discipline, Student Communications, and Student Grades for the year. It has an option for the user to see all years.
- In User Management, there are permissions for this tab/iGear. For example: Category> Grades NA will not allow any grade information to display from the Insight tab or from the iGear> Insight.
Program> Student Master RW
Delete - This button will delete the record that it is currently showing only. It will NOT delete all Student Master records for the year chosen. The user must have security rights in User Management to be able to see the button to delete a Student Master record. Access to this tab is controlled from User Management Category: Stu Master; Program: Student Master; Action: Delete: No Access/Delete. Delete reason required when deleting a record.
Help - Takes the user to the Help website for written instructions and/or instructional videos.
Clear - This option will clear any information that is displayed on the screen in Student Master.
Save - Select to save any information that has been entered in Student Master.
Prev - Select to see the previous student in Student Master.
Next - Select to see the next student listed in Student Master.
Setup - The user may change the settings previously selected for running the program.
Find - Select to find a student in Student Master. If a student has a Remote section assigned to them, then a user from their school will see that school's records as well as the remote school's records. But the user will only be able to see the records from the remote school but not be able edit any records.


