Fees Management
This program provides the user a way to add, edit, and delete fees on individual students and update accounts receivable on fees.
- Note that if a student transfers within district and owed a fee at the previous school, the fee is transferred to the new school but is identified with the previous school number.
Video
Go to User Management to create various security levels:
Category-Stu Master> Program-Fees Management> Action-Delete> Delete or No Access
- If user has NA security for Stu Master> Fees Management and selects Fees Management from the menu or selects Fees Management from the Student Master> Action menu, the user will not have access and gets a message stating that.
- If user has RO security for Stu Master> Fees Management OR has RO for Stu Master only and nothing selected for Fees Management PPerm, the user will not see Add Fee or Pay Fee buttons, Edit column on top table, Delete column on top table or Delete column on bottom table.
- If user has RW security for Stu Master> Fees Management, the user sees Add Fee or Pay Fee buttons, Edit column on top table, Delete column on top table or Delete column on bottom table. If user has No Access for Delete action, the Delete column on both tables are not seen. If user has Delete for Delete action, the Delete column on both tables are visible.
Menu Location

On the left navigation panel, select Student Master > Entry > Fees Management or Student Master > Action > Fee Management.
Setup Options

Year - The Year defaults to the current school year but can be changed by selecting a different year from the drop down list.
District - The District defaults to the user’s district and cannot be changed.
School - The user can select one or more schools from the drop-down list depending on security level.
Grades - Leave the field blank if all grade levels are to be included. Otherwise, choose the desired grade.
Active Only and As of Date - Check to list only those students who are actively enrolled as of the date selected in the date field.
Clubs - Leave the field blank if all clubs are to be included. Otherwise, choose the desired club.
Program - Leave the field blank if all programs are to be included. Otherwise, choose the desired program.
Special Codes - Leave the field blank if all special codes are to be included. Otherwise, choose the desired special code.
Show Only Open Fees - Check to show fees that have balances due.
Print Closed Fees on Statement - Check to print the students marked with closed fees on the statement.
To find definitions for standard setup values, follow this link: Standard Setup Options.
Main
The page is divided into two sections: Fees and History

Fees
Fees is where fees are added, edited and deleted. If you click on a row in the Fee column, the history of that fee record will display at the bottom history area.
![]()
Column Headers
Edit - Once a fee has been added and saved, it can be edited by:
- Clicking on the edit symbol.
- The same information that was added on the "Add Fee" pop up box will show on the "Edit Fee" pop up box.
- Make the changes needed.
- Click Save.


Sch - Student's school where fee was acquired
Fee - Name of fee
Comments - Fee comments
Total - Total amount of fee
Due - Total amount due for fee
Due Date - Fee due date
Last Pay Date - Date of last payment
Create User - Login name of the user who created the fee record
Delete - The only way to delete a whole fee record added is using the Delete button under the Delete column.
History
History is where payments and adjustments are made to fees. The payments will be displayed in the "History" section by clicking on the row of the fee in the top "Fee" section.

Column Headers
Date - This is the date of the transaction.
Debit - This is the debit amount.
Credit - This is the credit amount.
Payment Type - This is the type of payment made.
Comments - This is the payment comments.
Create User - Log in name of user that created the payment.
Delete
- If you click on a row that only has a debit listed, you will receive a pop up, "This history record is the primary record. To delete this record, you must delete the fee record."
- If you click on a row that has a credit listed, you will receive a pop up, "This will only delete this history record. Do you want to continue?" If yes is chosen, the total fee amount at the top will adjust by the amount that you deleted.
Buttons
Add Fee - Add an unlimited number of fees to a student and keep track of payment.
- Find the student using the Find button at the bottom of the screen.
- After choosing the student, you will see in the header, the student's name, ID number and grade level.
- Click the Add Fee button to display a box to enter the information about fee to be added.
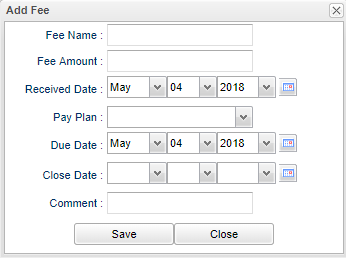

Fee Name - Select the name of the Fee from the drop down list.
Fee Amount - Enter the amount of the fee here.
Received Date - Enter the Accounts receivable date. It will default to the current date.
Pay Plan - Select from the drop down one of the following: 0-Due Now, 1-30 Days, 2-30/60 Days, 3-30/60/90 Days, 4-Monthly Due, 5-Monthly Accrued, 6-Monthly Reduced
Due Date - Click to set the Fee Due Date.
Close Date - Click to set the actual payoff date of the fee.
Comment - Click to enter any comment(s) about the fee.
Save - Click to Save the transaction.
Close - Click to close the window.
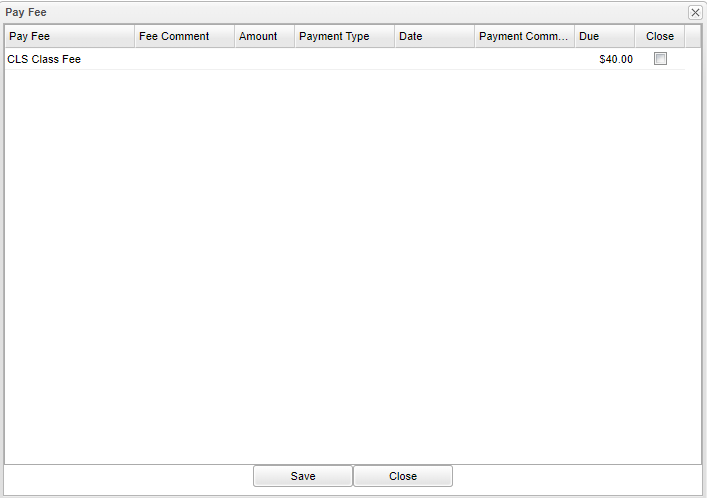
Pay Fee
- Find the student using the Find tab.
- Click Pay fee tab at the bottom and a list of fee(s) owed by the student will appear.
- Highlight the fee to be paid.
- Fee Comment can not be edited.
- Enter the Amount to be paid on the fee. This is required to be able to save.
- Select the Payment Type. This is required to be able to save.
- Click to set the Date fee was paid. This is required to be able to save.
- Click in the Payment Comment cell to enter additional information about the payment.
- Click the Save button.
- After you have saved the final payment, click on the Edit tab, and enter a close date for the fee.
- By clicking on a Fee name from the Fees portion of the screen, you can see payments/adjustments to the fee highlighted in the History portion of the screen.
- To Edit an amount entered for payment on a fee, you must Delete it using the Delete field under the Delete column on the History for the fee.


Action
All Printing is done under the Action button in the upper right corner.
Print All Invoices - This option prints a per page invoice for students based on the setup. The two Invoice choice printouts, Print All Invoices and Print Invoice, will include a Date column for date for fee. If there was a payment made to any of the fees, a Payment History table will appear below with each payment made. If no payments are made, no payment history will show.
Print Fees - This option prints a list of all fees for the student that was previously chosen under the Find tab.
- A print preview will appear.
- Click the print button at the top right to print the report.
- Close the print preview.
Print History - This option prints the history of a fee highlighted from the Fees section of the report. Click on the fee name in the Fees section to have the History portion of the page to populate.
- A print preview will appear.
- Click the print button at the top right to print the report.
- Close the print preview.
Print Invoice - This option prints a statement that shows charges/payments for a student. The two Invoice choice printouts, Print All Invoices and Print Invoice, will include a Date column for date for fee. If there was a payment made to any of the fees, a Payment History table will appear below with each payment made. If no payments are made, no payment history will show.
- Type in comments and choose OK.
- A print preview will appear.
- Click the print button at the top right to print the report.
- Close the print preview.
Print Statement - This option prints a statement that shows all transactions on a From Date/To Date with a closing balance as of the To Date.
- Type in comments and choose OK.
- A print preview will appear.
- Click the print button at the top right to print the report.
- Close the print preview.
Resources
- Video: Single Student Fees Management
- Video: Fees Auto Loader
- Video: Fee Related Reports