Obtain Feeder Students
This program provides a way for a school to obtain students from feeder school sites for the upcoming school year.
- Some districts allow schools to do this procedure, while in others it is a function reserved for the District Coordinator. If unsure, contact your District Coordinator.
- This program is not normally used if the Student Master "Next School" field was used to direct feeder students to upcoming year school sites. Consult with your District Coordinator if unsure.
Menu Location
Scheduling > Entry > Obtain Feeder Students
Setup Options
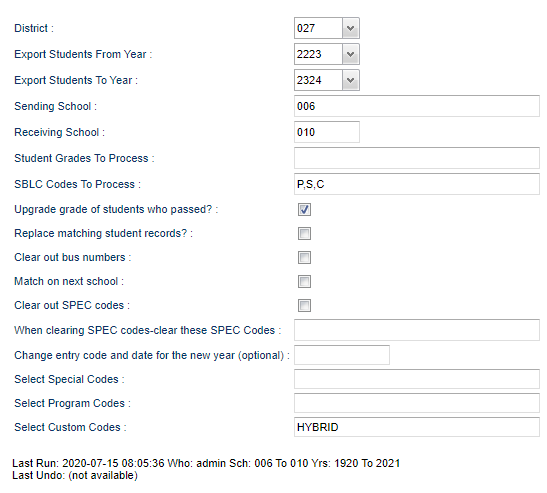
District - Default value is based on your security settings. You will be limited to your district only.
Export Students From Year - Select the year to export students from. Typically, this is the current year.
Export Students To Year - Select the year to export students to. Typically, this is the upcoming school year.
Sending School - Click in the box to select school(s) to pull students from.
Receiving School - Click in the box to select the school to move students to.
Student Grades to Process - Click in the field to choose your grade levels.
SBLC Codes to Process - Click in the field to select the SBLC codes for student transfer selection.
Upgrade Grade of Students Who Passed - Will move the students to the next grade level (Normally selected).
Replace Matching Student Grades - Select to replace existing student demographic records if it already exists in the new school year. Do not select, and it will not change the record in the new year.
Clear out Bus Numbers - Will blank out student's bus numbers in the upcoming year.
Match on Next School Only - Will limit the pick list of students to only those with a matching Student Master Next School site.
Clear out SPEC Codes - Check to clear the Special Codes selected in the following field for the next school year.
When clearing SPEC codes-clear these SPEC Codes - Choose specific Special codes to clear out for the next school year.
Change the Default Entry Code and Date for the New Year - Student master records, or leave this box empty to copy the existing student's entry information to the new year. This is optional.
Select Special Codes - Special Codes must have been entered into the Student Master record for students. Leave blank if all special codes are to be included in the report. Otherwise click in the field to the right of Special Codes to select the desired special code(s) to view.
Select Program Codes - Leave blank if all program codes are to be included in the report. Otherwise click in the field to the right of Program Codes to select the desired program code(s) to view.
Custom Code - Select Custom Code created in the Custom Code Management to filter the student list.
Last Runs and Last Undos will be documented with the date, time and who did these as shown in the picture above.
To find definitions for standard setup values, follow this link: Standard Setup Options.
Proceed - Click to feed the students to the new year.
Help - Click to show the help website with written instructions and/or videos.
Undo - Click to remove student records previously created by this program.
Main
Column Headers
Sel - Select students by checking them off.
NSch - Next School
Sidno - local ID of the student
Name - Student's full name
Grade, Grd - Grade level of the student and/or course
EDate - Date student enrolled in school/district
LDate - Date the student transfers to another school/district; this can also be a program completer indicator
FCode - Failure Code (SBLC Code)
SSN - Student social security number
Home Phone - Student's home phone number
Address - Student's home address
City - City in which the student resides
ST - State in which the student resides
Zip - Postal zip code associated with the student's/employee's address
To find definitions of commonly used column headers, follow this link: Common Column Headers.
Bottom
Flag All - Click to select all.
Deselect - Click to unselect all selections.
Toggle All - Click to select all or click to unselect all.
OK - Click to save your selections.
Close - Click to close program.
Print - This will allow the user to print the report.

