Difference between revisions of "Move Scheduled Students"
| Line 10: | Line 10: | ||
Select '''Loaders''', then '''Move Scheduled Students'''. | Select '''Loaders''', then '''Move Scheduled Students'''. | ||
| − | |||
| Line 22: | Line 21: | ||
:*'''Sched Start Date''': Select the date the schedule change is to start. | :*'''Sched Start Date''': Select the date the schedule change is to start. | ||
| + | |||
| + | Click '''Ok''' to move to the next screen. | ||
A split screen will be displayed. On the left, pick the class to move or copy students ''FROM''. On the right, pick the class to move or copy the students ''TO''. | A split screen will be displayed. On the left, pick the class to move or copy students ''FROM''. On the right, pick the class to move or copy the students ''TO''. | ||
Revision as of 11:45, 1 January 2015
This program will allow you to move or copy scheduled students from one section to another.
Video How-to
Select Scheduling from the list of program areas on the left of the screen.
Select Loaders, then Move Scheduled Students.
Setup Box Options
To find definitions for standard setup values, follow this link: Standard Setup Options.
For other set up values not listed in the standard set up list:
- Master Schedule Grades: Select Master Schedule grade levels to process
- Sched Start Date: Select the date the schedule change is to start.
Click Ok to move to the next screen.
A split screen will be displayed. On the left, pick the class to move or copy students FROM. On the right, pick the class to move or copy the students TO. Note--Column Headers on both sides of the screen are the same.
Column Headers
To find definitions of commonly used column headers, follow this link: Common Column Headers.
For other columns not listed in the common column list:
- Check box column: Used to select the section which students are moving from (left side) and the section to which students are moving (right side)
- Staff Name: Name of teacher from the Master Schedule
- Course: Name of course from the Master Schedule
- Section: Section number from the Master Schedule.
- S1 through S4: Check boxes indicating which semester(s) the courses are scheduled
- PD: Class period in which course is scheduled
- Room: Location of course
- GD: Grade level from the Master Schedule
- MAX: Maximum number of students allowed
- C1 through C4: Count of students in the class by semester; C1: semester 1, C2: semester 2, etc.
- SCH: School where student is enrolled
- DIST: District where student is enrolled
- RSCH: School where teacher is assigned
- RDIST: District where teacher is assigned
- REM: Indicator that course is being offered to other schools remotely
Process for Moving Scheduled Students
- You need to know the section number from which students are being moved or copied FROM and the section number TO which they are being moved or copied.
- You may sort the each side of the screen based on Teacher name and/or on Section number.
- Check the box by the original section on the left side of the screen (the course FROM which students are being moved or copied).
- Check the box by the new section on the right side of the screen (the course TO which students are being moved or copied).
- Click Move Students button at the bottom left of the screen.
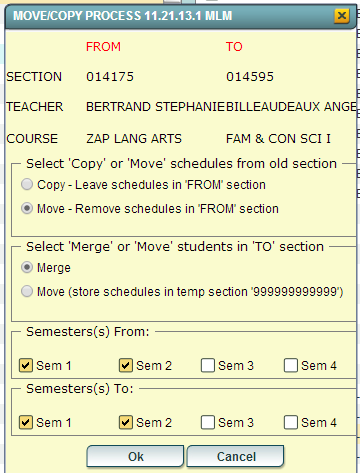
- A popup will appear on the screen. The top of the popup will show the information related to the two sections. Review for accuracy.
- If this is incorrect click the Cancel button and start process over by unchecking the incorrect section(s) and click the Move Students button.
- If this is correct continue with the steps below.
- There are four remaining sections of the popup that needs to be reviewed and changed as needed.
- Select Copy or Move schedules from old section:
- The Copy choice will leave students in the original section and create schedule records for the new section.
- The Move choice will remove the original section from the students' schedules and create schedule records for the new section.
- Select Merge or Move students in 'TO' section:
- The Merge choice (usually the default) will create the schedule records using the newly created section in the Master Schedule. If there are any students in the to section, the from students will be added to the roster.
- The Move choice should be used only if the students in the TO Section are to be moved into another section and are being replaced by the students in the FROM Section. This option will create schedule records using a temporary section number (999999999999) for the original list of students in the TO Section. After completing the move students process, you will need to move students from the 99999999999 section to another section and delete the temporary class from the Master Schedule.
- Semester(s) From: Select the semester(s) from which students are being moved or copied. You do not have to move them one semester at a time.
- Semester(s) To: Select the semester(s) to which students are being moved or copied. The Semester To selection should match the Semester From selection above.
- Select Copy or Move schedules from old section:
- Click Ok and a list of students in the FROM Section will appear on the screen.
- To Move selected students, click the check box to the left of the student's name.
- To Move all students, click the "select all" check box at the top left of the window.
- Click Ok.
- Click the Init button to update counts for the effected courses.
- Click the Setup button to refresh the screen to show corrected course counts; then, click Ok on the setup box.
