Difference between revisions of "Online Registration System Editor"
| (52 intermediate revisions by the same user not shown) | |||
| Line 1: | Line 1: | ||
| − | ''' The online registration procedure starts with parents registering their children from either the "Register System" or the "Student Progress Center". This | + | __NOTOC__ |
| + | ''' This program provides the districts a way to custom design their own Online Registration System and then the reviewing of student applications. The online registration procedure starts with parents registering their children from either the "[[Parent Register System website]]" or the "Student Progress Center". ''' | ||
| + | |||
| + | *From the login screen through each entry screen, the text in ORS can be displayed into as many different languages as needed. This includes instructions, labels, document uploads, messages and buttons. | ||
| − | In [[User Management]], the user MUST have read/write (RW) permission for the Student Master Category to use this program. | + | |
| − | # | + | In [[User Management]], the user MUST have read/write (RW) permission for the Student Master Category to use this program and also, if applicable, 700 as the school. |
| + | |||
| + | [[File:Example.ORS.png]] | ||
| + | |||
| + | |||
| + | #'''Category'''> Stu Master, RW, '''Program'''> ORS Editor. | ||
| + | #A popup will appear with '''Stu Master''' permission already set to RW. Sort the Program list and scroll to '''ORS Editor''' and select RW to add this user permission to ORS. | ||
#Click '''Save''' | #Click '''Save''' | ||
#Click '''NO''' to save new setting to all users with the same profile. | #Click '''NO''' to save new setting to all users with the same profile. | ||
| Line 12: | Line 21: | ||
Securities are sometimes required to be able to edit. | Securities are sometimes required to be able to edit. | ||
| + | |||
[[File:orsperm.png]] | [[File:orsperm.png]] | ||
| Line 17: | Line 27: | ||
==Menu Location== | ==Menu Location== | ||
| − | |||
| − | + | '''Student > Loaders > Online Registration System (ORS) Editor''' | |
==Setup Options== | ==Setup Options== | ||
| − | [[File: | + | [[File:orssetup5.png]] |
| − | |||
'''Year''' - Defaults to the current year. A prior year may be accessed by clicking in the field and making the appropriate selection from the drop down list. | '''Year''' - Defaults to the current year. A prior year may be accessed by clicking in the field and making the appropriate selection from the drop down list. | ||
| Line 42: | Line 50: | ||
'''Show Submitted Applications Only''' - Show only applications that have been submitted with a parent/guardian signature and date. | '''Show Submitted Applications Only''' - Show only applications that have been submitted with a parent/guardian signature and date. | ||
| − | '''Show Current Enrolled Students''' - Shows only currently enrolled students based on the school(s) chosen below. | + | '''Show Current Enrolled Students''' - Shows only currently enrolled students based on the school(s) chosen below. So it t only shows currently enrolled students with a student master record at the chosen school. If chosen, the''' Student Existing Only''' and '''New Applicant Only''' will be grayed out. |
| + | |||
| + | '''[[Alternate Review]]''' - Check this box for the normal columns to be hidden and the list columns appear. | ||
| + | |||
| + | '''Hide Rejected Applications''' - Check this box to hide rejected applications. | ||
'''Show''' - All, Approved Only, Not Approved Only. | '''Show''' - All, Approved Only, Not Approved Only. | ||
| + | *'''Approved Only''' - Only shows applications that have been approved by an administrator. | ||
| + | *'''Not Approved Only''' - Only shows applications that have not been approved by an administrator. | ||
| − | '''Student''' - All, Existing Only, New Applicant Only. | + | '''Student''' - All, Existing Only, or New Applicant Only. |
| + | *'''Existing Only''' - Only show students that have a current student master record. It uses the zone school application considering current school, zone school or requested school. | ||
| + | *'''New Applicant Only''' - Show only students that have an application created through the SPC or the ORS system. | ||
'''School''' - Student's school of enrollment when 'Show Current Enrolled Student' or 'Existing Only' is chosen. | '''School''' - Student's school of enrollment when 'Show Current Enrolled Student' or 'Existing Only' is chosen. | ||
| Line 60: | Line 76: | ||
To find definitions for standard setup values, follow this link: [[Standard Setup Options]]. | To find definitions for standard setup values, follow this link: [[Standard Setup Options]]. | ||
| − | Click the '''OK''' to advance to the next screen. | + | Click the '''OK''' to advance to the next screen. |
| + | ==Bottom Tabs== | ||
| + | |||
| + | [[File:orsbottomtabs.png]] | ||
| − | |||
*'''[[Summary (Graphs)]]''' | *'''[[Summary (Graphs)]]''' | ||
| − | |||
*'''[[Review Applications]]''' - This is where the district can review the student applications. | *'''[[Review Applications]]''' - This is where the district can review the student applications. | ||
*'''[[Control Panel]]''' - This is where the district would set up ORS. | *'''[[Control Panel]]''' - This is where the district would set up ORS. | ||
| Line 72: | Line 89: | ||
| + | '''Q & A''' | ||
| + | |||
| + | '''Q''' - We turned on our ORS for 24-25 PK & K and it is putting everyone at 999 zone. We checked the mapping for a 24/25 year but do not see one. Is this why? | ||
| + | |||
| + | '''A''' - Yes, you are seeing the 999 zone because there are no DMS maps for 2425. The first step to copying the map to the new year is to roll over your [[Sponsor Site Editor]] into 2425. | ||
| + | |||
| + | Then, copy the DMS maps for the new year by going to: Maps> Entry> [[DMS System]] | ||
| + | |||
| + | 1. Click on "Copy Zones" in the bottom left hand corner | ||
| + | |||
| + | 2. In Copy From section | ||
| + | |||
| + | *Check the box to the left of "From Live Year:" | ||
| + | |||
| + | *Select 2324 from the drop down of the "From Live Year:" options | ||
| + | |||
| + | 4. In Copy To section | ||
| + | |||
| + | *Check the box to the left of "To Live Year:" | ||
| + | |||
| + | *Select 2425 from the drop down of the "From Live Year:" options (if 2425 is not an option the [[Sponsor Site Editor]] has not been rolled over) | ||
| − | + | 5. Click Copy | |
==Resources== | ==Resources== | ||
| Line 80: | Line 118: | ||
:[https://1drv.ms/w/s!Ag-H9brkjZjvgaA-GCH5XH8rUgV6DA?e=4CjTP3 ORS Security Setup Guide] | :[https://1drv.ms/w/s!Ag-H9brkjZjvgaA-GCH5XH8rUgV6DA?e=4CjTP3 ORS Security Setup Guide] | ||
:[https://1drv.ms/w/s!Ag-H9brkjZjvgaA_uJBJCKwrOyc-NQ?e=fUt3vH ORS Editor Guide] | :[https://1drv.ms/w/s!Ag-H9brkjZjvgaA_uJBJCKwrOyc-NQ?e=fUt3vH ORS Editor Guide] | ||
| − | :[https:// | + | :[https://wiki.edgear.net/wiki/w/images/5/5f/JCampus_Parent_ORS_Evangeline.pdf ORS Parent Guardian Information Guide] |
:[https://1drv.ms/w/s!AhrvV3Y0sWWG8ANUZ2htdBJIgLhY?e=u3DuKT ORS Approval Process] | :[https://1drv.ms/w/s!AhrvV3Y0sWWG8ANUZ2htdBJIgLhY?e=u3DuKT ORS Approval Process] | ||
Latest revision as of 14:41, 23 September 2024
This program provides the districts a way to custom design their own Online Registration System and then the reviewing of student applications. The online registration procedure starts with parents registering their children from either the "Parent Register System website" or the "Student Progress Center".
- From the login screen through each entry screen, the text in ORS can be displayed into as many different languages as needed. This includes instructions, labels, document uploads, messages and buttons.
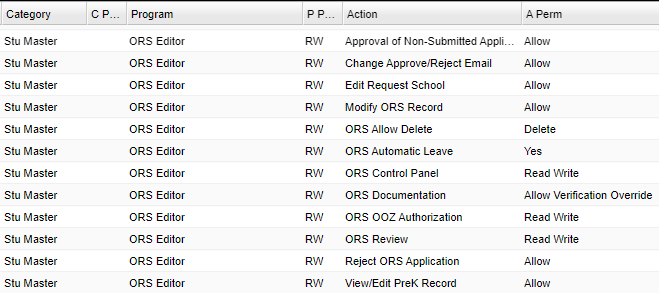
In User Management, the user MUST have read/write (RW) permission for the Student Master Category to use this program and also, if applicable, 700 as the school.
- Category> Stu Master, RW, Program> ORS Editor.
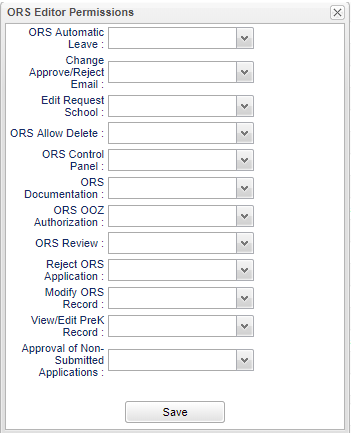
- A popup will appear with Stu Master permission already set to RW. Sort the Program list and scroll to ORS Editor and select RW to add this user permission to ORS.
- Click Save
- Click NO to save new setting to all users with the same profile.
- If you click Yes, then all user permissions with the same profile will be updated with the new permissions.
- A new line will be added to the User Management display with Student Master/ORS Editor with RW for both.
- Click the Action cell and select from the available actions found in the chart below this sections of instructions.
- You can return to this program to alter the actions for a specific user by clicking the Action column by one of the ORS permission and edit the previously selected Actions.
- For any new Actions selected or previous selections edited/removed, the changes will add rows to the User Management screen or remove them as needed.
Securities are sometimes required to be able to edit.
Menu Location
Student > Loaders > Online Registration System (ORS) Editor
Setup Options
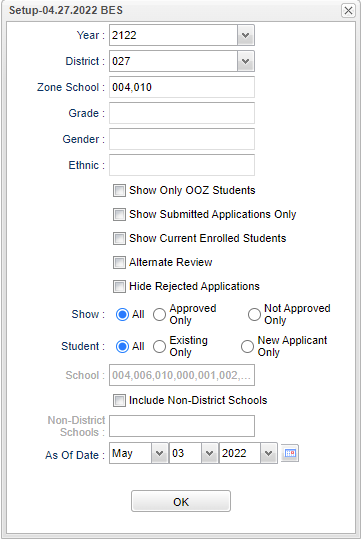
Year - Defaults to the current year. A prior year may be accessed by clicking in the field and making the appropriate selection from the drop down list.
District - Default value is based on the user's security settings. The user will be limited to their district only.
Zone School - Default value is based on the user's security settings. If the user is assigned to a school, the school default value will be their school site code. The user will not be able to change this value. If the user is a supervisor or other district office employee with access to the Student Information System, they will be able to run programs for one school, a small group of schools, or all schools in your district.
Grade - Grade level of students whose records need to be edited or whose names are to be included on a report. Leave the field blank if all grade levels are to be included. Otherwise, click in the field to the right of Grade(s) to select the desired grade level(s) to be included.
Gender - Gender of students whose records need to be edited or whose names are to be included on a report. Leave the field blank if both genders are to be included. Otherwise, click in the field to the right of Gender to select the desired gender to be included.
Ethnic - Ethnicity of students whose records need to be edited or whose names are to be included on a report. Leave the field blank if all ethnics are to be included. Otherwise, click in the field to the right of Ethnic to select the desired ethnic(s) to be included.
Show Only OOZ Students - Shows only applicants whose current or requested school are Out of Zone.
Show Submitted Applications Only - Show only applications that have been submitted with a parent/guardian signature and date.
Show Current Enrolled Students - Shows only currently enrolled students based on the school(s) chosen below. So it t only shows currently enrolled students with a student master record at the chosen school. If chosen, the Student Existing Only and New Applicant Only will be grayed out.
Alternate Review - Check this box for the normal columns to be hidden and the list columns appear.
Hide Rejected Applications - Check this box to hide rejected applications.
Show - All, Approved Only, Not Approved Only.
- Approved Only - Only shows applications that have been approved by an administrator.
- Not Approved Only - Only shows applications that have not been approved by an administrator.
Student - All, Existing Only, or New Applicant Only.
- Existing Only - Only show students that have a current student master record. It uses the zone school application considering current school, zone school or requested school.
- New Applicant Only - Show only students that have an application created through the SPC or the ORS system.
School - Student's school of enrollment when 'Show Current Enrolled Student' or 'Existing Only' is chosen.
Include Non-District Schools - Include applicants who have requested a Non-District school.
Non-District Schools - Site number of non-district school(s).
As Of Date - Current date of application.
OK - Click to continue.
To find definitions for standard setup values, follow this link: Standard Setup Options.
Click the OK to advance to the next screen.
Bottom Tabs
- Summary (Graphs)
- Review Applications - This is where the district can review the student applications.
- Control Panel - This is where the district would set up ORS.
- Zone Approval - Since parents are able to request a school outside of their physical address zone, the school official can create a zone approval code.
Q & A
Q - We turned on our ORS for 24-25 PK & K and it is putting everyone at 999 zone. We checked the mapping for a 24/25 year but do not see one. Is this why?
A - Yes, you are seeing the 999 zone because there are no DMS maps for 2425. The first step to copying the map to the new year is to roll over your Sponsor Site Editor into 2425.
Then, copy the DMS maps for the new year by going to: Maps> Entry> DMS System
1. Click on "Copy Zones" in the bottom left hand corner
2. In Copy From section
- Check the box to the left of "From Live Year:"
- Select 2324 from the drop down of the "From Live Year:" options
4. In Copy To section
- Check the box to the left of "To Live Year:"
- Select 2425 from the drop down of the "From Live Year:" options (if 2425 is not an option the Sponsor Site Editor has not been rolled over)
5. Click Copy
Resources
- Online Registration System Control Panel Overview
- Webex Recording of ORS Demonstration- 1hr
- ORS Security Setup Guide
- ORS Editor Guide
- ORS Parent Guardian Information Guide
- ORS Approval Process


