Difference between revisions of "Next School Loader"
| (31 intermediate revisions by the same user not shown) | |||
| Line 1: | Line 1: | ||
| + | __NOTOC__ | ||
| + | '''Use this program to choose the school that the student is being assigned to for the next school year. This will not move the student but only tag them for a specific school. When that specific school does their [[Create New Year Student Master]], and checks "Include Next Year Students", they will be moved to the chosen school.''' | ||
| + | ==Menu Location== | ||
| − | ''' | + | '''Student > Loaders > Next School Loader''' |
| + | ==Setup Options== | ||
| − | + | [[File:nextschloadersetup2.png]] | |
| − | |||
| − | |||
| − | |||
| − | |||
| + | '''Year''' - For the school year setting, stay in the current school year to mark students for the next school year. | ||
| − | ''' | + | '''District''' - Default value is based on the user's security settings. It will be limited to their district only. |
| − | + | '''School''' - Default value is based on the user's security settings. If the user is assigned to a school, the school default value will be their school site code. | |
| − | + | '''Grade''' - Leave blank or select all to include all grade levels. Otherwise, choose the desired grade. | |
| − | |||
| − | |||
| − | |||
| + | '''Gender''' - Leave blank or select all to include both genders. Otherwise, choose the desired gender. | ||
| − | ''' | + | '''Ethnic''' - Leave blank or select all to include all ethnicities. |
| − | |||
| − | |||
| − | |||
| + | '''As of Date''' - This choice will list only those students who are actively enrolled as of the date selected in the date field. | ||
| − | ''' | + | '''Sped:''' |
| − | + | ||
| − | + | '''All''' - Select to view all students. | |
| − | + | ||
| − | + | '''Sped Only''' - Select to view only Sped students. | |
| − | + | ||
| − | + | '''Non Sped''' - Select to view only non Sped students. | |
| − | + | ||
| + | '''504:''' | ||
| + | |||
| + | '''All''' - Select to view all students. | ||
| + | |||
| + | '''504 Only''' - Select to view only 504 students. | ||
| + | |||
| + | '''Non 504''' - Select to view only non 504 students. | ||
| + | |||
| + | '''LEP:''' | ||
| + | |||
| + | '''All''' - Select to view all students. | ||
| + | |||
| + | '''LEP Only''' - Select to view only LEP students. | ||
| + | |||
| + | '''Non LEP''' - Select to view only non LEP students. | ||
| + | |||
| + | '''Special Codes''' - Leave blank if all special codes are to be included into the report. Otherwise, choose the desired special code. | ||
| + | |||
| + | '''Custom Codes''' - Select the Custom Codes created in the Custom Code Management to filter the student list. | ||
| + | |||
| + | '''Program''' - Leave blank if all program codes are to be included into the report. Otherwise, choose the desired program code. | ||
| + | |||
| + | '''Clubs''' - Leave blank if all clubs are to be included into the report. Otherwise, choose the desired club code. | ||
| + | |||
| + | '''Sports''' - Leave blank if all sports are to be included into the report. Otherwise, choose the desired sport code. | ||
| + | |||
| + | '''Use Next Year Schools''' - Checking this box will populate the right side window with next school year schools. To show '''new''' school(s) for your next school year. For instance, if you | ||
| + | "added a new school to your district" for the next school year, it will appear on the list if the box is checked. Unchecked, the new school will not appear. | ||
| + | |||
| + | '''OK''' - Click to continue | ||
| + | |||
| + | To find definitions for standard setup values, follow this link: [[Standard Setup Options]]. | ||
| + | |||
| + | ==Main== | ||
| + | |||
| + | [[File:nextschloadermain.png]] | ||
| + | |||
| + | ===Column Headers=== | ||
| + | |||
| + | '''Sch''' - Site code of the school in which the student/employee is enrolled | ||
| + | |||
| + | '''SIDNO''' - Student's identification number | ||
| + | |||
| + | '''Last Name''' - Student's last name | ||
| + | |||
| + | '''First Name''' - Student's first name | ||
| + | |||
| + | '''Middle Name''' - Student's middle name | ||
| + | |||
| + | '''Grade''' - Student's grade of enrollment | ||
| + | |||
| + | '''Ethnic''' - Student's race/ethnicity | ||
| + | |||
| + | '''Gender''' - Student's gender | ||
| + | |||
| + | '''Homeroom''' - Student's homeroom teacher's name | ||
| + | |||
| + | '''PAddress 1''' - Student's physical address line 1 | ||
| + | |||
| + | '''PApt/Lot''' - Student's physical address line 2 | ||
| + | |||
| + | '''PCity''' - Student's physical city | ||
| + | |||
| + | '''NSch''' - Student's next school | ||
| + | |||
| + | ===Column Headers for Right Side=== | ||
| + | |||
| + | '''School''' - School ID number | ||
| + | |||
| + | '''School Name''' - Name of school | ||
| + | |||
| + | To find definitions of commonly used column headers, follow this link: [[Common Column Headers]]. | ||
| + | |||
| + | ==Bottom== | ||
| + | |||
| + | |||
| + | [[File:next.png]] | ||
| + | |||
| + | '''Setup''' - Click to go back to the Setup box. | ||
| + | |||
| + | [[Standard Print Options | '''Print''']] - This will allow the user to print the report. | ||
| + | |||
| + | '''Help''' - Click to view written instructions and/or videos. | ||
| + | |||
| + | |||
| + | ---- | ||
| + | [[Student Master|'''Student Master''' Main Page]] | ||
| + | |||
| + | ---- | ||
| + | [[WebPams|'''JCampus''' Main Page]] | ||
Latest revision as of 16:17, 18 July 2023
Use this program to choose the school that the student is being assigned to for the next school year. This will not move the student but only tag them for a specific school. When that specific school does their Create New Year Student Master, and checks "Include Next Year Students", they will be moved to the chosen school.
Menu Location
Student > Loaders > Next School Loader
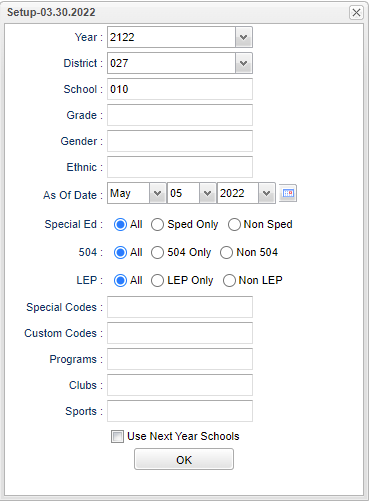
Setup Options
Year - For the school year setting, stay in the current school year to mark students for the next school year.
District - Default value is based on the user's security settings. It will be limited to their district only.
School - Default value is based on the user's security settings. If the user is assigned to a school, the school default value will be their school site code.
Grade - Leave blank or select all to include all grade levels. Otherwise, choose the desired grade.
Gender - Leave blank or select all to include both genders. Otherwise, choose the desired gender.
Ethnic - Leave blank or select all to include all ethnicities.
As of Date - This choice will list only those students who are actively enrolled as of the date selected in the date field.
Sped:
All - Select to view all students.
Sped Only - Select to view only Sped students.
Non Sped - Select to view only non Sped students.
504:
All - Select to view all students.
504 Only - Select to view only 504 students.
Non 504 - Select to view only non 504 students.
LEP:
All - Select to view all students.
LEP Only - Select to view only LEP students.
Non LEP - Select to view only non LEP students.
Special Codes - Leave blank if all special codes are to be included into the report. Otherwise, choose the desired special code.
Custom Codes - Select the Custom Codes created in the Custom Code Management to filter the student list.
Program - Leave blank if all program codes are to be included into the report. Otherwise, choose the desired program code.
Clubs - Leave blank if all clubs are to be included into the report. Otherwise, choose the desired club code.
Sports - Leave blank if all sports are to be included into the report. Otherwise, choose the desired sport code.
Use Next Year Schools - Checking this box will populate the right side window with next school year schools. To show new school(s) for your next school year. For instance, if you "added a new school to your district" for the next school year, it will appear on the list if the box is checked. Unchecked, the new school will not appear.
OK - Click to continue
To find definitions for standard setup values, follow this link: Standard Setup Options.
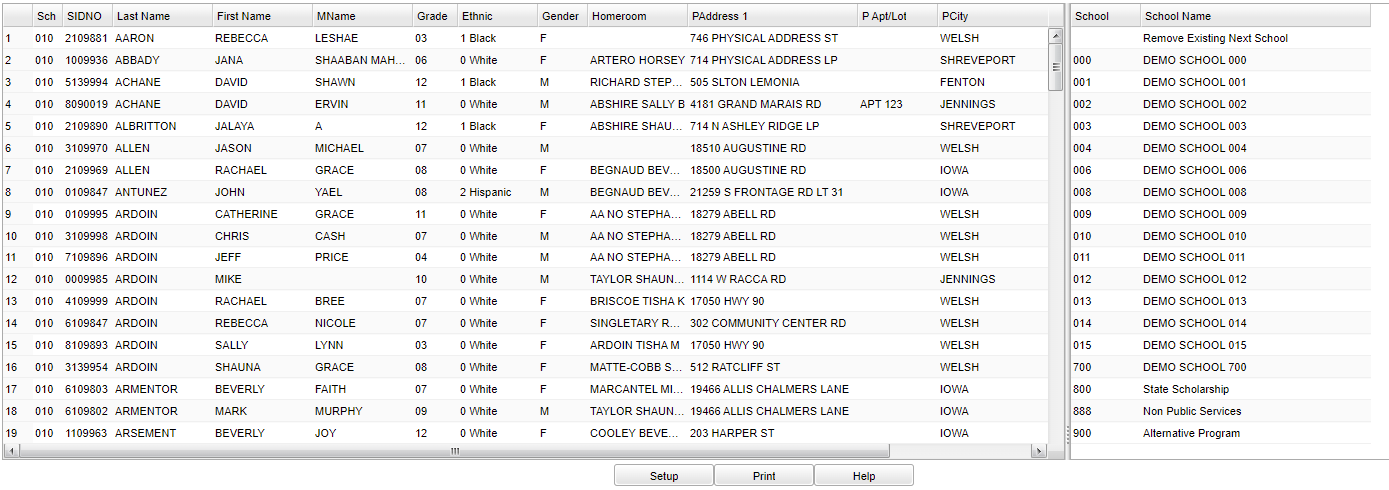
Main
Column Headers
Sch - Site code of the school in which the student/employee is enrolled
SIDNO - Student's identification number
Last Name - Student's last name
First Name - Student's first name
Middle Name - Student's middle name
Grade - Student's grade of enrollment
Ethnic - Student's race/ethnicity
Gender - Student's gender
Homeroom - Student's homeroom teacher's name
PAddress 1 - Student's physical address line 1
PApt/Lot - Student's physical address line 2
PCity - Student's physical city
NSch - Student's next school
Column Headers for Right Side
School - School ID number
School Name - Name of school
To find definitions of commonly used column headers, follow this link: Common Column Headers.
Bottom
Setup - Click to go back to the Setup box.
Print - This will allow the user to print the report.
Help - Click to view written instructions and/or videos.

