Difference between revisions of "Core Course Balance Audit By Term"
(→Bottom) |
|||
| Line 59: | Line 59: | ||
| − | + | ---- | |
| − | [[ | + | [[Scheduling|'''Scheduling''' Main Page]] |
| + | |||
| + | ---- | ||
| + | [[WebPams|'''JCampus''' Main Page]] | ||
Revision as of 03:08, 10 April 2018
The Core Course Balance Audit By Term creates a list of students that shows the number of Core Courses taken in each Term. The program will display all students found matching the setup criteria with 2 terms showing the count of the number of core courses scheduled to each term. Another column will display a "Y" or an "N" to denote whether the student`s schedule is in balance (Y), or not in balance (N). For 2 semester schools, semester 1 is term 1, and semester 2 is term 2. For 4 semester schools, term 1 is semesters 1 and 2, and term 2 is semesters 3 and 4. Note that a course/section is counted only once per term, so a course lasting 4 semesters should be counted once in term 1 (fall) and once in term 2 (spring). A course/section taught in a 2 semester setting will be counted once in the fall, and once in the spring. For a 4x4 school a course/section taught only in term 1 (semesters one and two) is counted only once. As an example, in a 4x4 system, the 1st and 2nd semesters would be considered the 1st Term and the 3rd and 4th semesters would be considered the 2nd Term.
Menu Location
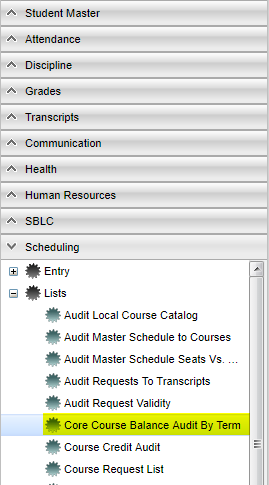
On the left navigation panel, select Scheduling > Lists > Core Course Balance Audit By Term.
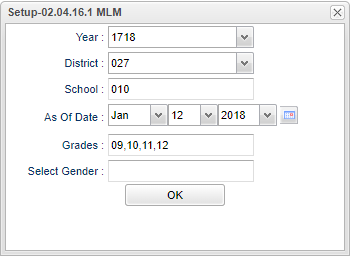
Setup Options
- Year - Defaults to the current year. A prior year may be accessed by clicking in the field and making the appropriate selection from the drop down list.
- District - Default value is based on your security settings. You will be limited to your district only.
- School - Default value is based on your security settings. If you are assigned to a school, the school default value will be your school site code. You will not be able to change this value. If you are a supervisor or other district office employee with access to the Student Information System, you will be able to run programs for one school, a small group of schools, or all schools in your district.
- As Of Date - Limits the list to those students who are active as of the date selected.
- Grades - Grade level of students whose names are to be included on the report. Leave the field blank if all grade levels are to be included. Otherwise, click in the field to the right of Grade to select the desired grade level(s) to be included.
- Select Gender - Gender of students whose records need to be included on the report. Leave the field blank if both genders are to be included. Otherwise, click in the field to the right of Gender to select the desired gender to be included.
- To find definitions for standard setup values, follow this link: Standard Setup Options.
- Click OK to continue.
Main
Column Headers
- Below are the columns that will be displayed on the screen and the printed report:
- Sch - Displays the 3-digit code of student's school of enrollment.
- Name - Displays the student's name (Last First Middle).
- Student ID - Displays the student's 7-digit student ID number.
- Grade - Displays the student's grade level.
- Gender - Displays the student's gender.
- Term 1 Count - Displays the number of Core Courses scheduled for the 1st Term.
- Term 2 Count - Displays the number of Core Courses scheduled for the 2nd Term.
- In Balance - Displays a "Y" if the number of Core Courses for the 1st Term is the same as the number of Core Courses for the 2nd Term and displays an "N" if they are not the same.
- To find definitions of commonly used column headers, follow this link: Common Column Headers.
- Note - Sorting on this column will allow the user to generate a list of students who are not balanced.
Bottom
- Setup- will display the original setup box with the previously selected settings displayed.
- Print- To find the print instructions, follow this link: Standard Print Options.
- Help- will take the user to "Scheduling" in the help system.


