Attendance By Course and History
This program displays absences by course, absence history and provides a way for the user to post failures due to attendance.
Video How-to
Attendance By Course and History video
YOU MUST HAVE A BELL SCHEDULE TO MAKE THIS PROGRAM WORK CORRECTLY FOR THE SUMMARIES TAB (not the History tab)
Menu Location
Staff - Attendance > Count > Attendance By Course and History
Teachers - Classroom > Reports > Attendance > Attendance By Course and History
Setup Options
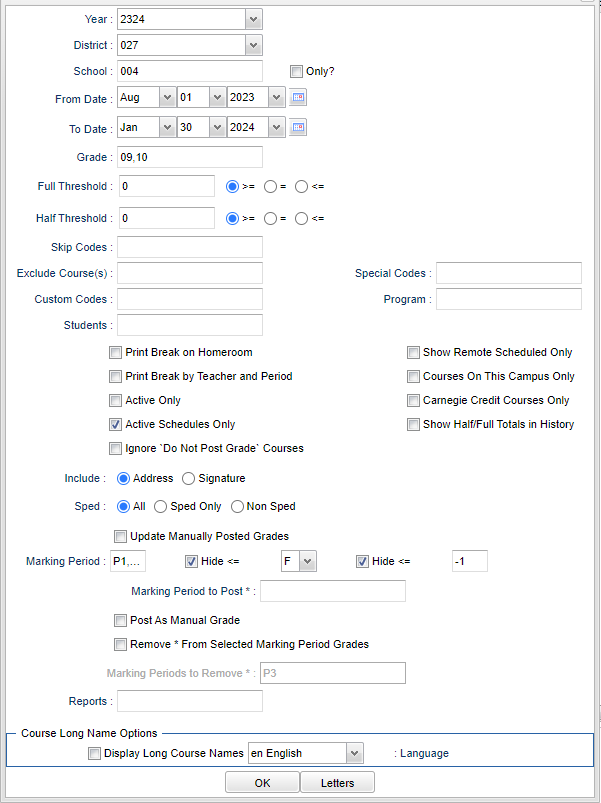
Year - Defaults to the current year. A prior year may be accessed by clicking in the field and making the appropriate selection from the drop down list.
District - Default value is based on the user’s security settings. The user will be limited to their district only.
School - Default value is based on the user’s security settings. If the user is assigned to a school, the school default value will be their school site code.
Only? - If checked, the program will only use the absences that occurred at the specified school(s).
Grade - Leave blank or select all to include all grade levels. Otherwise, choose the desired grade level.
Gender - Leave blank or select alla to include all genders. Otherwise, choose a desired gender.
From Date and To Date - A set of dates that limits the selection of records for the report to a beginning date (from) and an ending date (to) range.
Full (semester) Threshold - In two/four semester (all year) courses, enter the number of absence days of which the programs needs to search.
Half (semester) Threshold - In one semester (half year) courses, enter the number of absence days of which the programs needs to search.
Skip Codes - To be skipped by selecting the codes. These are absence codes that you do not want to count against the student using this report.
Exclude Courses - Click in the box for a list of courses to select if the user wants to exclude on report.
Special Codes - Leave blank if all special codes are to be included into the report. Otherwise, choose the desired special code.
Custom Codes - Select Custom Codes as created in the Custom Code Management to filter the student list.
Program - Leave blank if all program codes are to be included into the report. Otherwise, choose the desired program code.
Students - Leave blank for all students to be selected or click in the field and place checks by the student(s) needed.
Print Break on Homeroom - This option will create a print break based on the homeroom order only.
Print Break by Teacher and Period - This option will create a print break based on the teacher name and period.
Show Remote Scheduled - If this box is checked, then those students who come to your school from another school in the district will be listed in addition to regular students.
Active Only - This choice will list only those students who are actively enrolled as of the date selected in the date field.
Carnegie Credit Courses Only - If checked, courses with 0 credit will not show on the report.
Print in Home Language - If the student has a language that is the main language of the household it will be documented in Student Master in the Country Entry, Home Language field. The letter will not be translated so it must be written in the designated language. This will indicate which letter version to use of the letter that was created in Letter Maintenance.
Show Half/Full Totals in History - Defaults to being checked
Courses On This Campus Only - If checked the program will only show the courses that are offered at the selected schools.
Active Schedules Only - This choice will list only those schedules that are active with the date field selected.
Ignore "Do Not Post Grade" Courses - Select this option if you do not want to include sections where no grades are posted (Early Dismissal, etc.).
Address or Signature - to be printed on the letters created by this report.
Sped:
All - Select to view all students.
Sped Only - Select to view only Sped students.
Non Sped - Select to view only non Sped students.
Update Manually Posted Grades - Check this, if a manually entered grade needs to be updated with the attendance failure asterisk(*).
Marking Period that will be used in calculating absences by clicking in the field to the right and then selecting the appropriate marking period(s).
- To remove students from the list that made a certain alpha grade (A, B, C, D, F) or lower, check Hide <= and then select the alpha grade from the drop down.
- To remove students from the list that made a certain numeric grade (0-100) or lower, check Hide <= and then enter the numeric grade.
Marking Period to Post - If Auto Fail is to be used at the end of a grading period or semester, select the marking period to which the attendance failure asterisk(*) will be posted by clicking in this box.
Post as manual grade - Checking this will force the grade, that is marked as failing with the "*", as a manually posted uppercase grade to prevent recalculations.
Remove from Selected Marking Period Grades - Will allow the user to remove an attendance failure asterisk (*) from the selected
Marking Periods To Remove when using the Auto Fail button. Note: This feature can only be used in conjunction with the Marking Period to Post feature and cannot be used as just a way to remove asterisks. You have to be posting and removing all at one time.
Report - The user can click in this box to select a report that was previously created.
Display Long Course Names - Select this option to display the long course name.
Default Language - Select the default language for the long course names.
Letters - Click the Letters button at the bottom of the setup box. (they are to be printed with this report).
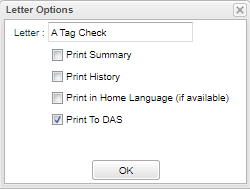
Letter Options - Click in the field to the right of Letter, a box will appear.
Select the appropriate letter by selecting the small square to the left of the letter title. Before selecting the letter, the letter can be previewed by selecting Preview at the bottom. If the letter is appropriate, click OK and Letter Options box disappears.
Print Summary - Click to print summary.
Print History - Click to print history.
Print in Home Language (If Available) - Click to print in home language.
Print to DAS - Click to print to Document Archive System.
OK - Click to continue.
To find definitions for standard setup values, follow this link: Standard Setup Options.
Main
Column Headers Summaries Tab
Note: You will need a bell schedule in place to see summaries information.
School - School site number.
Student Name - Student's full name.
GD - Student's grade of enrollment.
SIDNO - Student's identification number.
Homeroom - Student's homeroom teacher's name.
Course - State course name.
Rem - Displays a "Y" if this course is a remotely scheduled course.
HF - Half/Full credits.
SL - Number of semesters this course spans.
Teacher - Course teacher name.
Pd - Course class period.
STCode - State code.
Section - Section number.
Gd1 - Gd8 - Grading periods 1 - 8.
Total - Total Absences for all grading periods including check ins and check outs.
Makeup - Total number of Makeup Attendance Records.
City - Student's mailing address city.
State - Student's mailing address state.
Zip - Student's mailing address zip.
Phone - Student's main home phone number.
Start Date - Start date of the course.
End Date - End date of the course.
Sched Type - Scheduling type.
Base Sch - Student's base school.
To find definitions of commonly used column headers, follow this link: Common Column Headers.
A list of students appear. Some of the students will already be checked/highlighted indicating who still needs a letter generated for them. The default behavior of the program is to not print previously printed letters. The program uses the Letter Log Report to make this determination.
If you want all students to receive a letter, select the small square to the left of each name.
Select print letters. The letter(s) appear ready to print.
A history of the student’s absences can be selected by clicking on the History tab. This will give a complete history of absences for all or a specific student.
Main
Column Headers History Tab
School - School site number
Student Name - Student's full name
GD - Student's grade of enrollment
SIDNO - Student's identification number
Homeroom - Student's homeroom teacher's name
Date - Student's attendance record date
OTIM - Student's check out time
ITIM - Student's check in time
Type - Type of absence full/half/other
Excused - Excused absence
Code - Attendance code and excuse check out, check in, and Dr's excuse
Reason - Code reason
Address - Student's mailing address first line
City - Student's mailing address city
State - Student's mailing address state
Zip - Student's mailing address zip
Phone - Student's main home phone number
To find definitions of commonly used column headers, follow this link: Common Column Headers.
Bottom
Setup - Click to go back to the Setup box.
Print - This will allow the user to print the report.
Communicate - This button will allow communication via automated call or email. .
Print Letters - Print letters for selected students on the summaries tab.
Auto Fail - This button will post failures automatically.
HELP - Click to view written instructions and/or videos.
Save - Click save first and a box will appear to name the report. Then click to save the report.
Report - The user can click in this box to select a report that was previously created.


