Difference between revisions of "SPC (Student Progress Center)"
From EDgearWiki
Jump to navigationJump to search| Line 1: | Line 1: | ||
| − | '''This program will allow you to modify Student Progress Center registration and viewing options.''' | + | __FORCETOC__ |
| + | __NOEDITSECTION__ | ||
| + | |||
| + | ===<u>'''Overview'''</u>=== | ||
| + | '''This program will allow you to modify the Student Progress Center's registration and viewing options.''' | ||
| + | |||
| + | ===<u>'''Accessing the Student Progress Center Registration and Viewing Options'''</u>=== | ||
| + | |||
| + | JCampus > System > Communication Configuration | ||
| + | |||
| + | |||
| + | |||
[[File:ans2.PNG]] [[File:SPC_Validation.png]] | [[File:ans2.PNG]] [[File:SPC_Validation.png]] | ||
| Line 8: | Line 19: | ||
#Click the '''Ok''' button. | #Click the '''Ok''' button. | ||
#Click on the tab at the bottom labeled '''SPC''' | #Click on the tab at the bottom labeled '''SPC''' | ||
| − | # | + | #Three tabs are at the top of the screen. The first two, ''Options'' and ''Validation'' will be addressed below: |
#*'''Options Tab''' - The Options tab will allow the user to control the look and actions of the Student Progress Center for students and parents. The Options tab is broken up into three sections. Display, Contact, and Login. | #*'''Options Tab''' - The Options tab will allow the user to control the look and actions of the Student Progress Center for students and parents. The Options tab is broken up into three sections. Display, Contact, and Login. | ||
#*'''Display discipline without administrator action''' - Check this option to display all discipline referrals for a student regardless of whether the referral is major or minor. If left unchecked, only major referrals will be displayed. | #*'''Display discipline without administrator action''' - Check this option to display all discipline referrals for a student regardless of whether the referral is major or minor. If left unchecked, only major referrals will be displayed. | ||
Revision as of 12:16, 5 January 2016
Overview
This program will allow you to modify the Student Progress Center's registration and viewing options.
Accessing the Student Progress Center Registration and Viewing Options
JCampus > System > Communication Configuration
- In the Navigation Menu, click on System
- Under Entry, select Communication Configuration
- If you need instructions for setup values to be used, follow the link for Standard Setup Options.
- Click the Ok button.
- Click on the tab at the bottom labeled SPC
- Three tabs are at the top of the screen. The first two, Options and Validation will be addressed below:
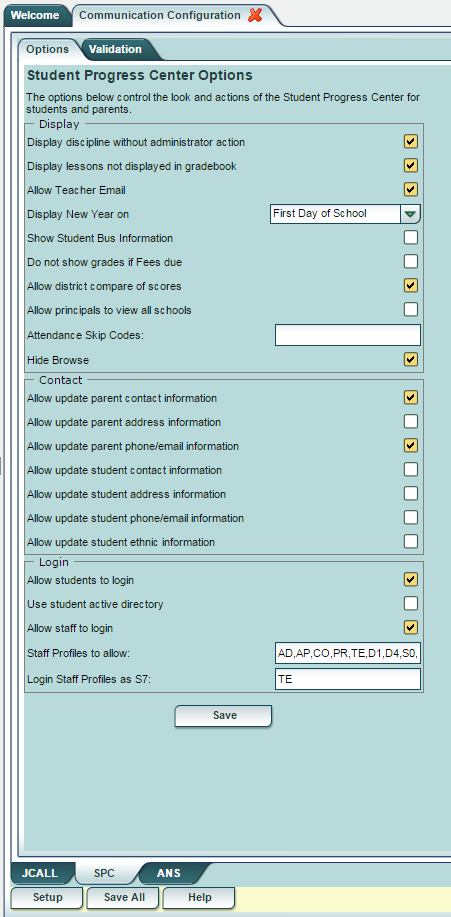
- Options Tab - The Options tab will allow the user to control the look and actions of the Student Progress Center for students and parents. The Options tab is broken up into three sections. Display, Contact, and Login.
- Display discipline without administrator action - Check this option to display all discipline referrals for a student regardless of whether the referral is major or minor. If left unchecked, only major referrals will be displayed.
- Display lessons not displayed in gradebook - Check this option to display teacher lesson plans from the Lesson Book and assignments from the gradebook that the teacher has chosen not to display in the gradebook. If left unchecked, only gradable assignment from the gradebook will be displayed.
- Allow Teacher Email - Check to allow students and parents to access their teacher's and principal's e-mail address on the Communication page.
- Display New Year On - Select "Always Show", "First Day of School", or 1, 2, 3, or 4 "Week(s) Before First Day". This option will tell the system when to display new year items to the students and parents.
- Show Student Bus Information - Check to display the student's bus and stop number on the Student Home Page
- If selected, the option Show Student Bus Address will become available. If checked, the address where the student will be picked up and dropped off will be visible.
- Do not show grades if Fees due - If a student owes a fee and the fee is stored in our system, by checking this option, when a student or parent clicks on the Grades button, they will be asked to call the school for more information.
- Allow district compare of scores - Check this option to display graphs comparing the student's grades in a course to the average district grade in the same course.
- Allow principals to view all schools - Check this option to allow the principals to access all students at all schools. If unchecked, a principal will only have access their students at their school.
- Attendance Skip Codes: - Select the attendance codes to skip when counting and displaying total days absence to students and parents
- Hide Browse - If you leave unchecked there will be a Browse School Courses button, but if you check this option the browse button will not show.
- Allow update parent contact information - Check this box to display "Contact Information" within the "Make Selection" drop down. This option will not allow a student or parent to update the parent contact information, only view.
- Allow update parent address information - Check this option to allow the students and parents to update the parent's mailing address.
- Allow update parent phone/email information - Check this option to allow the students and parents to update the parent's phone number and e-mail address.
- Allow update student contact information - Check this box to display "Contact Information" on the Student's Home Page. This option will not allow a student or parent to update the student's contact information, only view.
- Allow update student address information - Check this option to allow the students and parents to update the student's mailing address.
- Allow update student phone/email information - Check this option to allow the students and parents to update the student's phone number and e-mail address.
- Allow update student ethnic information - Check this option to allow the students and parents to update the student's primary and secondary ethnicity.
- Allow students to login - Check this option to allow students to log in to the Student Progress Center. See Student Login Editor for instructions on how to generate usernames and passwords for students.
- Use student active directory - If students have an active directory account, check this option to use their active directory usernames and passwords instead of generating usernames and passwords in JCampus. When checked, you will then be asked to enter the active directory "Domain" name, "Host" name, and DN (Distinguished Name).
- Allow staff to login - Check this option to allow district staff members to log in to the Student Progress Center. District staff is defined as AD, PR, AP, CO, SO and S7 profiles.
- Staff Profiles to allow: If you would like to add additional profiles, such as TE or SE, to the list of those that can log in to the Student Progress Center, click in this field and select the desired profiles as well as the profiles listed above. By adding additional profiles, you are deactivating the default profiles, so they have to be added back in also.
- Login Staff Profiles as S7 - If you want a profile to have the same security as a S7, then add the profile here.
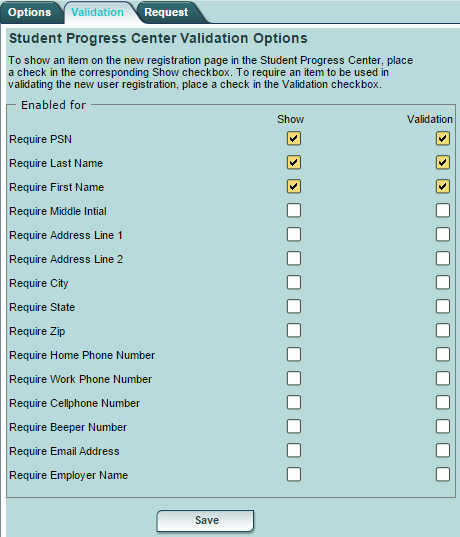
- Validation Tab - To show an item on the new registration page in the Student Progress Center, place a check in the corresponding "Show" check box. To require an item to be used in validating the new user registration, place a check in the "Validation" check box.

