Grade Distribution
Video How-to
Grade Distribution Report video
This program can be accessed using either of the following methods:
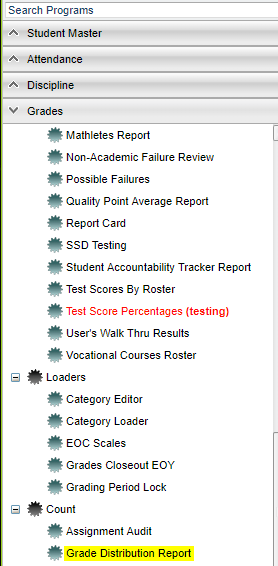
- Admin or Direct access via the left navigation panel, select Grades > Count > Grade Distribution Report.
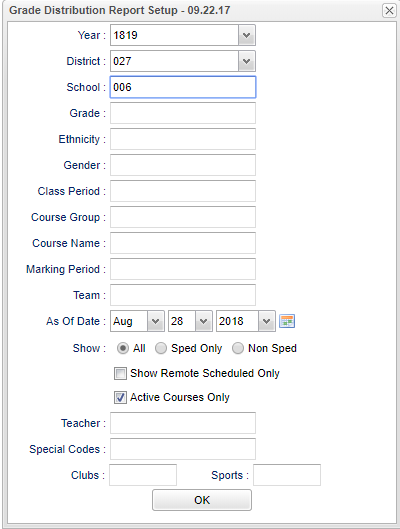
- Using this method, the setup options will pop up when the program opens.
- Teacher via the Gradebook, select Reports > Grades > Grade Distribution Report.
- Using this method, the setup options will NOT pop up when the program is displayed. The user will need to click on the setup button associated with the program to bring up the setup options.
Setup Options (For Administrators Only)
Year - Defaults to the current year. A prior year may be accessed by clicking in the field and making the appropriate selection from the drop down list.
District - Default value is based on your security settings. You will be limited to your district only.
School - Default value is based on your security settings. If you are assigned to a school, the school default value will be your school site code. You will not be able to change this value.
Grade - Grade level of students whose names are to be included on a report. Leave the field blank if all grade levels are to be included. Otherwise, click in the field to the right of Grade(s) to select the desired grade level(s) to be included.
Ethnicity - Ethnicity of students whose names are to be included on a report. Leave the field blank if all ethnics are to be included. Otherwise, click in the field to the right of Ethnic to select the desired ethnic(s) to be included.
Gender - Gender of students whose names are to be included on a report. Leave the field blank if both genders are to be included. Otherwise, click in the field to the right of Gender to select the desired gender to be included.
Class Period - A numeric value that indicated the period of the day a course is offered according to the Master Schedule Editor. To select all class periods leave the field blank or click in the field and select the check box at the top of the list of class periods; to select one or more class periods click in the field and select the desired class period(s) from the popup list.
Course Group - Transcript group courses.
Course Name - Course name of which the grades are gathered.
Marking Period - Grading period of the grades
Team - This selection should only be used if your school is using Team Scheduling. Leave blank if all team names are to be included into the report. Otherwise click in the field to the right of Teams to select the desired Teams(s) to view.
As Of Date - This choice will list only those students who are actively enrolled as of the date selected in the date field.
Show
- All - This will display all students.
- Sped Only - This will display only sped students.
- Non Sped - This will display only non sped students.
- Show Remote Only - If this box is checked, the report will list only those students who come to your school from another school in the district.
- Active Courses Only - Only show courses that the student is actively in as shown on their schedule.
Teacher - Select the teacher(s) for which to show on the report.
Special Codes - Special Codes must have been entered into the Student Master record for students. Leave blank if all special codes are to be included into the report. Otherwise click in the field to the right of Special Codes to select the desired special code(s) to view.
Clubs - Extracurricular activities in which students may participate and must have been entered into the Student Master record for students. Leave blank if all clubs are to be included into the report. Otherwise click in the field to the right of Clubs to select the desired club(s) to view.
Sports - Sports in which students may participate and must have been entered into the Student Master record for students. Leave blank if all sports are to be included into the report. Otherwise click in the field to the right of Sports to select the desired sport(s) to view.
OK - Click to continue.
To find definitions for standard setup values, follow this link: Standard Setup Options.
Column Headers
Sch - School site number
Teacher - Teacher name To obtain a quick list of the teacher's attendance record and student discipline referral incident count, click on the teacher's name.
Course - Course name
TGR: Total grades posted.
Column Header A, A%, through F, F%: Count of students with an A, B, etc., followed by the percent of each. If the user clicks on the number in the grades count cells, the roster of students who have that grade will be displayed on the screen.
- To obtain a quick list of students failing a single course, click on the count of "F" grades for a single course.
- To obtain a quick list of students failing all classes taught by a teacher, on the teacher summary row, click on the count of "F" grades.
Column Header P, P%: Number of students earning a grade of P followed by the percent.*Column Header O, O% through U, U%: Number of students earning a grades of O, S, N, U followed by the percent of each.
Column Header I, I%: Number of students with an incomplete followed by the percent.
Column NUM: Total numeric points divided by total grades posted.
Column Grade: Grading scale letter equivalent of the NUM column. This field will be empty if a mix of grading scales are used.
Column OT: The total of other grades posted.
column QP: The total quality points divided by the number of grades posted.
Num - Total numeric points divided by total grades posted. Clicking in the cell will display a drill down of the grades counted. This field will be empty if mixed grading scales are used.
Grade - Grading scale letter equivalent of the NUM column. Clicking in this cell will display a drill down of the grades being counted. This field will be empty if mixed grading scales are used.
To find definitions of commonly used column headers, follow this link: Common Column Headers.
Setup - Click to go back to the Setup box.
Print - This will allow the user to print the report.
HELP - Click to view written instructions and/or videos.

