Absence Analysis
This report allows the user to modify the number of absences that their parish uses when printing attendance letters.
Menu Location
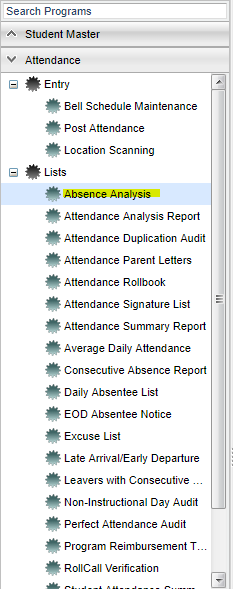
On the left navigation panel, select Attendance > List > Absence Analysis.
Setup Options
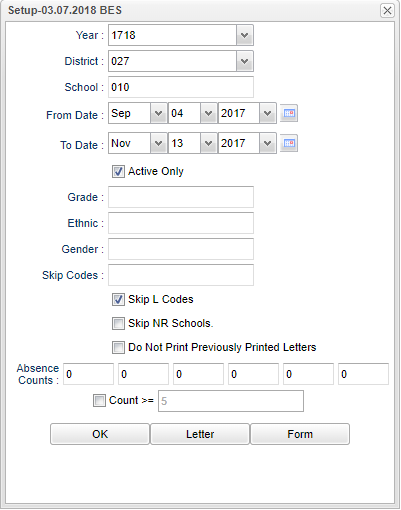
Year - Defaults to the current year. A prior year may be accessed by clicking in the field and making the appropriate selection from the drop down list.
District - Default value is based on your security settings. You will be limited to your district only.
School - Default value is based on your security settings. If you are assigned to a school, the school default value will be your school site code. You will not be able to change this
value. If you are a supervisor or other district office employee with access to the Student Information System, you will be able to run programs for one school, a small group of schools, or all
schools in your district.
Grade - Grade level of students whose records need to be edited or whose names are to be included on a report. Leave the field blank if all grade levels are to be included. Otherwise,
click in the field to the right of Grade(s) to select the desired grade level(s) to be included.
From Date and To Date - A set of dates that limits the selection of records for the report to a beginning date (from) and an ending date (to) range.
Active Only - This choice will list only those students who are actively enrolled as of the date selected in the date field.
To find definitions for standard setup values, follow this link: Standard Setup Options.
For other set up values not listed in the standard set up list:
- Skip L Codes - This will skip the leave codes.
- Skip NR Schools - This option will prevent schools that do not have the option "Submit SIS Batch Files?" checked in the "Sponsor Site Editor" from displaying results on the report.
- Do Not Print Previously Printed Letters - This will uncheck the students who have previously had a letter printed for that letter name. Make sure you choose a letter on the set up box so the correct students will be checked/hilighted.
- Absence Counts - Enter the number of absences of which to run the report and to print letters. This will correspond with the columns on the report.
- Count >/= - Select to override the preset numbers in the above boxes. If you enter a number in this box, after clicking OK, you will get a number/count of absences . Upon clicking on the number, you will have a list of students with absences of at least that number entered or more (>=).
- Letter - Choose the letter(s) needed to send to the parents of students. Note: Letters are created in the Letter Maintenance Program.
Click the OK to advance to the next page.
Column Headers
To find definitions of commonly used column headers, follow this link: Common Column Headers.
For other columns not listed in the common column list:
- Number Columns - These correspond with the numbers you added to the boxes in the set up box for number of absences to report.
- Total - total number of students with absences from all columns
To Print Labels
- Click the Print Labels button at the bottom of the screen.
- Select the student(s) for whom labels are needed.
- Click the Print Labels button at the bottome of the screen and a print preview of the labels will appear in the upper left corner of the screen.
- Click the printer icon in the upper right of the preview window.
- Then, click the blue print button.
To Print Letters
- Click the Print Letters button at the bottom of the screen.
- A print preview will appear in the upper left corner of the screen.
- Click the print icon at the upper right of the print preview.
- Then, click the blue print button at the top left to print the report. Close the print preview.

