Classroom Lessons Tools Administrators
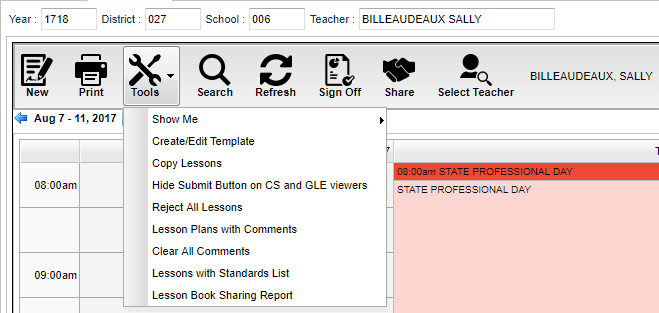
- Show Me under Tools
- If checked:
- Lessons will show the lessons for the week along with the status.
- Assignments will show the assignments that were made in the Gradebook. This does not apply to assignments made in the Lesson Book.
- Assignment Due will show you the assignments that are due.
- Accepted Lessons will show if the lesson is accepted with a green header.
- Submitted Lessons will show if the lesson has been submitted with a gray header.
- Rejected Lessons will show if the lesson has been rejected with a red header.
- Shared Lessons will show the lessons that are shared.
- If checked:
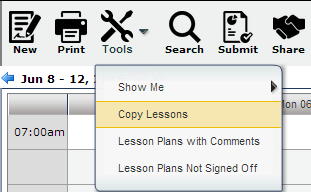
Copy Lessons will allow a user to copy lesson plans from one class to other classes.
Video
Copying Lessons in Lesson Book video
- Click on menu Tools and then click on Copy Lessons.
- Click Next.
- A list of lesson plans available to copy will appear in the Lessons and Assignments window. Select the lesson plans to copy.
- Note: When a teacher moves from one school to another, the teacher can choose their lesson plans from the previous school in the previous year to the new school in the new year. You will see these in the list.
- Click Next to move to the next screen or click Back to go to the previous window to select a different year and section.
- In the Copy Lesson window, the lesson that was selected to copy will be listed.
- Check Create lesson per day: only if a lesson is taught more than one day and each day is considered an independent lesson plan.
- For example: A history teacher is covering Julius Caesar. The lesson will last a week, but each day is a different topic about Julius Caesar. So the teacher copies a lesson plan about Julius Caesar from a previous class and/or year and, by using the Create lesson per day: feature, creates individual lessons per day over the course of the week, making minor adjustments to each day.
- Check Create lesson per day: only if a lesson is taught more than one day and each day is considered an independent lesson plan.
- Click in the cell(s) under Copy to Section to select the section to copy the lesson plan to and it will appear in that column.
- For teachers assigned to multiple schools, choose more schools from the school column where the same lesson will be taught.
- Click in the cells under Plan Start Date and Plan End Date to make adjustments to when the lesson will begin and end.
- Click Copy to complete the process.
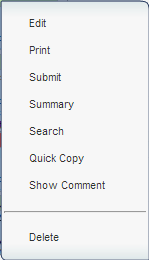
- Left click on a lesson plan and select Quick Copy.
- In the Copy Lesson window, the lesson selected to copy will be listed.
- Check Create lesson per day: only if a lesson is taught more than one day and each day is considered an independent lesson plan.
- For example: A history teacher is covering Julius Caesar. The lesson will last a week, but each day is a different topic about Julius Caesar. So the teacher copies a lesson plan about Julius Caesar from a previous class and/or year and, by using the Create lesson per day feature, creates individual lessons per day over the course of the week, making minor adjustments to each day.
- Check Create lesson per day: only if a lesson is taught more than one day and each day is considered an independent lesson plan.
- Click in the cell under Copy to Section to select the section(s) to copy the lesson plan to.
- For teachers assigned to multiple schools, choose more schools from the school column where the same lesson will be taught.
- Click in the cells under Plan Start Date and Plan End Date to make adjustments for when the lesson will begin and end.
- Click Copy to complete the process.
This program will give the user (teacher, administrator, librarian, district level user, etc.) a count of lessons that cover various GLEs and Common Core Standards for a given date period by teacher / class.
On the left navigation panel, select Grades, Lesson Book, under Tools select Lessons with Standards List.
Setup Box Options
To find definitions for standard setup values, follow this link: Standard Setup Options.
For other set up values not listed in the standard set up list:
- Teacher - Choose a teacher.
- Standard Type - Choose Common Core or Comprehensive Curriculum .
- Content Area - Choose the course content area.
- Standards - Choose the standards for the search.
Click the OK to advance to the next page.
Click on the number to view lesson(s) that cover the chosen GLE or Common Core Standard and lesson information.
Column Headers
To find definitions of commonly used column headers, follow this link: Common Column Headers.
For other columns not listed in the common column list:
- Standard - This column will be named with the chosen GLE or Common Core sandard.
To Print this Report
Click the Print button at the bottom of the screen.
A popup will appear with a set of document print options--PDF, XLS, CSV, HTML.
The default print option will be PDF.
Click the print button on this popup and a print preview window will appear.
To get the print icon on this window, hover the mouse in the bottom right area of the preview. A grey rectangle will appear with several icons.
Click the print icon at the right end of this rectangle. Another print preview will appear.
Click the print button at the top left to print the report. Close the print preview.


