Load Student Schedules
This loader will allow the user to manually load students into specific classes in the master schedule. It is very handy in New Year scheduling in which a listed group of students will be directly scheduled into a section that is not going to move or be changed, such as Athletic PE.
Video How-to
Menu Location
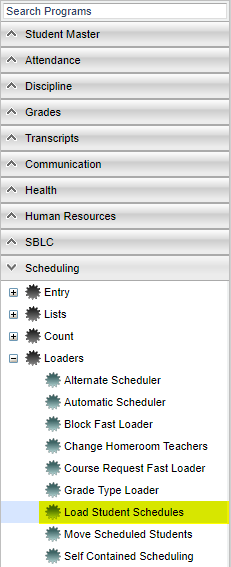 Click on Schedule. Under Loaders, select Load Student Schedules.
Setup Options
 To find definitions for standard setup values, follow this link: Standard Setup Options.
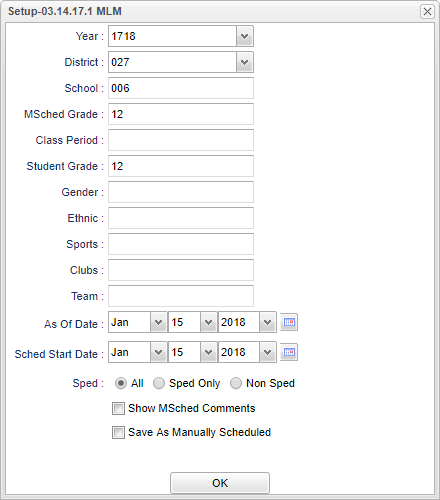
Year - Defaults to the current year. A prior year may be accessed by clicking in the field and making the appropriate selection from the drop down list. IMPORTANT! Set for the next school year if working on the upcoming school year scheduling.
District - Default value is based on your security settings. You will be limited to your district only.
School - Default value is based on your security settings. If you are assigned to a school, the school default value will be your school site code. You will not be able to change this value. If you are a supervisor or other district office employee with access to the Student Information System, you will be able to run programs for one school, a small group of schools, or all schools in your district.
MSched Grades: Set to filter the class listing based on the grade level of courses in the master schedule. Example: Set to grade of ‘1’ to filter out classes except those with a grade level of 1 such as “Reading 1”.
Class Periods: Set to filter the class listing based on a desired class period. Example: Set class period to ‘1’ will filter out all classes except those offered at 1st period.
Gender - Gender of students whose records need to be edited or whose names are to be included on a report. Leave the field blank if both genders are to be included. Otherwise, click in the field to the right of Gender to select the desired gender to be included.
Ethnic - Ethnicity of students whose records need to be edited or whose names are to be included on a report. Leave the field blank if all ethnics are to be included. Otherwise, click in the field to the right of Ethnic to select the desired ethnic(s) to be included.
Sports - Leave blank if all sports are to be included into the report. Otherwise click in the field to the right of Sports to select the desired sport(s) to view.
Clubs - Extracurricular activities in which students may participate. Leave blank if all clubs are to be included into the report. Otherwise click in the field to the right of Clubs to select the desired club(s) to view.
Team - This selection should only be used if your school is using Team Scheduling. Leave blank if all team names are to be included into the report. Otherwise click in the field to the right of Teams to select the desired Teams(s) to view.
As Of Date - This choice will list only those students who are actively enrolled as of the date selected in the date field.
Sched Start Date - Select start date to use for the schedule records.
Sped
- All
- Sped Only
- Non Sped
Show MSched Comments: Selecting with show the “Comments” column from the master schedule.
Save As Manual Scheduled: **This is normally checked** A very important setting indicating that the classes scheduled will be left alone when any automatic scheduler is run afterwards.
Click OK to continue.
Main
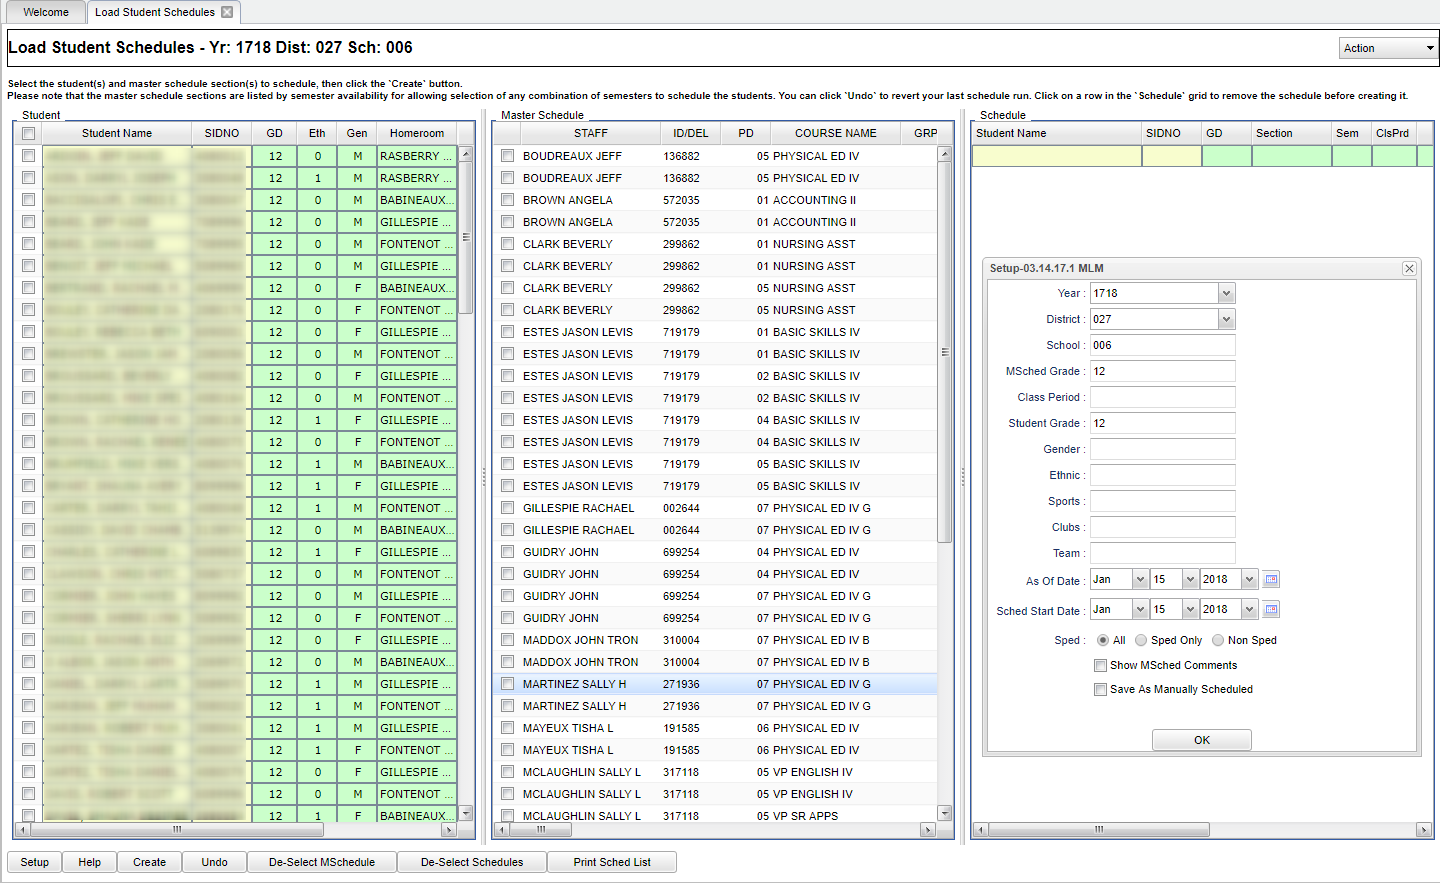
A screen showing Students on the left, and Master Schedule courses to pick from in the center is displayed as shown below. Note the select boxes on the side of each student and each course. 
Buttons at the Bottom of the Screen:
- Setup: Click to return to the setup box.
- Help: Click to see written instructions and videos.
- Create: Click to assign selected students to selected classes.
- Undo: Click to “unschedule” selected students in selected classes.
- De-select MSchedule: Click to remove all of the checks from the classes.
- De-select Schedules: Click to remove students from the scheduled area of the student listing.
- Print Sched List: Click to produce a listing of students and classes that are selected to be scheduled. This can be printed before or after the Create action is performed.
Column Headers
To find definitions of commonly used column headers, follow this link: Common Column Headers.
Selecting Students and Classes
- Click next to the desired student(s) names, then in the center, click next to the desired class or classes.
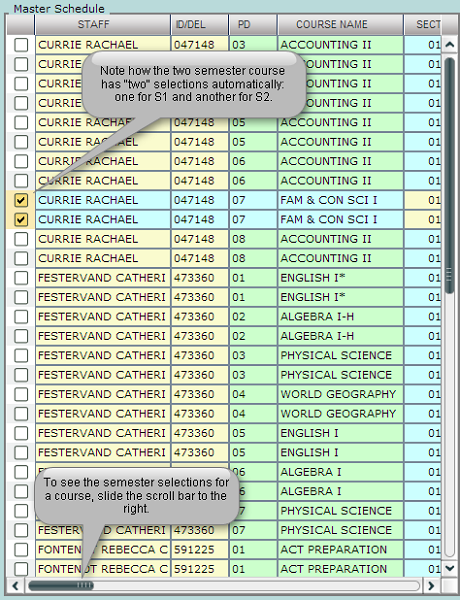
- The user will notice that the course listings appear to be doubled for courses lasting two semesters or more. By default, the user will pick the first instance of the class and the second semester of the course will be automatically selected also. This is normal.
- As the students and classes are selected, the user will notice that the students are shown on the right in the Schedules columns. They will appear twice for 2 semester courses: Once for semester 1, and again for semester 2. This is normal.
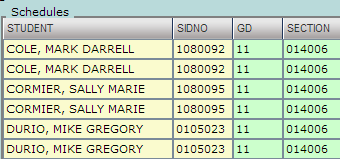
- When done selecting the students and classes, click the Create button at the lower left of the screen. This will schedule the students to the class or classes. A confirmation message will appear.
- If the user wishes to schedule other students and classes, click the buttons labeled De-select MSchedule and De-select Schedules to clear the selections and start over.
- If the user made a mistake, or if things have changed, and there is a need to unschedule the students from the class, do the following:
- Select the students and class or classes scheduled earlier. Click the “Undo” button. This will take the students out of the class or classes.
- A Final Note: Remember at the setup box there was a setting for “Save as Manual Scheduled”? If the user selected this before scheduling students with this utility, the classes scheduled will remain if any subsequent automatic scheduling is performed. In other words, the auto scheduler will leave these classes in place and work to schedule other requests around these classes.
