Difference between revisions of "Travel Time Report"
| Line 4: | Line 4: | ||
==Menu Location== | ==Menu Location== | ||
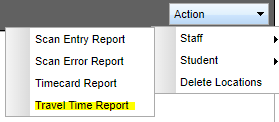
| − | On the left navigation panel, select '''Attendance''' > '''Entry''' > '''HR Location Scanning''' > '''Action'''. | + | On the left navigation panel, select '''Attendance''' > '''Entry''' > '''HR Location Scanning''' > '''Action''' . '''Travel Time Report'''. |
[[File:traveltimeaction.png]] | [[File:traveltimeaction.png]] | ||
| − | |||
| − | |||
==Setup Options== | ==Setup Options== | ||
Revision as of 08:24, 18 May 2022
This report will provide a user with the amount of time it takes for a staff member to scan out of one location and scan into the next location.
Menu Location
On the left navigation panel, select Attendance > Entry > HR Location Scanning > Action . Travel Time Report.
Setup Options
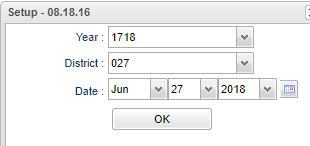
Year - Defaults to the current year. A prior year may be accessed by clicking in the field and making the appropriate selection from the drop down list.
District - Default value is based on the user’s security settings. The user will be limited to their district only.
Date - Current date
OK - Click to continue.
To find definitions for standard setup values, follow this link: Standard Setup Options.
Main
District - District number
Staff ID - Staff member's identification number
Last Name - Staff member's last name
First Name - Staff member's first name
Suffix - Staff member's generational suffix
Checked in Minutes - What time staff member scanned in
Travel Minutes - Staff member's travel time to the next assigned site
The Travel Time report will appear on the screen.
The report will show the number of minutes the employee was scanned in at a site and the number of travel minutes to the next assigned site.
To find definitions of commonly used column headers, follow this link: Common Column Headers.
Bottom
Setup - Click to go back to the Setup box.
Print - This will allow the user to print the report.
Help - Click to view written instructions and/or videos.


