Difference between revisions of "Complete Sped Data"
| Line 25: | Line 25: | ||
'''Exclude Inactive Students''' - Students who have leave codes. | '''Exclude Inactive Students''' - Students who have leave codes. | ||
| − | |||
| − | |||
'''[[Report]]''' - The user can click in this box to select a report that was previously created. | '''[[Report]]''' - The user can click in this box to select a report that was previously created. | ||
| Line 38: | Line 36: | ||
[[File:compspeddatafilters.png]] | [[File:compspeddatafilters.png]] | ||
| + | '''Active Enrollment Only''' - Only include estudents who are actively enrolled based on the setup As Of Date. | ||
Revision as of 07:29, 20 April 2022
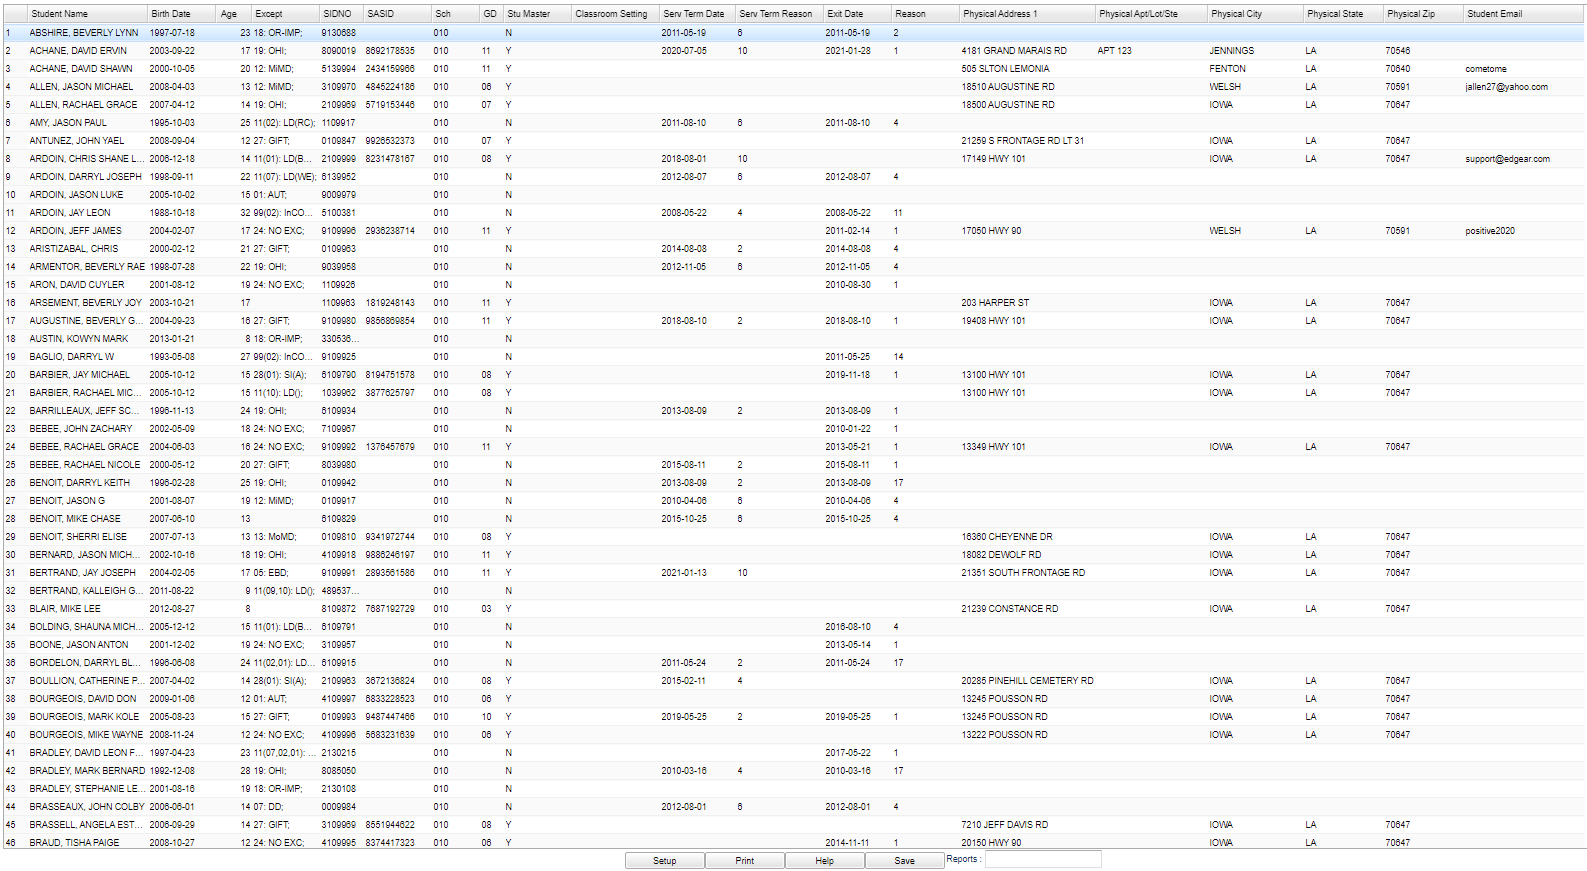
This report will display student data, all of the IEP dates and whether or not the student has exited SpEd and the reason.
Menu Location
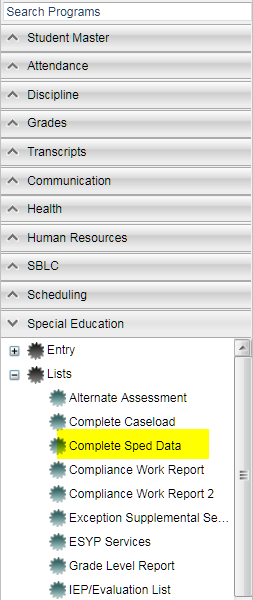
On the left navigation panel, select Special Education > Lists > Complete Sped Date.
Setup Options
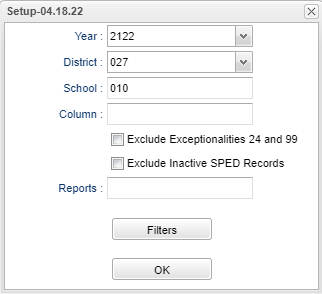
Setup Box Options
Year - Defaults to the current year. A prior year may be accessed by clicking in the field and making the appropriate selection from the drop down list.
District - Default value is based on the user's security settings. It will be limited to the user's district only.
School - Default value is based on the user's security settings. If the user is assigned to a school, the school default value will be the user's school site code.
Column - Leave blank to include all columns. Click to obtain a pick list columns that can be selected to view on the report.
Exclude Exceptionalities 24 and 99 - Specific exceptionalities to be excluded from the report.
Exclude Inactive Students - Students who have leave codes.
Report - The user can click in this box to select a report that was previously created.
OK - Click to continue.
To find definitions for standard setup values, follow this link: Standard Setup Options.
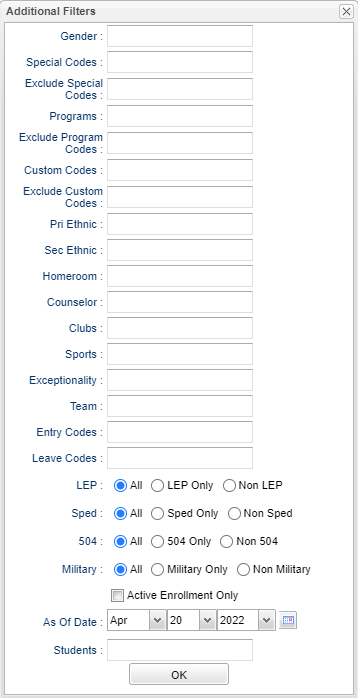
Filters
Active Enrollment Only - Only include estudents who are actively enrolled based on the setup As Of Date.
As-of-date - Limits the list to those students who are actively enrolled as of the date selected.
Exceptionality - The area of functioning in which he or she is significantly different from an established norm.
Custom Codes - Select the Custom Codes created in the Custom Code Management to filter the student list.
Main
Column Headers
Student Name - Student's name
Birth Date - Student's date of birth
Age - Student's age
Except-Exceptionality of the student
SIDNO - Student's identification number
SASID - the State Assigned Student ID number
Sch- State number of the school
GD - Grade level of the student
Stu Master - Indicated if the student has a record in the Student Master
Classroom Setting - Student classroom setting from IEP.
Serv Term Date - Service Termination Date
Serv Term Reason - Service Termination Code
Exit Date - Program exit date
Reason - Exit Reason Code
Physical Address 1 - Student's physical address line 1
Physical APT/LOT/STE/BLDG - Student's physical address line 2
Physical City - Student's physical city
Physical State - Student's physical state
Physical Zip - Student's physical zip
Student Email - Student's email
Parent/Guardian - Student's Guardian, Father or Mother's name
Parent Email - Student's Guardian, Father or Mother's email.
- In Student Master, this will check the Guardian Name field and if not blank, display the guardian email in this column.
- If the Guardian Name field is blank, then it checks the Father Name field.
- If the Father Name field is not blank, display the father email in this column.
- if the Father Name field is blank, then it checks the Mother Name field, etc.
To find definitions of commonly used column headers, follow this link: Common Column Headers.
Bottom
Setup - Click to go back to the Setup box.
Print - This will allow the user to print the report.
HELP - Click to view written instructions and/or videos.
Save - Click save first and a box will appear to name the report. Then click to save the report.
Report - The user can click in this box to select a report that was previously created.


