Difference between revisions of "Import IBC"
| Line 1: | Line 1: | ||
__NOTOC__ | __NOTOC__ | ||
'''This program will import scanned Industry Based Certificates (IBCs) into the Document Archiving System (DAS). This will not copy the IBCs to the IBC Editor on the Transcript or the IGP. In [[User Management]], you will need Student Master RO and then RW to Import IBC Import. ''' | '''This program will import scanned Industry Based Certificates (IBCs) into the Document Archiving System (DAS). This will not copy the IBCs to the IBC Editor on the Transcript or the IGP. In [[User Management]], you will need Student Master RO and then RW to Import IBC Import. ''' | ||
| + | |||
'''NOTE:''' This cannot be used if your district does not have [[Doc Archive]] activated. | '''NOTE:''' This cannot be used if your district does not have [[Doc Archive]] activated. | ||
Revision as of 05:47, 22 January 2019
This program will import scanned Industry Based Certificates (IBCs) into the Document Archiving System (DAS). This will not copy the IBCs to the IBC Editor on the Transcript or the IGP. In User Management, you will need Student Master RO and then RW to Import IBC Import.
NOTE: This cannot be used if your district does not have Doc Archive activated.
Menu Location
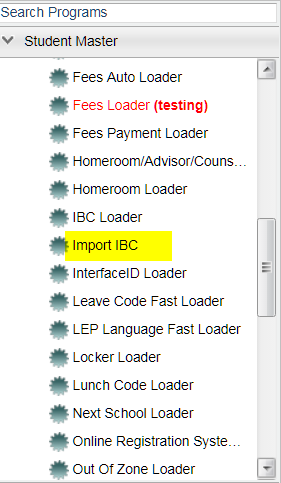
On the left navigation panel, select Student Master > Loaders > Import IBC.
Setup Options
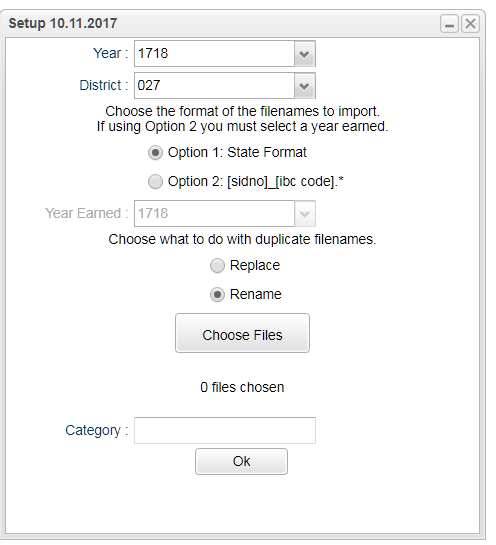
Year - Defaults to the current year. A prior year may be accessed by clicking in the field and making the appropriate selection from the drop down list.
District - Default value is based on the user’s security settings. The user will be limited to their district only.
Format - Refer to this list for other set up values not listed in the standard set up list:
- Option 1 - This option requires the scanned IBC files be in the state file name format (SiteCode_StudentLocalID_BeginningSchoolYear_3DigitIBCCode.pdf, jpg, jpeg, bmp, gif, doc, docx).
- The import format recognizes if an IBC is 833 by the file name. It correctly marks the record as so.
- Option 2 - This option requires the scanned IBC files be in StudentLocalID_3DigitIBCCode.pdf, jpg, jpeg, bmp, gif, doc, docx format.
- Year Earned - If Option 2 is selected, then the year the IBCs were earned must be selected.
- Choose Files - Select all of the files to import.
- FYI - In Windows, the known file type can be set to hidden, and as a result, the file will be .pdf.pdf" as a file extension and the count will show "0 files selected. To catch this condition, we show the file type error (as in document archive upload) to inform the user why no selected files are being counted to upload.
Category - Select the IBC category (folder) to import the IBCs into.
OK - Click to continue.
To find definitions for standard setup values, follow this link: Standard Setup Options.
Main
Column Headers
SIDNO - Local Student Identification Number
IBC - The Industry Based Certificate code
Year- Year the IBC was earned
File - Location of the file(s) to be imported
Status - Whether the import was successful or not.
To find definitions of commonly used column headers, follow this link: Common Column Headers.
Bottom
Setup - Click to go back to the Setup box.
Print - This will allow the user to print the report.

