Difference between revisions of "Graduation Template Editor"
| Line 15: | Line 15: | ||
'''Year''' - Defaults to the current year. A prior year may be accessed by clicking in the field and making the appropriate selection from the drop down list. | '''Year''' - Defaults to the current year. A prior year may be accessed by clicking in the field and making the appropriate selection from the drop down list. | ||
| − | '''District''' - Default value is based on | + | '''District''' - Default value is based on the user's security settings. It will be limited to the user's district only. |
| − | '''School''' - Default value is based on | + | '''School''' - Default value is based on the user's security settings. If the user is assigned to a school, the school default value will be the user's school site code. |
'''Grade''' - Select the Grade(s) for which this template is created. | '''Grade''' - Select the Grade(s) for which this template is created. | ||
Revision as of 08:15, 19 October 2018
The Graduation Template Editor will allow the counselor to create a multi-year request template so that they may easily load in students` requests by using the Student Graduation Template Loader. Once loaded, the counselor can quickly review the students` current and future requests and make adjustments based on the students` progress.
Menu Location
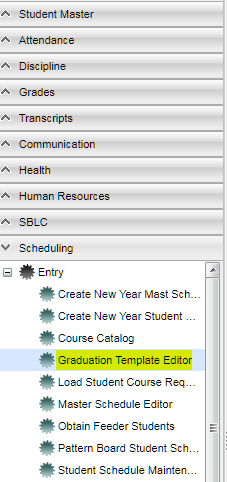
On the left navigation panel, select Scheduling > Entry > Graduation Template Editor.
Setup Options
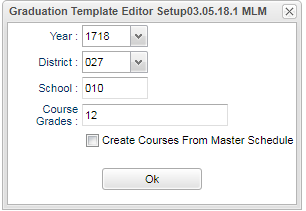
Year - Defaults to the current year. A prior year may be accessed by clicking in the field and making the appropriate selection from the drop down list.
District - Default value is based on the user's security settings. It will be limited to the user's district only.
School - Default value is based on the user's security settings. If the user is assigned to a school, the school default value will be the user's school site code.
Grade - Select the Grade(s) for which this template is created.
Check Box - Click this check box if you want the courses to be gathered from the school's Master Schedule Editor. Otherwise, the default source of the courses is the Course Catalog.
OK - Click to continue
To find definitions for standard setup values, follow this link: Standard Setup Options.
Main
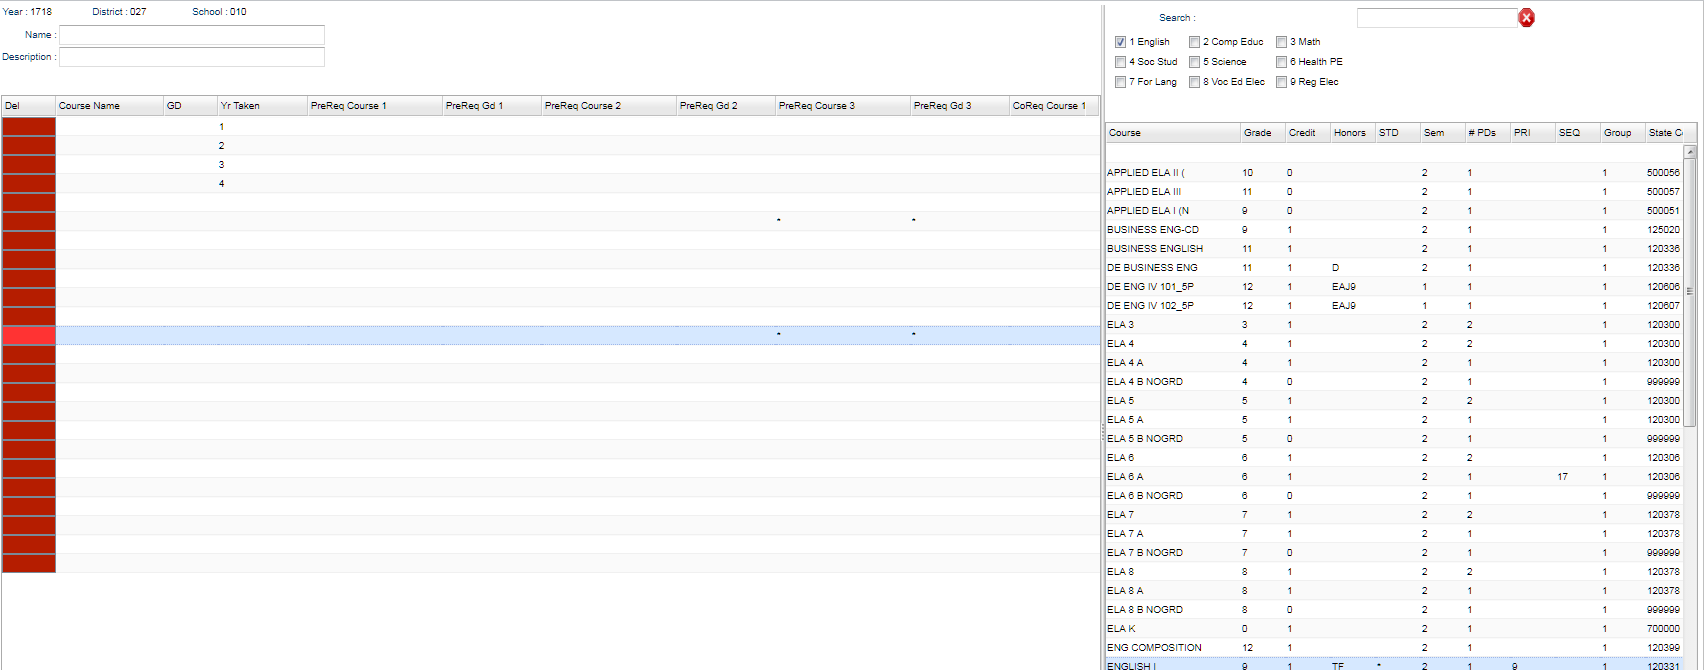
Column Headers
- Delete - deletes that row only
- Course Name - name of the course
- Gd - course grade level
- Yr Taken - year the course was taken
- PreReq Course 1,2,3 - course needed before chosen course is taken
- PreReq Gd 1,2,3 -
- CoReq Course 1,2,3 -
- CoReq Gd 1,2,3 -
- Save - saves that row only
- Course - Local name for the course.
- Grade - Grade level of the course.
- Credit - Carnegie Unit value.
- Honors - Course Categories (EX: Honors, Obsolete, TOPS).
- STD - Standard Course for grade indicator.
- Sem - The number semesters the course lasts.
- # PDs - The length of time the course lasts for measured in class periods.
- PRI - Priority Code for auto scheduling-higher number has more priority.
- SEQ - Horizontal Semester Priority.
- Group - State Approved Transcript Group. 1=Eng, 3=Math, etc.
- State Code - State Code assigned for course.
- Local Code - Local Course Number.
- School - School Number where course is taught.
To find definitions of commonly used column headers, follow this link: Common Column Headers.
Bottom
- Setup - Click to display the setup screen
- Clear - Click to clear the screen to create a new template header
- Save - Click to save the current schedule template header
- Delete - Click to delete the current schedule template header
- Print - This will allow the user to print the report.
- Find - Click to find a schedule template header.
- Copy - Click to copy this template and then enter the edited information for the template to copy "To".
- If copying within the same year, the user must change the name or the description of the template by at least one character before it will complete the task.
- If copying to another year, then the user must change the year and no change to the template name or the description is needed.
- Help - Click to view written instructions and/or videos.
Top
- Year - Year selected on the setup box.
- District - District selected on the setup box.
- School - School selected on the setup box.
- Enter a Name and Description for the template. Make sure the name is unique for every template created.
- Search - allows you to narrow your courses to certain transcript groups or you can use the search box.
- Check one or more transcript groups to narrow the course listing to only those courses that are in the selected transcript group(s).


