Difference between revisions of "Import IBC"
From EDgearWiki
Jump to navigationJump to search| Line 1: | Line 1: | ||
'''This program will import scanned Industry Based Certificates (IBCs) into the Document Archiving System (DAS).''' | '''This program will import scanned Industry Based Certificates (IBCs) into the Document Archiving System (DAS).''' | ||
| + | ==Menu Location== | ||
| + | [[File:import IBC.png]] | ||
'''Student Master -> Loaders -> Import IBC''' | '''Student Master -> Loaders -> Import IBC''' | ||
Revision as of 08:18, 9 May 2018
This program will import scanned Industry Based Certificates (IBCs) into the Document Archiving System (DAS).
Menu Location
Student Master -> Loaders -> Import IBC
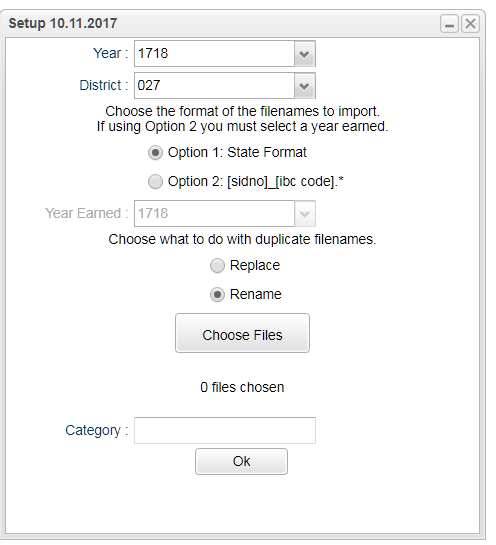
Setup Box Options
- To find definitions for standard setup values, follow this link: Standard Setup Options.
- Refer to this list for other set up values not listed in the standard set up list:
- Option 1 - This option requires the scanned IBC files be in the state file name format (SiteCode_StudentLocalID_BeginningSchoolYear_3DigitIBCCode.pdf, jpg, jpeg, bmp, gif, doc, docx).
- The import format recognizes if an IBC is 833 by the file name. It correctly marks the record as so.
- Option 2 - This option requires the scanned IBC files be in StudentLocalID_3DigitIBCCode.pdf, jpg, jpeg, bmp, gif, doc, docx format.
- Year Earned - If Option 2 is selected, then the year the IBCs were earned must be selected.
- Choose Files - Select all of the files to import.
- Category - Select the IBC category (folder) to import the IBCs into.
- Click the OK to advance to the next page.
Column Headers
- To find definitions of commonly used column headers, follow this link: Common Column Headers.
- For other columns not listed in the common column list:
- IBC - The Industry Based Certificate code.
- Year- The year the IBC was earned.
- File - ?
- Status - Whether the import was successful or not.
Print Options
- To find the print instructions, follow this link: Standard Print Options.
- By highlighting rows within the list and then by clicking print, the rows highlighted will be the only rows printed. To undo a highlight, press and hold down the Control key while clicking back on the highlighted area/row.
- Click + Drag: Selects adjacent rows to be printed.
- Control + Click: Selects individual rows to be printed.
