Difference between revisions of "Gain Loss Report"
| Line 45: | Line 45: | ||
'''Show Student''' | '''Show Student''' | ||
| − | + | ||
| − | + | '''SIDNO''' - Select to display the student's student identification number. | |
| + | |||
| + | '''SSN''' - Select to display the student's social security number. | ||
'''Sped''' | '''Sped''' | ||
| − | + | ||
| − | + | '''All''' - Select to display all students. | |
| − | + | ||
| + | '''Sped Only''' - Select to display only sped students. | ||
| + | |||
| + | '''Non Sped''' - Select to display only non sped students. | ||
'''Show''' | '''Show''' | ||
| − | + | ||
| − | + | '''All''' - Select to display all gains and losses for the date range selected. | |
| − | + | ||
| + | '''Gain Only''' - Select to display only gains for the date range selected. | ||
| + | |||
| + | '''Losses Only''' - Select to display only the losses for the date range selected. | ||
'''Show Transfers From''' - This field is the district(s) from which a student has transferred and it will only have information if it was entered upon enrolling. Leave the field blank if | '''Show Transfers From''' - This field is the district(s) from which a student has transferred and it will only have information if it was entered upon enrolling. Leave the field blank if | ||
Revision as of 09:47, 13 March 2018
Video How-to
Menu Location
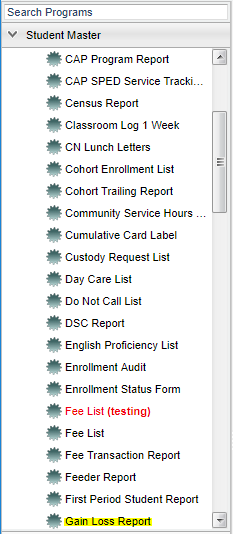
On the left navigation panel, select Student Master > Lists > Gain Loss Report.
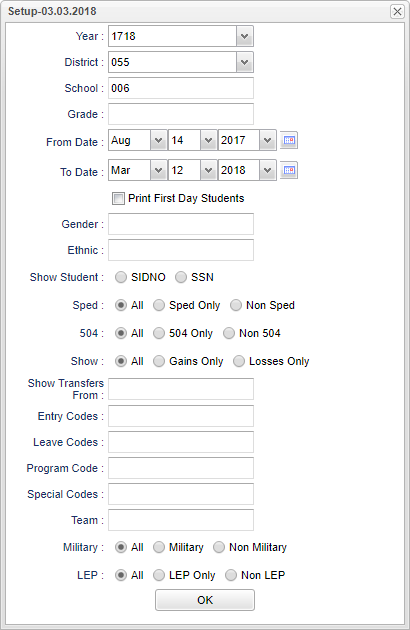
Setup Options
Year - Defaults to the current year. A prior year may be accessed by clicking in the field and making the appropriate selection from the drop down list.
District - Default value is based on your security settings. You will be limited to your district only.
School - Default value is based on your security settings. If you are assigned to a school, the school default value will be your school site code. You will not be able to change this
value. If you are a supervisor or other district office employee with access to the Student Information System, you will be able to run programs for one school, a small group of schools, or all
schools in your district.
Grade - Grade level of students whose records need to be edited or whose names are to be included on a report. Leave the field blank if all grade levels are to be included. Otherwise,
click in the field to the right of Grade(s) to select the desired grade level(s) to be included.
From Date - The first day to start the report for data.
To Date - The last day to end the report for data.
Print First Day Students - Display all students enrolled on the first day of school
Gender - Gender of students whose records need to be edited or whose names are to be included on a report. Leave the field blank if both genders are to be included. Otherwise, click in
the field to the right of Gender to select the desired gender to be included.
Ethnic - Ethnicity of students whose records need to be edited or whose names are to be included on a report. Leave the field blank if all ethnics are to be included. Otherwise, click in
the field to the right of Ethnic to select the desired ethnic(s) to be included.
Show Student
SIDNO - Select to display the student's student identification number.
SSN - Select to display the student's social security number.
Sped
All - Select to display all students.
Sped Only - Select to display only sped students.
Non Sped - Select to display only non sped students.
Show
All - Select to display all gains and losses for the date range selected.
Gain Only - Select to display only gains for the date range selected.
Losses Only - Select to display only the losses for the date range selected.
Show Transfers From - This field is the district(s) from which a student has transferred and it will only have information if it was entered upon enrolling. Leave the field blank if
you want transfers from all districts. Click in the field to restrict the report to one or more districts.
Entry Codes - Leave the Entry Code field blank if all Entry Codes are to be included. Otherwise, click in the box to select the desired code(s) to be included.
Leave Codes - Leave the Leave Code field blank if all Leave Codes are to be included. Otherwise, click in the box to select the desired code(s) to be included.
Program Code - Leave blank if all program codes are to be included into the report. Otherwise click in the field to the right of Program Codes to select the desired program code(s) to
view.
Special Codes - Special Codes must have been entered into the Student Master record for students. Leave blank if all special codes are to be included into the report. Otherwise click in
the field to the right of Special Codes to select the desired special code(s) to view.
Teams - This selection should only be used if your school is using Team Scheduling. Leave blank if all team names are to be included into the report. Otherwise click in the field to the
right of Teams to select the desired Teams(s) to view.
Military - Select All, Military, or Non-Military
- All - Select to display all student.
- Military - Select to display only students associated with family in the military.
- Non Military - Select to display only student with non military association.
LEP
- All - Select to display all students.
- LEP Only - Select to display only LEP students.
- Non LEP - Select to display only non LEP students.
If you need instructions for setup values to be used, follow the link for Standard Setup Options.
Main
Column Headers
GD - Student's grade of enrollment
Sch - Student's school site of enrollment
SIDNO - List of students by Sidno for whom an Enrollment Status Form will be printed. Select one or more students or leave the field blank for all students or check the box at the top of
the student list to select all students
Gender - Gender of students whose records need to be edited or whose names are to be included on a report. Leave the field blank if both genders are to be included. Otherwise, click in
the field to the right of Gender to select the desired gender to be included.
Ethnic - Ethnicity of students whose records need to be edited or whose names are to be included on a report. Leave the field blank if all ethnics are to be included. Otherwise, click in
the field to the right of Ethnic to select the desired ethnic(s) to be included.
GLFD--Students gained or lost on the first day of school
FD--Students gained on the first day of school
GOST--Students gained out of state
GIST--Students gained in state
GID--Students gained in district
GOTH--Students gained other than out of state, in state or in district
GTOT--Total students gained
LOST--Students lost out of stateLIST--Students lost in state
LID--Students lost in district
LOTH--Students lost other than out of state, in state or in district
LTOT--Total students gained
TOTAL--Net gain (positive value) or net loss (negative value)
TRANSFRM--6 digit site code if site is located in Louisiana
TRANSTO--6 digit site code if site is located in Louisiana
SASID - The State Assigned Student ID number.
Teams - This selection should only be used if your school is using Team Scheduling. Leave blank if all team names are to be included into the report. Otherwise click in the field to the
right of Teams to select the desired Teams(s) to view.
To find definitions of commonly used column headers, follow this link: Common Column Headers.
Bottom
Setup - The user may change the settings previously selected for running the program.
Print - To find the print instructions, follow this link: Standard Print Options.
Help - Takes you to the Help website for written instructions and instructional videos
Sorting and other data manipulations are explained in the following link: List Programs Instructions/Video


