|
|
| Line 86: |
Line 86: |
| | | | |
| | '''CTYPE''' - Course Type Designation | | '''CTYPE''' - Course Type Designation |
| − |
| |
| − | After clicking "Ok", a list of courses should appear on the screen.
| |
| − |
| |
| − | To create a new course, at the top of the list of courses is a blank row. Begin by clicking in the blank cell underneath the header '''GD'''. A list of grade levels will appear. Select the appropriate grade level for the course being created.
| |
| − |
| |
| − | Click in the next empty cell under the header labeled '''COURSE NAME'''. A box will appear with an area to type the name of the course. Staying within a sixteen character limit, including
| |
| − |
| |
| − | spaces, type the name of the course.
| |
| − |
| |
| − | '''Course''' names need to be unique''. Verify that the course being created does not already exist. If not seen in the active course catalog, check obsolete courses by unchecking the
| |
| − |
| |
| − | '''Active Only''' at the bottom of the screen. If it does exist but is not exactly right, DO NOT CHANGE OR DELETE existing courses, CREATE A NEW COURSE. If the course that already exists is
| |
| − |
| |
| − | not being used anymore, in the "HONR" field, select "O" for obsolete. If the course is still being used, leave it alone and when typing the name of the new course, be sure the name is
| |
| − |
| |
| − | UNIQUE.
| |
| − |
| |
| − | '''Symbols''' - There are symbols that can be added to the course name title.
| |
| − |
| |
| − | '''!''' - Triggers the course to use alpha grades regardless of what the Pupil Progression Plan states.
| |
| − |
| |
| − | '''*''' - This has no significance at all but is used by a specific district so disregard.
| |
| − |
| |
| − | '''^''' - Denoted courses taught below grade level.
| |
| − |
| |
| − | Click in the next empty cell under the header labeled '''CRE'''. A box will appear listing available credit value options. Select the appropriate credit value for the course being c
| |
| − |
| |
| − | created.
| |
| − |
| |
| − | Click in the next empty cell under the header labeled '''HONR'''. A box will appear with a list of codes to define the course. Select all the codes that apply to the course being created.
| |
| − |
| |
| − | For example a "W" means the GPA will be weighted at 5.0.
| |
| − |
| |
| − | Click in the next empty cell under the header labeled '''ST'''. "ST" means that the course is a standard course for the grade level selected. Select the "*" for standard for all students,
| |
| − |
| |
| − | the "F" for standard for all '''females''', or "M" for standard for all '''males'''.
| |
| − |
| |
| − | NOTE: The "ST" field is not a required field. It only needs to be entered if the mass request loader is going to be used within the "Load Student Course Requests" program.
| |
| − |
| |
| − | Click in the next empty cell under the header labeled '''SE'''. A box will appear listing the possible number of semesters the course could last. Select the appropriate number of semesters
| |
| − |
| |
| − | the course will last.
| |
| − |
| |
| − | NOTE: Six and nine week school systems should only use 1 and 2 semesters. Only 4x4 school systems have the option to use semesters 3 and 4.
| |
| − |
| |
| − | Click in the next empty cell under the header labeled '''PD'''. "PD" means that the length of the course lasts the length of the number of standard class periods entered into this field.
| |
| − |
| |
| − | Select the appropriate number of periods. Standard is 1.
| |
| − |
| |
| − | Click in the next empty cell under the header labeled '''ST CODE'''. A list of state course codes will appear. Select the correct state course code that applies to the course being
| |
| − |
| |
| − | created.*After selecting the state course code, a box will appear asking to overwrite the existing course name with the state description. Click '''NO''' unless the state course name is
| |
| − |
| |
| − | preferred.*The field '''ST COURSE''' will be populated after "ST COURSE" is selected.
| |
| − |
| |
| − | NOTE: Please verify that the correct state course code is selected. There are state course codes that are for private schools only, locally initiated programs, and grade level specific. BE
| |
| − |
| |
| − | ABSOLUTELY SURE OF THE STATE COURSE CODE SELECTED''.
| |
| − |
| |
| − | The field '''LNUM''' means "Local Number" and is not a required field. The field is used for districts who have local numeric descriptions of courses. To enter a number, click in the empty
| |
| − |
| |
| − | cell under the header "LNUM". In the box that appears on the screen, enter a six digit number then click "Save".
| |
| − |
| |
| − | The field '''PT''' means priority. Courses can be given a priority number that will cause the automatic scheduler to schedule those courses in order of priority. The higher the priority
| |
| − |
| |
| − | number the earlier the auto scheduler schedules the course. This field is not required.
| |
| − |
| |
| − | The field '''SEQ''' means sequential. By giving two course sequential codes, such as 101 and 102, the auto scheduler knows that, if both courses are requested, the course with 101 should be
| |
| − |
| |
| − | scheduled in the first semester and the course with the code 102 should be scheduled in the second semester. To sequence the next set of courses, skip the next number in the sequence, in
| |
| − |
| |
| − | this case 103, and start with the next number set, 104 and 105. This field is not required.
| |
| − |
| |
| − | The field '''VOC PRI''' stands for vocational priority. Click in the blank field below the header to get a list of vocational clusters. If the course being created is a vocational course,
| |
| − |
| |
| − | select the appropriate vocational cluster.
| |
| − |
| |
| − | Click in the blank cell below the header labeled as '''GRP''' and select the best general description of the course.
| |
| − |
| |
| − | The field '''REC''' is a field populated by the system and cannot be changed by the user.
| |
| − |
| |
| − | The field '''SCH''' should be populated with the default school selected on the setup box.
| |
| − |
| |
| − | Click in the blank cell below the header '''OBJFUN''' to select the default object/function code to be associated with the course.
| |
| − |
| |
| − | NOTE: Object/function is a numerical job description the state uses. The object code, the first three numbers, is the type of job, e.g. supervisor, teacher, aide, etc. The function code,
| |
| − |
| |
| − | the last four numbers, is the description of the job, e.g. supervisor of child welfare and attendance and teacher of secondary education.
| |
| − |
| |
| − | The field '''PDF''' will be populated with a number after the course has been created, the button '''Update PDF''' is pushed, and the course is associated with Curriculum Units and GLEs. If
| |
| − |
| |
| − | a number is displayed, then teachers will be able to select Curriculum Units and GLEs when creating assignments and lesson plans.
| |
| − |
| |
| − | If the course being created is an EOC course, then click in the blank field below the header '''FWGT'''. Select the weight value that will be associated with the EOC course. '''To Remove a
| |
| − |
| |
| − | Weight''' select 0.0 as the weight and save. Refresh the screen and the FWGT field will be blank.
| |
| − |
| |
| − | The '''Part''' field is for any course that is typically taken for a full credit, but is being scheduled for only one semester but not in the semester in which it is typically scheduled. For
| |
| − |
| |
| − | example, a first semester (part 1) is being scheduled in the second semester with the check mark in the S2 column check box. This is usually for students who have failed a particular
| |
| − |
| |
| − | semester and must retake that semester. The retake does not have to be in the same school year. '''GD TYPE''' provides a list of custom grading scales created in the '''Sponsor Site
| |
| − |
| |
| − | Editor''' on the '''Grading Scale''' tab using the '''Grading Scales Manager''' under the ''Action'' drop down. When a custom grading scale is selected, all sections assigned to that course
| |
| − |
| |
| − | for the school assigned in the '''Course Catalog''' will use that grading scale. If school 700 is assigned, all schools in the district using the course will use the assigned grading scale.
| |
| − |
| |
| − | When selecting the grade type and using the grade scale database for the listing, if more than one grade type is selected, one and only one of the selections must have the semester final
| |
| − |
| |
| − | option selected as "Y". If only one grade type is selected, the final semester does not have to be selected. When teachers are creating assignments, the selected grading scale will be the
| |
| − |
| |
| − | only option.
| |
| − |
| |
| − | The '''FIVE PT''' is for 'Display Only' (adjustments cannot be made in this column) indicating that the state uses the five point grading scale for this course for STS purposes. This will
| |
| − |
| |
| − | not affect your GPAs in your calculations unless you have a "W' in the Honors column of the Course Catalog.
| |
| − |
| |
| − | '''WEIGHT''' provides a list of custom marking period weights created in the '''Sponsor Site Editor''' on the '''Grading Scale''' tab using the '''Course Weights Manager''' under the
| |
| − |
| |
| − | '''Action''' drop down. When a custom marking period weight is selected, all sections assigned to that course for the school school assigned in the '''Course Catalog''' will use those
| |
| − |
| |
| − | weights. If school 700 is assigned, all schools in the district using the course will use the assigned marking period weights.
| |
| − |
| |
| − | After all fields have been populated correctly, click the '''Save New''' button at the bottom of the screen.
| |
| − |
| |
| − | If the grade level selected for the course being created is -1 to 08, then after clicking '''Save New''', a box will appear listing other grade levels between -1 and 08. If this course is
| |
| − |
| |
| − | needed for other grade levels as well, select those grade levels from the selection box and click '''Ok'''. If the course is not needed in other grade levels, simply click '''Ok'''.
| |
| | | | |
| | ==Bottom== | | ==Bottom== |
The Course Catalog is a list of courses available to students to choose from for the current year.
Video
Course Catalog video
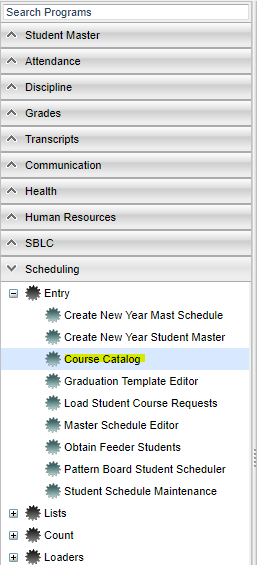
On the left navigation panel, select Scheduling > Entry > Course Catalog.
Setup Options
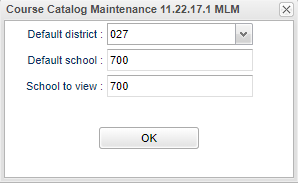
Default District - Verify that the district is correct.
Default School - Should be set to the school that course will be created for.
School to View - Will display the courses associated with the school selected.
To find definitions for standard setup values, follow this link: Standard Setup Options.
OK - Click to continue.
Main
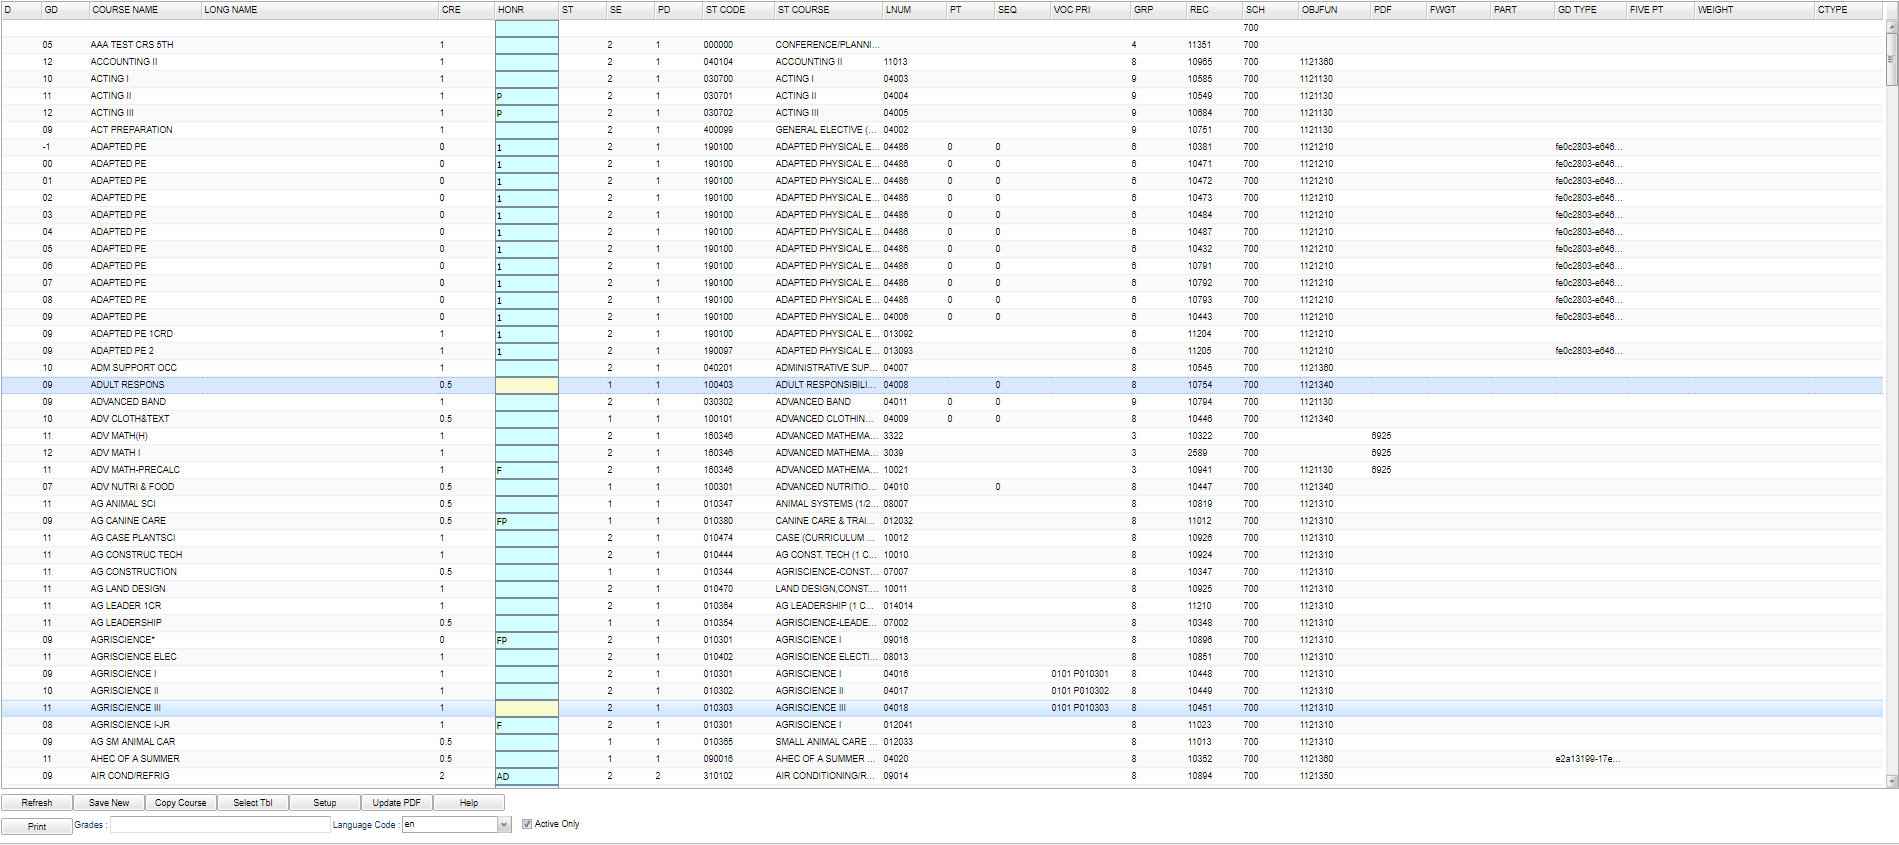
Column Headers
To find definitions of commonly used column headers, follow this link: Common Column Headers.
Grade - Grade level of the course
Course Name - Local name for the course (prints on report cards, screens, etc.)
Long Name - Expanded name of course to include internationalization
Cre - Credit Carnegie Unit value
Honr - Course Categories (EX: Honors, Obsolete, TOPS)
ST - Standard Course for grade indicator
SE - Number Horizontal Semesters-one session-this course
PD - Number of Vertical Periods-one session-this course
ST Code - State Code assigned for course
ST Course - State Course Name
LNUM - Local Course Number
PT - Priority Code for auto scheduling-higher number has more priority
SEQ - SEQ Horzontal Semester Priority
VOC PRI - Vocational Course-only necessary to code this column for primary only
GR Type - Course Grade Type ID for grades calculations
SEM Final - Grade Type Semester Final
GRP - State Approved Transcript Group. 1=Eng, 3=Math, etc.
REC - Record Number
SCH - School Number where course is taught
OBJFUN - Employee Job Code for this Course
PDF - Obsolete
FWGT - Final Weight Percentage for final exam. This applies to the E2 grade as a percentage of the overall grade
PART - Part Number used for Partial Year Courses to denote what half is taken
FIVE PT - Uses the 5 point grading scale
WEIGHT - Course Weight override of sponsor PPP settings
CTYPE - Course Type Designation
Bottom

Refresh - button to view any newly created messages.
Save New - Save any information added.
Copy Course - Will copy course for another grade
Select Tbl - Select the whole table.
Setup - To find definitions for standard setup values, follow this link: Standard Setup Options.
Update PDF - Obsolete
Help - This button links to the JCampus videos and/or written instructions.
Print - To find the print instructions, follow this link: Standard Print Options.
Grades - Course grades
Language Codes - Select Language Code
Active Only - Checked it will show only active courses, unchecked it will show all, including obsolete courses.
JCampus / Scheduling


