Difference between revisions of "Load Student Schedules"
| Line 1: | Line 1: | ||
| − | + | This loader will allow the user to manually load students into specific classes in the master schedule. It is very handy in New Year scheduling in which a listed group of students will be directly scheduled into a section that is not going to move or be changed, such as Athletic PE. | |
===Video How-to=== | ===Video How-to=== | ||
| Line 5: | Line 5: | ||
| − | === | + | ===Getting Started=== |
| − | |||
In the navigation pane on the left, select '''Schedule''', '''Loaders''', then '''Load Student Schedules'''. | In the navigation pane on the left, select '''Schedule''', '''Loaders''', then '''Load Student Schedules'''. | ||
| − | |||
===Setup Box Options=== | ===Setup Box Options=== | ||
| Line 28: | Line 26: | ||
| − | A screen showing '''Students''' on the left, and '''Master Schedule courses''' to pick from in the center is displayed as shown below. Note the select boxes on the side of each student and each course. | + | A screen showing '''Students''' on the left, and '''Master Schedule courses''' to pick from in the center is displayed as shown below. Note the select boxes on the side of each student and each course. <br><br>[[image:loadstudentschedules3.png]]<br><br> |
| − | |||
| − | [[image:loadstudentschedules3.png]] | ||
===Buttons at the Bottom of the Screen:=== | ===Buttons at the Bottom of the Screen:=== | ||
| Line 49: | Line 45: | ||
#Click next to the desired student(s) names, then in the center, click next to the desired class or classes. | #Click next to the desired student(s) names, then in the center, click next to the desired class or classes. | ||
#The user will notice that the course listings appear to be doubled for courses lasting two semesters or more. By default, the user will pick the first instance of the class and the second semester of the course will be automatically selected also. This is normal. | #The user will notice that the course listings appear to be doubled for courses lasting two semesters or more. By default, the user will pick the first instance of the class and the second semester of the course will be automatically selected also. This is normal. | ||
| − | #*If the user wants to schedule the student to only a single semester of the course, slide the scroll bar to the see the semesters offered, then deselect the row of the semester that is not needed. | + | #*If the user wants to schedule the student to only a single semester of the course, slide the scroll bar to the see the semesters offered, then deselect the row of the semester that is not needed. <br><br>[[image:loadstudentschedules5.png]]<br><br> |
| − | + | #As the students and classes are selected, the user will notice that the students are shown on the right in the '''Schedules''' columns. They will appear twice for 2 semester courses: Once for semester 1, and again for semester 2. This is normal. <br><br>[[image:loadstudentschedules6.png]]<br><br> | |
| − | #As the students and classes are selected, the user will notice that the students are shown on the right in the '''Schedules''' columns. They will appear twice for 2 semester courses: Once for semester 1, and again for semester 2. This is normal. | ||
| − | |||
#When done selecting the students and classes, click the '''Create''' button at the lower left of the screen. This will schedule the students to the class or classes. A confirmation message will appear. | #When done selecting the students and classes, click the '''Create''' button at the lower left of the screen. This will schedule the students to the class or classes. A confirmation message will appear. | ||
#If the user wishes to schedule other students and classes, click the buttons labeled '''De-select MSchedule''' and '''De-select Schedules''' to clear the selections and start over. | #If the user wishes to schedule other students and classes, click the buttons labeled '''De-select MSchedule''' and '''De-select Schedules''' to clear the selections and start over. | ||
Revision as of 07:24, 21 February 2015
This loader will allow the user to manually load students into specific classes in the master schedule. It is very handy in New Year scheduling in which a listed group of students will be directly scheduled into a section that is not going to move or be changed, such as Athletic PE.
Video How-to
Getting Started
In the navigation pane on the left, select Schedule, Loaders, then Load Student Schedules.
Setup Box Options
To find definitions for standard setup values, follow this link: Standard Setup Options.
For other set up values not listed in the standard set up list:
- Year: IMPORTANT! Set for the next school year if working on the upcoming school year scheduling.
- MSched Grades: Set to filter the class listing based on the grade level of courses in the master schedule. Example: Set to grade of ‘1’ to filter out classes except those with a grade level of 1 such as “Reading 1”.
- Class Periods: Set to filter the class listing based on a desired class period. Example: Set class period to ‘1’ will filter out all classes except those offered at 1st period.
- Student Grades: Set to filter the student listing based on a desired grade range of students.
- Show MSched Comments: Selecting with show the “Comments” column from the master schedule.
- As of Date: Set for date student's are enrolled.
- Sched Start Date: Set for date the student is to start (be enrolled in) the class.
- Save As Manual Scheduled: **This is normally checked** A very important setting indicating that the classes scheduled will be left alone when any automatic scheduler is run afterwards.
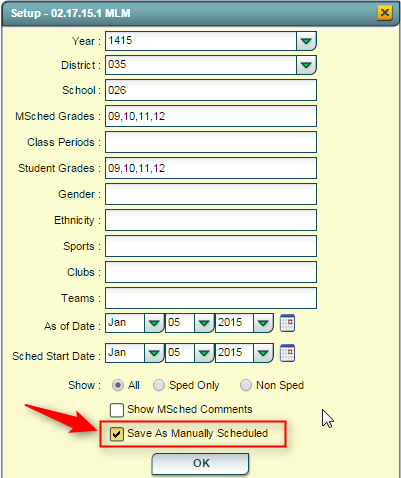

Click the OK button.
A screen showing Students on the left, and Master Schedule courses to pick from in the center is displayed as shown below. Note the select boxes on the side of each student and each course. 
Buttons at the Bottom of the Screen:
![]()
- Setup: Click to return to the setup box.
- Help: Click to see written instructions and videos.
- Create: Click to assign selected students to selected classes.
- Undo: Click to “unschedule” selected students in selected classes.
- De-select MSchedule: Click to remove all of the checks from the classes.
- De-select Schedules: Click to remove students from the scheduled area of the student listing.
- Print Sched List: Click to produce a listing of students and classes that are selected to be scheduled. This can be printed before or after the Create action is performed.
Column Headers
To find definitions of commonly used column headers, follow this link: Common Column Headers.
Selecting Students and Classes
- Click next to the desired student(s) names, then in the center, click next to the desired class or classes.
- The user will notice that the course listings appear to be doubled for courses lasting two semesters or more. By default, the user will pick the first instance of the class and the second semester of the course will be automatically selected also. This is normal.
- If the user wants to schedule the student to only a single semester of the course, slide the scroll bar to the see the semesters offered, then deselect the row of the semester that is not needed.
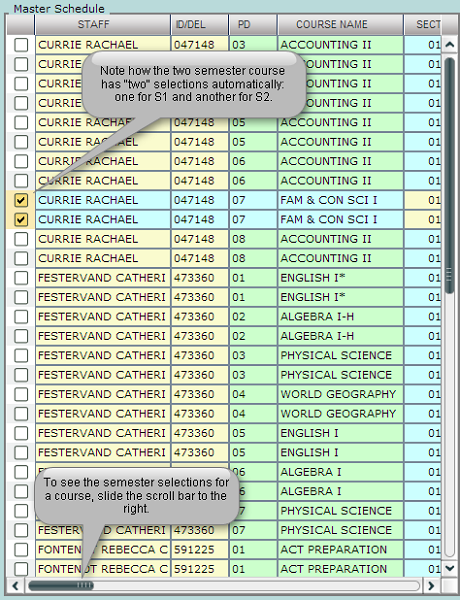
- If the user wants to schedule the student to only a single semester of the course, slide the scroll bar to the see the semesters offered, then deselect the row of the semester that is not needed.
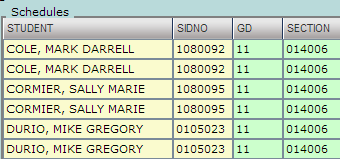
- As the students and classes are selected, the user will notice that the students are shown on the right in the Schedules columns. They will appear twice for 2 semester courses: Once for semester 1, and again for semester 2. This is normal.
- When done selecting the students and classes, click the Create button at the lower left of the screen. This will schedule the students to the class or classes. A confirmation message will appear.
- If the user wishes to schedule other students and classes, click the buttons labeled De-select MSchedule and De-select Schedules to clear the selections and start over.
- If the user made a mistake, or if things have changed, and there is a need to unschedule the students from the class, do the following:
- Select the students and class or classes scheduled earlier. Click the “Undo” button. This will take the students out of the class or classes.
- A Final Note: Remember at the setup box there was a setting for “Save as Manual Scheduled”? If the user selected this before scheduling students with this utility, the classes scheduled will remain if any subsequent automatic scheduling is performed. In other words, the auto scheduler will leave these classes in place and work to schedule other requests around these classes.

