Difference between revisions of "Teacher Schedule w/Squares By Transcript Group"
(→Video) |
|||
| (77 intermediate revisions by the same user not shown) | |||
| Line 1: | Line 1: | ||
__NOTOC__ | __NOTOC__ | ||
| − | This program will display/print teacher schedules horizontally in a square format. Each square includes the course name, section number, room number, grade of the course (not necessarily the grade of the students), max number allowed to be scheduled to the class, and number scheduled. | + | '''This program will display/print teacher schedules horizontally in a square format. Each square includes the course name, section number, room number, grade of the course (not necessarily the grade of the students), max number of students allowed to be scheduled to the class, and number of students scheduled with details.''' |
| − | === | + | ==Menu Location== |
| − | |||
| − | + | '''Scheduling > Lists > Teacher Schedule w/Squares by Transcript Group''' | |
| − | |||
| − | |||
| − | + | ==Setup Options== | |
| − | |||
| − | |||
| − | |||
| − | |||
| − | |||
| − | |||
| − | |||
| − | |||
| − | + | [[File:teacherswsgridssetup2.png]] | |
| − | |||
| − | |||
| + | For other set up values not listed in the standard set up list: | ||
| + | |||
| + | '''Year''' - Defaults to the current year. A prior year may be accessed by clicking in the field and making the appropriate selection from the drop down list. | ||
| + | |||
| + | '''District''' - Default value is based on the user's security settings. It will be limited to their district only. | ||
| + | |||
| + | '''School''' - Default value is based on the user's security settings. If the user is assigned to a school, the school default value will be their school site code. | ||
| + | |||
| + | '''Master Schedule Grades''' - Select the desired grade level(s) to be included in the report | ||
| + | |||
| + | '''Break on Teacher''' - Select to page break for each teacher when printing the report. | ||
| + | |||
| + | '''Print Co Teachers''' - Select to show one or more co teachers on the report. | ||
| + | |||
| + | '''Break Down per Code''' - Select to print Special and Custom Codes. If this is not checked only the total count will be shown. | ||
| + | |||
| + | '''Special Codes''' - Leave blank if all special codes are to be included into the report. Otherwise, choose the desired special code. | ||
| + | |||
| + | '''Custom Codes''' - Select Custom Codes created in the [[Custom Code Management]] to filter the student list. | ||
| + | |||
| + | '''Master Schedule Course Display''' - Select to display course names or comments from the Master Schedule. | ||
| + | |||
| + | '''Campus Location Taught''' - Select to print all courses, on campus only courses, or off campus only courses. | ||
| + | |||
| + | '''Core Groups''' - for the report. Leave blank to default to all or select all of the groups to include all of them on the report. Or you may limit the report to only one group or more than one group. | ||
| + | |||
| + | '''Master Schedule Grades''' - Select Master Schedule grades to process. | ||
| + | |||
| + | '''Semester''' - Select Semester to process. | ||
| + | |||
| + | '''Break On Teacher''' - Print each teacher on a separate page. | ||
| + | |||
| + | '''Print Co Teachers''' - Select to print all "Co" teachers on the roster. This will pull from the teacher's name from the '''Add Staff''' in the [[Master Schedule Editor]]. | ||
| + | |||
| + | '''Master Schedule Course Display''' - Select to display the Master Schedule Records Course name or comments in the report. | ||
| + | |||
| + | '''Select Campus Location Taught''' - Select to display the Master Schedule Records location in the system where ON/OFF campus shows all records, ON Campus shows just records taught at the school, and OFF campus shows only records taught at another site. | ||
| + | |||
| + | '''Select Core Groups''' - Select this record. | ||
| + | |||
| + | '''Group''' - Transcript Group Code | ||
| + | |||
| + | '''Transcript''' - Transcript Group Description | ||
| + | |||
| + | To find definitions for standard setup values, follow this link: [[Standard Setup Options]]. | ||
| + | |||
| + | ==Main== | ||
| + | |||
| + | [[File:teachschedwsquaremain.png]] | ||
| + | |||
| + | ===Column Headers=== | ||
| + | |||
| + | '''Teacher''' - Name of the teacher of the course in which the student is enrolled | ||
| + | |||
| + | '''Periods 1-8''' - Class period(s) of the course(s) in which the student is enrolled | ||
| + | *If the NP column (number of periods) is set at 2 for the course in the [[Master Schedule Editor]], then the course will show in two different squares. | ||
| + | Also, if the last period of the day class is marked an NP of 2, then the grid will show an additional period to display 2nd half of the NP class. | ||
| + | |||
| + | To find definitions of commonly used column headers, follow this link: [[Common Column Headers]]. | ||
| + | |||
| + | ==Bottom== | ||
| + | |||
| + | [[File:schedule squares bottom.png]] | ||
| + | |||
| + | [[Standard Print Options | '''Print''']] - This will allow the user to print the report. | ||
| + | |||
| + | '''Export As XLS''' - To print in an Excel spreadsheet, use this button. | ||
| + | |||
| + | '''Setup''' - Click to go back to the Setup box. | ||
| + | |||
| + | '''Help''' - Click to view written instructions and/or videos. | ||
---- | ---- | ||
[[Scheduling|'''Scheduling''' Main Page]] | [[Scheduling|'''Scheduling''' Main Page]] | ||
| + | |||
| + | ---- | ||
| + | [[WebPams|'''JCampus''' Main Page]] | ||
Latest revision as of 10:10, 6 June 2024
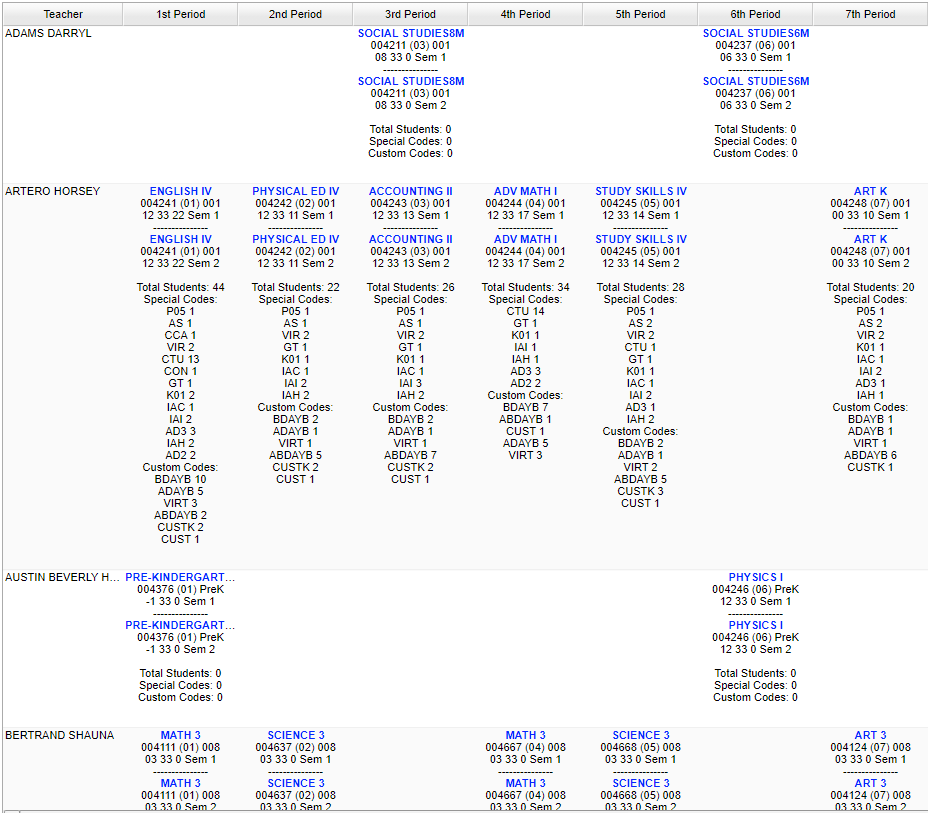
This program will display/print teacher schedules horizontally in a square format. Each square includes the course name, section number, room number, grade of the course (not necessarily the grade of the students), max number of students allowed to be scheduled to the class, and number of students scheduled with details.
Menu Location
Scheduling > Lists > Teacher Schedule w/Squares by Transcript Group
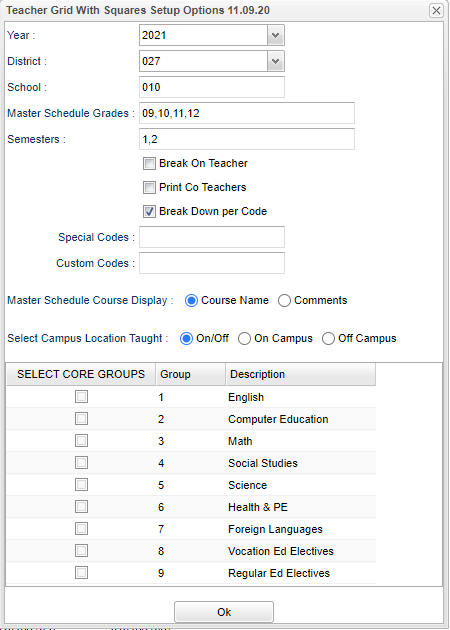
Setup Options
For other set up values not listed in the standard set up list:
Year - Defaults to the current year. A prior year may be accessed by clicking in the field and making the appropriate selection from the drop down list.
District - Default value is based on the user's security settings. It will be limited to their district only.
School - Default value is based on the user's security settings. If the user is assigned to a school, the school default value will be their school site code.
Master Schedule Grades - Select the desired grade level(s) to be included in the report
Break on Teacher - Select to page break for each teacher when printing the report.
Print Co Teachers - Select to show one or more co teachers on the report.
Break Down per Code - Select to print Special and Custom Codes. If this is not checked only the total count will be shown.
Special Codes - Leave blank if all special codes are to be included into the report. Otherwise, choose the desired special code.
Custom Codes - Select Custom Codes created in the Custom Code Management to filter the student list.
Master Schedule Course Display - Select to display course names or comments from the Master Schedule.
Campus Location Taught - Select to print all courses, on campus only courses, or off campus only courses.
Core Groups - for the report. Leave blank to default to all or select all of the groups to include all of them on the report. Or you may limit the report to only one group or more than one group.
Master Schedule Grades - Select Master Schedule grades to process.
Semester - Select Semester to process.
Break On Teacher - Print each teacher on a separate page.
Print Co Teachers - Select to print all "Co" teachers on the roster. This will pull from the teacher's name from the Add Staff in the Master Schedule Editor.
Master Schedule Course Display - Select to display the Master Schedule Records Course name or comments in the report.
Select Campus Location Taught - Select to display the Master Schedule Records location in the system where ON/OFF campus shows all records, ON Campus shows just records taught at the school, and OFF campus shows only records taught at another site.
Select Core Groups - Select this record.
Group - Transcript Group Code
Transcript - Transcript Group Description
To find definitions for standard setup values, follow this link: Standard Setup Options.
Main
Column Headers
Teacher - Name of the teacher of the course in which the student is enrolled
Periods 1-8 - Class period(s) of the course(s) in which the student is enrolled
- If the NP column (number of periods) is set at 2 for the course in the Master Schedule Editor, then the course will show in two different squares.
Also, if the last period of the day class is marked an NP of 2, then the grid will show an additional period to display 2nd half of the NP class.
To find definitions of commonly used column headers, follow this link: Common Column Headers.
Bottom
Print - This will allow the user to print the report.
Export As XLS - To print in an Excel spreadsheet, use this button.
Setup - Click to go back to the Setup box.
Help - Click to view written instructions and/or videos.

