|
|
| (69 intermediate revisions by the same user not shown) |
| Line 2: |
Line 2: |
| | '''Security Actions in [[User Management]]''' | | '''Security Actions in [[User Management]]''' |
| | | | |
| − | *A user must have a category of '''Staff'''-'''Program''' Human Resource Master-'''Action''' Delete A Perm (Program Level Permission) to '''allow''' the Delete button to show - Delete a '''No Access''' it will '''not allow''' the '''Delete''' button to display. | + | *A user must have a category of '''Staff'''>'''Program''' Human Resource Master>'''Action''' Delete A Perm (Program Level Permission) to '''allow''' the Delete button to show - Delete a '''No Access''' it will '''not allow''' the '''Delete''' button to display. |
| | | | |
| | *With the '''Staff'''→ '''Human Resource RW'''→ '''SSN''' → '''Insert''' permission, you can hide the SSN in the [[Human Resource Master]] after the first input of a new person. When you are making a "New" person and you save it, the SSN will gray out and then when you do Prev/Next, the SSN area will disappear. | | *With the '''Staff'''→ '''Human Resource RW'''→ '''SSN''' → '''Insert''' permission, you can hide the SSN in the [[Human Resource Master]] after the first input of a new person. When you are making a "New" person and you save it, the SSN will gray out and then when you do Prev/Next, the SSN area will disappear. |
| | | | |
| − | *A user must have the action of '''Update Contact Information''' set to blank in order to access the tabs at the bottom of the [[Human Resource Master]]. If the action is set to '''Update''', the user will only have access to the Demographic tab. | + | *IMPORTANT! A user must have the action of '''Update Contact Information''' set to '''No Access''' in order to access the tabs at the bottom of the [[Human Resource Master]]. If the action is set to '''Update''' or '''Blank''', the user will only have access to the Demographic and the Absences tab. |
| − | | |
| − | ====Video====
| |
| − | [[media:HR-AddEmploy.mov|Adding an Employee video]]
| |
| | | | |
| | ==Menu Location== | | ==Menu Location== |
| | | | |
| − | [[File:humanresmenu.png]]
| + | '''Human Resources > Entry > Human Resource Master''' |
| − | | |
| − | On the left navigation panel, select '''Human Resources''' > '''Human Resource Master'''.
| |
| | | | |
| | ==Setup Options== | | ==Setup Options== |
| | | | |
| − | [[File:humanrecsetup.png]] | + | [[File:humresmastsetup.png]] |
| | | | |
| | '''Select School Year''' - For school year 19/20, 2019 would be displayed. The default value is ALL because when you are entering a new employee, you may want to see returning personnel to update instead of requiring a new employee record. | | '''Select School Year''' - For school year 19/20, 2019 would be displayed. The default value is ALL because when you are entering a new employee, you may want to see returning personnel to update instead of requiring a new employee record. |
| Line 37: |
Line 32: |
| | To find definitions for standard setup values, follow this link: [[Standard Setup Options]]. | | To find definitions for standard setup values, follow this link: [[Standard Setup Options]]. |
| | | | |
| − | ===Demographics Tab===
| |
| − |
| |
| − | [[File:hrdemomain3.png]]
| |
| − |
| |
| − | The Resource Master screen will have the following title fields with '''RED''' letters *'''Name, Staff ID, SSN, Gender, Date of Birth'''. These are critical fields that are required for a new employee record to be created. Additional information will be required for data submission to the DOE for PEP.
| |
| − |
| |
| − | '''*Name''' - Click in the field and a new popup will appear. Enter First Name, Middle Name, Last Name and suffix (if applicable).
| |
| − |
| |
| − | '''Contact Information''' - Add addresses, phone numbers and types, emails, etc.
| |
| | | | |
| − | '''*Staff ID''' will be automatically generated at this time. | + | '''NOTE:''' When a staff member has a separation date, their name will be in red in the top black line, in the Find box and in the Search box like students are done in [[Student Master]] when they are dropped. |
| | | | |
| − | '''*[[SSN]]''' - Click the field for the data entry popup to appear. Add the Social Security number, Interface ID information, etc. The '''generate temporary SSN''' popup will also appear. Click '''Yes''' to generate one. Click '''No''' then enter the SSN for the employee. In place of a SSN, the staff members State ID can be entered instead. | + | =='''[[Demographics Tab]]'''== |
| | | | |
| − | '''*Gender''' - Click in the box using the drop down list. | + | =='''[[Absences Tab]]'''== |
| | | | |
| − | '''*Date of Birth''' - Click this field and use the calendar selection process to select the employee's date of birth. | + | =='''[[Education Tab]]'''== |
| | | | |
| − | '''Driver License''' - Click this field to enter the information for License Type, License State, License Number, and Expiration Date. | + | =='''[[Qualification Tab]]'''== |
| | | | |
| − | '''Citizenship''' - Click this field to enter the information for Citizenship Status, Country of Citizenship Code, Nationality, First Entry Date into the US, and Country of Citizenship Name. | + | =='''[[Employment Tab]]'''== |
| | | | |
| − | '''Languages''' - Click this field to enter the information for Correspondence Language Code, Dominant Language Code, Home Language Code, Correspondence Language Name, Dominant Language Name, and Home Language Name.
| + | =='''[[Confidential Tab]]'''== |
| − | | |
| − | '''Eligibility''' - Click inside the box for a list to choose from.
| |
| − | | |
| − | '''Substitute Info''' - Click this box to enter the information for Sub Area, Sub Location, and Approval Date.
| |
| − | | |
| − | '''Obsolete''' - Click this box for a list of Type, and Codes to choose from.
| |
| − | | |
| − | '''NPI NO''' -
| |
| − | | |
| − | '''Department''' - Click inside the box for a list to choose from.
| |
| − | | |
| − | '''Position''' - Click this field to enter the information Immunization Type, Date, Mandated or Not, and Immunization Status Code.
| |
| − | | |
| − | '''General Ethnic/Religion''' - Select whether employee is Hispanic/Latino or Non-Hispanic/Latino
| |
| − | | |
| − | '''Applicable Ethnic''' - Select either 01 American Indian or Alaskan Native, 02 Asian, 03 Black (Not Hispanic), 04 Hispanic (not required if employee is Hispanic), 05 White (Not Hispanic) or 06 Native Hawaiian or Pacific Islander. Multiple ethnic indicators can be selected.
| |
| − | | |
| − | '''Married Status''' - Click inside the box for a list to choose from.
| |
| − | | |
| − | '''Military Status''' - Click this field to enter the information Military Service Type, Military Duty Status, Military Enter Date, Military Discharge Date, Military Discharge Type, and Military Res. Oblig. Ending Date.
| |
| − | | |
| − | '''Emergency Contact''' - Click inside the box to enter emergency contact information.
| |
| − | | |
| − | '''Health Information''' - Click inside the box to enter health information such as Medical Examinations, Health Insurance, etc.
| |
| − | | |
| − | '''Immunization Info''' - Click inside the box to enter Immunization information.
| |
| − | | |
| − | '''Highest Education''' - Information required for all employees.
| |
| − | | |
| − | '''Cert Info''' - Certification Information. Enter information in the Active Certification section-Type, Number, Suffix, and/or Exception. Also, you can import a teacher`s certificates by clicking on the TeachLA button.
| |
| − | | |
| − | '''NTE/Praxis Info''' - Click inside the box to see information.
| |
| − | | |
| − | '''Highly Qualified''' - Enter up to 14 areas in which a certified employee is highly qualified. Each area requires a Method by which HQ was determined.
| |
| − | | |
| − | '''Payroll ID''' - You may type in this information if you have the security in User Management.
| |
| − | | |
| − | '''Do Not Overwrite with Import''' - Check this box to not change employee record during automatic employee imports.
| |
| − | | |
| − | '''Status Code''' - Click inside the box to choose from the list, 01 School Board Employee, 02 Post Secondary Employee, 03 Contracted Professional Services Person, 04 Third Party Contracted Employee, 05 Classified State Employee, 06 Unclassified State Employee, and 07 Resident Teacher.
| |
| − | *'''Resident Teacher''' works in combination with the Add Staff of the [[Master Schedule Editor]].
| |
| − | | |
| − | '''Hire Date''' - Date employee was hired.
| |
| − | | |
| − | '''Staff Info''' - Click to see confidential info.
| |
| − | | |
| − | '''Site''' - Contract/Site information.
| |
| − | | |
| − | '''Contracts''' - Contract/Site information.
| |
| − | | |
| − | '''[[Special Codes]]''' - Click inside the box for staff special codes information.
| |
| − | | |
| − | '''Separation''' - Click inside the box for separation information. Add a date that the staff member is terminating employment. This is similar to a leave date for students in [[Student Master]] except that PEP defines the end date as the last day an employee is assigned work. Student leave dates are the day after their last day of attendance at the school.
| |
| − | | |
| − | '''Retirement Code''' - Click inside for a list of retirement codes.
| |
| − | | |
| − | '''Retiree CD''' - Indication of whether a return-to-work retiree salary is with/without salary limits or caps
| |
| − | | |
| − | '''Change Data''' - Date and time employee made change(s).
| |
| − | | |
| − | '''Comments''' - Other comments.
| |
| − | | |
| − | '''Save''' - or continue entering the information in the other remaining fields. Refer to the PEP data requirements below to determine what additional information will be needed for DOE submissions.
| |
| − | | |
| − | '''No security assigned''': When an employee is given a separation date, and if there is no username and password in [[User Management]] assigned to the employee, you will get the statement, "No Security Records Found for this Employee."
| |
| − | | |
| − | '''Security record''': When a separation date is assigned, you will then be get the question, "This will immediately inactivate any access the user has to the JCampus system. Do you wish to inactivate this user in security?" You will need to answer Yes or No.
| |
| − | | |
| − | *Then, choose the separation reason and add a comment if necessary; close the box and save the record.
| |
| − | | |
| − | '''[[Employee Picture]]''' - To upload the picture to the appropriate staff member, click on the picture.
| |
| − | | |
| − | ===Education Tab===
| |
| − | | |
| − | [[File:educationtabnan.png]]
| |
| − | | |
| − | '''Delete''' - Delete information in this row
| |
| − | | |
| − | '''Title''' - Title of degree
| |
| − | | |
| − | '''Type''' - Type of certification
| |
| − | | |
| − | '''Conferring Date''' - Conferring date
| |
| − | | |
| − | '''Degree/Cert No''' - Degree/Certification number
| |
| − | | |
| − | '''Funding Source''' - Funding source
| |
| − | | |
| − | '''Institution''' - Institution name
| |
| − | | |
| − | '''Inst Type''' - Instructional type
| |
| − | | |
| − | '''Specialization''' - Special certification
| |
| − | | |
| − | '''Postsecondary''' - Secondary certification
| |
| − | | |
| − | '''Course Work Taken''' - Course work taken
| |
| − | | |
| − | '''GPA''' - Grade point average
| |
| − | | |
| − | '''Non Course Ed Program/Staff Dev. Act''' - List Non-Course Educational programs and Staff Developments attended.
| |
| − | | |
| − | '''Outcomes''' - Outcomes of these programs
| |
| − | | |
| − | '''Distinctions''' - Distinction awards
| |
| − | | |
| − | '''Honor and Award''' - Names of honors and awards
| |
| − | | |
| − | '''ID System''' - ID system of institution
| |
| − | | |
| − | '''Address/Contact''' - Address of institution and contact information | |
| − | | |
| − | '''Ed Program/Staff Development'''
| |
| − | | |
| − | '''Program Support'''
| |
| − | | |
| − | '''Rid''' -
| |
| − | | |
| − | '''Save''' -
| |
| − | | |
| − | '''Key''' -
| |
| − | | |
| − | ===Qualification Tab===
| |
| − | | |
| − | [[File:qualificationtabnan.png]] | |
| − | | |
| − | '''Delete''' - Click to delete information in this row
| |
| − | | |
| − | '''Credential Type'''
| |
| − | | |
| − | '''Non Educator Credential Type'''
| |
| − | | |
| − | '''Non Teaching Credential Type'''
| |
| − | | |
| − | '''Teaching Credential Type'''
| |
| − | | |
| − | '''Teaching Credential Basis'''
| |
| − | | |
| − | '''Credential Authorized Function'''
| |
| − | | |
| − | '''Authorized Instruction Level'''
| |
| − | | |
| − | '''Teaching Field or Area Authorized'''
| |
| − | | |
| − | '''Fee Amount'''
| |
| − | | |
| − | '''Fee Payment Status'''
| |
| − | | |
| − | '''Fee Payment Date'''
| |
| − | | |
| − | '''Program Sponsor'''
| |
| − | | |
| − | '''Credential Description'''
| |
| − | | |
| − | '''Date Credential Requirement Met'''
| |
| − | | |
| − | '''Credential Issuance Date'''
| |
| − | | |
| − | '''Credential Expiration Date'''
| |
| − | | |
| − | '''Initial Credential Issuance Requirements'''
| |
| − | | |
| − | '''Induction Program Mentor'''
| |
| − | | |
| − | '''Credential Renewal Requirements'''
| |
| − | | |
| − | '''Number of Units Required for Credential Renewal'''
| |
| − | | |
| − | '''Credential Renewal Units Attempted'''
| |
| − | | |
| − | '''Staff Advisor for Credential Renewal'''
| |
| − | | |
| − | '''Credential Renewal Date'''
| |
| − | | |
| − | '''Background Check Type'''
| |
| − | | |
| − | '''Background Check Completion Date'''
| |
| − | | |
| − | '''Assessment Information'''
| |
| − | | |
| − | '''ID System'''
| |
| − | | |
| − | '''Institution Information'''
| |
| − | | |
| − | '''Save'''
| |
| − | | |
| − | '''Rid'''
| |
| − | | |
| − | '''Key'''
| |
| − | | |
| − | '''Prior Experience'''
| |
| − | | |
| − | '''Public Service'''
| |
| − | | |
| − | '''Related Traveling Experience'''
| |
| − | | |
| − | '''Other Interests'''
| |
| − | | |
| − | '''Publications'''
| |
| − | | |
| − | '''Internship/Apprentice'''
| |
| − | | |
| − | '''Membership'''
| |
| − | | |
| − | ===Employment Tab===
| |
| − | | |
| − | [[File:employmenttabnan.png]]
| |
| − | | |
| − | '''Delete''' - Click to delete information in this row.
| |
| − | | |
| − | '''Institution'''
| |
| − | | |
| − | '''Business Type'''
| |
| − | | |
| − | '''Start Date'''
| |
| − | | |
| − | '''Teaching Assessment & Level'''
| |
| − | | |
| − | '''Employment Nature'''
| |
| − | | |
| − | '''Status'''
| |
| − | | |
| − | '''Seperation Reason'''
| |
| − | | |
| − | '''Contact Information'''
| |
| − | | |
| − | '''Supervisor and Mentor'''
| |
| − | | |
| − | '''Entry Information'''
| |
| − | | |
| − | '''Salary Compensation'''
| |
| − | | |
| − | '''Benefit Compensation'''
| |
| − | | |
| − | '''Benefit Contributions'''
| |
| − | | |
| − | '''Beneficiary'''
| |
| − | | |
| − | '''Payroll Info'''
| |
| − | | |
| − | '''Tax Withholding Info'''
| |
| − | | |
| − | '''Attendance Status'''
| |
| − | | |
| − | '''Grievances''' | |
| − | | |
| − | '''Save'''
| |
| − | | |
| − | '''Record No'''
| |
| − | | |
| − | '''Key'''
| |
| − | | |
| − | ===Confidential Tab===
| |
| − | | |
| − | [[File:confidentialtabnan.png]]
| |
| − | | |
| − | ===Additional PEP 100 Staff Demographic Info===
| |
| − | ===Contracts/Site Position Information===
| |
| − | | |
| − | *Note: The user may click on the paperclip next to the employee's name at the top shaded area to show "Employee" Doc Archive Records.
| |
| | | | |
| | ==Bottom== | | ==Bottom== |
| | | | |
| − | [[File:humanresourcebottom.png]] | + | [[File:hrmasterbottom.png]] |
| | | | |
| | ===Bottom Tabs=== | | ===Bottom Tabs=== |
| − | | + | See above for details. |
| − | '''Demographics'''
| |
| − | | |
| − | '''Education'''
| |
| − | | |
| − | '''Qualification'''
| |
| − | | |
| − | '''Employment'''
| |
| − | | |
| − | '''Confidential'''
| |
| | | | |
| | ===Bottom=== | | ===Bottom=== |
| Line 354: |
Line 71: |
| | | | |
| | '''Help''' - Click to view written instructions and/or videos. | | '''Help''' - Click to view written instructions and/or videos. |
| | + | |
| | + | |
| | + | |
| | + | |
| | + | :[[Entering Confidential, Site and Contract Information]] |
| | + | |
| | | | |
| | | | |
Security Actions in User Management
- A user must have a category of Staff>Program Human Resource Master>Action Delete A Perm (Program Level Permission) to allow the Delete button to show - Delete a No Access it will not allow the Delete button to display.
- With the Staff→ Human Resource RW→ SSN → Insert permission, you can hide the SSN in the Human Resource Master after the first input of a new person. When you are making a "New" person and you save it, the SSN will gray out and then when you do Prev/Next, the SSN area will disappear.
- IMPORTANT! A user must have the action of Update Contact Information set to No Access in order to access the tabs at the bottom of the Human Resource Master. If the action is set to Update or Blank, the user will only have access to the Demographic and the Absences tab.
Human Resources > Entry > Human Resource Master
Setup Options
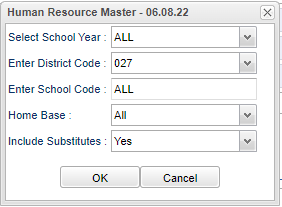
Select School Year - For school year 19/20, 2019 would be displayed. The default value is ALL because when you are entering a new employee, you may want to see returning personnel to update instead of requiring a new employee record.
Enter District Code - Default value will be your district.
Enter School Code - Default value is ALL. This is recommended so that changing of or adding new contracts can be done without changing setup values.
Home Base - Default value is ALL.
Include Substitutes - Default value is YES.
OK - Click to continue.
Cancel - Click to cancel box.
To find definitions for standard setup values, follow this link: Standard Setup Options.
NOTE: When a staff member has a separation date, their name will be in red in the top black line, in the Find box and in the Search box like students are done in Student Master when they are dropped.
Bottom

Bottom Tabs
See above for details.
Bottom
Delete - Click to delete information.
New - Click to add new employee/information.
Save - Click to save information.
Prev - Click to see previous employee.
Next - Click to see next employee.
Setup - Click to go back to the Setup box.
Print - This will allow the user to print the report.
Help - Click to view written instructions and/or videos.
- Entering Confidential, Site and Contract Information
Human Resource Master Main Page
Human Resources Main Page
JCampus Main Page

