Difference between revisions of "Category Editor"
| (7 intermediate revisions by the same user not shown) | |||
| Line 1: | Line 1: | ||
__NOTOC__ | __NOTOC__ | ||
| − | + | '''The Category Editor will provide a way for the district to control and create Category Groups that can be assigned to sections in the [[Master Schedule Editor]] using the <span style="font:blue">[[Category Loader]]</span>'''. | |
| − | '''The Category Editor | + | *As an example, a district could create an Elementary ELA Group composed of three categories: Reading, Writing, and Spelling. This group could then be assigned to every ELA section for all the schools in the district using the [[Category Loader]]. |
| − | *As an example, a district could create an Elementary ELA Group composed of three categories: Reading, Writing, and Spelling. This group could then be assigned to every ELA section for all the schools in the district using the Category Loader. | ||
*In creating the group, the district could also determine if the individual teachers could change the default points or the color for the specific category. | *In creating the group, the district could also determine if the individual teachers could change the default points or the color for the specific category. | ||
*Also consult the Sponsor Site [[District Policy]] for defaulting of the gradebook category. | *Also consult the Sponsor Site [[District Policy]] for defaulting of the gradebook category. | ||
| Line 9: | Line 8: | ||
==Menu Location== | ==Menu Location== | ||
| − | + | '''Grades > Loaders > Category Editor''' | |
| − | |||
| − | |||
==Setup Option== | ==Setup Option== | ||
| Line 41: | Line 38: | ||
[[File:categoryeditor2.png]] | [[File:categoryeditor2.png]] | ||
| − | ==Column Headers | + | ==Column Headers== |
:*'''D''': Clicking in this cell will delete the associated Category. | :*'''D''': Clicking in this cell will delete the associated Category. | ||
:*'''Category''': Click this icon to create or change the name of the associated Category. | :*'''Category''': Click this icon to create or change the name of the associated Category. | ||
Latest revision as of 15:16, 24 September 2024
The Category Editor will provide a way for the district to control and create Category Groups that can be assigned to sections in the Master Schedule Editor using the Category Loader.
- As an example, a district could create an Elementary ELA Group composed of three categories: Reading, Writing, and Spelling. This group could then be assigned to every ELA section for all the schools in the district using the Category Loader.
- In creating the group, the district could also determine if the individual teachers could change the default points or the color for the specific category.
- Also consult the Sponsor Site District Policy for defaulting of the gradebook category.
This help section will guide the user in creating Category Groups.
Menu Location
Grades > Loaders > Category Editor
Setup Option
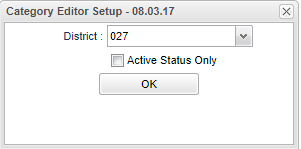
District - Default value is based on the user's security settings. It will be limited to their district only.
Active Status Only - If this item is checked, only Active Category Groups will be displayed. If left unchecked, then all Category Groups will be displayed.
OK - Click to continue
Category Editor Screen
The Category Editor Screen is divided into two panels
- The left panel is used to create/edit Category Groups and their associated attributes.
- The panel on the right is used to define the individual categories within a Category Group.
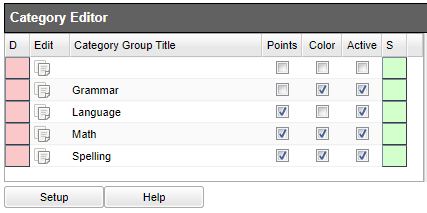
Category Group Edit Panel
- D: Clicking in this cell will delete the associated Category Group.
- Category Group Title: This is the title of the Category Group. Click on the Edit icon to create or make changes to the title.
- Points: If checked, the teacher will be able to change the default points possible for categories within the group. Otherwise, the default points possible cannot be changed.
- Color: If checked, the teacher will be able to change the color associated with the categories within the group. Otherwise, the color associated with the categories cannot be changed.
- Active: If checked, the Category Group is displayed in the Category Loader and can be applied to Master Schedule sections. Otherwise, the Category Group will not be displayed in the Category Loader.
- S: Clicking in this area will save a new Category Group or any changes to an existing Category Group.
Column Headers
- D: Clicking in this cell will delete the associated Category.
- Category: Click this icon to create or change the name of the associated Category.
- Default Max: Enter the optional default points to be used as the Max Value for this category.
- Only Max: Forces the default max points to be used in the assignment editor. Teacher can not change assignment's points possible.
- Max Bonus: The maximum bonus points allowed for assignments using this category. Any bonus points the teacher assigns must be equal to or less than this number
- Floor: Any points posted, for assignments using this category, below this value will use the floor value.
- Weight: Enter the optional weight value for this category. (If used, the total weight values for a group is usually 100)
- Color: If used, select the color to be used for this category. (In the gradebook, the grades assigned to this category will have a background of the selected color)
- Header Color - Display the category color in the header only for Classroom Gradebooks.
- P1-P8 - This applies to this grading period.
- E1-E4 - This applies to this grading period.
- S: Save by clicking in this area will save a new Category or any changes to an existing Category.
Creating a Category Group
Two steps are required to create a Category Group
- Create and Save the Group Title
- Define and Save each of the categories within the Group
Steps to Create/Save a Category Group
In the left panel, use the first row to create a new Category Group by:
- Clicking on the Edit icon or click in the blank cell in the "Category Group Title" column.
- When the text box pops up, type in the Group Title for the new Category Group. (Make the title meaningful)
- Select the Points, Color, and Active check boxes as required for the new Category Group.
- Click the Save cell to save the new Group Category.
- When the Save cell is clicked, the new Category Group will move down into the Group list in alphabetical order.
Steps to Define/Save a Category
In the right panel, use the first row to create a new Category by:
- Clicking in the blank cell in the "Category column".
- When the text box pops up, type in the name for the new Category. (Make the name meaningful)
- Enter the Default Max Value for the category if required.
- Enter the Weight value if required.
- Select the Color if required.
- Click the Save cell to save the new Category.
- When the Save cell is clicked, the new Category will move down into the Category list in alphabetical order.
Examples of Category Groups


