Difference between revisions of "Program Code Fast Loader"
(→Main) |
|||
| (77 intermediate revisions by the same user not shown) | |||
| Line 1: | Line 1: | ||
__NOTOC__ | __NOTOC__ | ||
| − | '''This program | + | '''This program will provide the user a way to fast load program codes to students and also update the program code list.''' |
| + | |||
==Menu Location== | ==Menu Location== | ||
| − | |||
| − | + | '''Student > Loaders > Program Code Fast Loader''' | |
==Setup Options== | ==Setup Options== | ||
| − | [[File: | + | |
| + | [[File:programcodefastloadsetup.png]] | ||
'''Year''' - Defaults to the current year. A prior year may be accessed by clicking in the field and making the appropriate selection from the drop down list. | '''Year''' - Defaults to the current year. A prior year may be accessed by clicking in the field and making the appropriate selection from the drop down list. | ||
| − | '''District''' - Default value is based on | + | '''District''' - Default value is based on the user’s security settings. The user will be limited to their district only. |
| + | |||
| + | '''School''' - Default value is based on the user’s security settings. If the user is assigned to a school, the school default value will be their school site code. | ||
| + | |||
| + | '''Active Only and As of Date''' - These choices will list only those students who are actively enrolled as of the date selected in the date field. | ||
| + | |||
| + | '''Multiple Code Selection''' - Allow multiple codes to be selected for each student selected. | ||
| + | |||
| + | '''OK''' - Click to continue. | ||
| + | |||
| + | To find definitions for standard setup values, follow this link: [[Standard Setup Options]]. | ||
| + | |||
| + | [[File:progcodeloadersfilters3.png]] | ||
| + | |||
| + | '''Grade''' - Leave blank or select all to include all grade levels. Otherwise, choose the desired grade level. | ||
| + | |||
| + | '''Gender''' - Leave blank or select all to include both genders. Otherwise, choose the desired gender. | ||
| + | |||
| + | '''Ethnic''' - Leave blank or select all to include all ethnicities. Otherwise, choose the desired enthnicity. | ||
| + | |||
| + | '''Program Code''' - Leave blank or select all to include all programs. Otherwise, choose the desired program. | ||
| + | |||
| + | * If the user chooses codes 48, 49, 50 or 51, and the Homeless Reason is empty, the message below will display. | ||
| + | |||
| + | [[File:homelesscode.png]] | ||
| + | |||
| + | '''Homeroom''' - Leave blank or select all to include all homerooms. Otherwise, choose the desired homeroom. | ||
| + | |||
| + | '''Class''' - Leave blank or select all to include all classes. Otherwise, choose the desired class. | ||
| + | |||
| + | '''Team''' - Leave blank or select all to include all teams. Otherwise, choose the desired team. | ||
| + | |||
| + | '''Clubs''' - Leave blank if all clubs are to be included into the report. Otherwise, choose the desired club code. | ||
| − | ''' | + | '''Sports''' - Leave blank if all sports are to be included into the report. Otherwise, choose the desired sport code. |
| − | |||
| − | |||
| − | ''' | + | '''Custom Codes''' - Select Custom Codes created in the Custom Codes Management to filter the student list. |
| − | ''' | + | '''Special Codes''' - Leave blank if all special codes are to be included into the report. Otherwise, choose the desired special code. |
| − | |||
| − | ''' | + | '''Special Ed:''' |
| − | ''' | + | '''All''' - Select to view all students. |
| − | ''' | + | '''Sped Only''' - Select to view only Sped students. |
| − | ''' | + | '''Non Sped''' - Select to view only non Sped students. |
| − | ''' | + | '''LEP:''' |
| − | + | '''All''' - Select to view all students. | |
| − | + | '''LEP Only''' - Select to view only LEP students. | |
| − | |||
| − | + | '''Non LEP''' - Select to view only non LEP students. | |
| − | ''' | + | '''504:''' |
| − | ''' | + | '''All''' - Select to view all students. |
| − | ''' | + | '''504 Only''' - Select to view only 504 students. |
| − | ''' | + | '''Non 504''' - Select to view only non 504 students. |
| − | ''' | + | '''Students''' - This will generate a list of students to select from. |
| − | ''' | + | '''Filter Dates''' |
| − | ''' | + | '''From Date and To Date''' - This date is for filtering students who had a service on or after this date. From date can be blank, but the To Date must also be blank. |
| − | + | '''OK''' - Click to continue. | |
| − | + | To find definitions for standard setup values, follow this link: [[Standard Setup Options]]. | |
| − | + | ==Main== | |
| + | [[File:programloadmain.png]] | ||
| − | + | ===Left Column Headers=== | |
| + | '''SIDNO''' - Student's identification number | ||
| − | + | '''Student Name''' - Student's full name | |
| − | + | '''Grade''' - Student's grade of enrollment | |
| − | + | '''School''' - Student's school of enrollment | |
| − | ''' | + | '''Code''' - Student's program code (Click in the '''Code''' field and an asterisk will appear). |
| − | ''' | + | '''Begin Date''' - Student's program code begin date. You can edit the begin date by clicking the date field and changing it then move out of the field. |
| − | ''' | + | '''Begin Type''' - Student's program code type description. |
| − | ''' | + | '''End Date''' - Student's program code end date. You can edit the begin date by clicking the date field and changing it then move out of the field. |
| − | + | '''End Type''' - Student's program code type description. | |
| − | ''' | + | To edit/add multiple '''Begin and/or End''' Dates: |
| + | *Click on the existing code and an asterisk will appear. | ||
| + | *Add the desired begin and/or end date and check the '''Overwrite''' checkbox in the lower right corner. | ||
| + | *Re-choose the original code and the begin and/or end date will display. | ||
| − | ''' | + | '''Add''' - Add new code. |
| − | + | To find definitions of commonly used column headers, follow this link: [[Common Column Headers]]. | |
| − | + | ===Right Column Headers=== | |
| − | ''' | + | '''Code''' - Choose the program code from the list on the right and the asterisk will change to that code. Choose the appropriate begin/end dates using the '''Post Dates''' at the bottom. |
| + | This will indicate the timeline that the student was in the program. | ||
| − | ''' | + | '''Description''' - Description of program codes |
| − | ''' | + | '''Post Dates:''' - |
| − | ''' | + | '''Begin Date''' - This date is for the values posted as begin dates. |
| − | ''' | + | '''End Date''' - This date is for the values posted as end dates. |
| − | ''' | + | '''Begin Type''' - Click inside the box and choose begin type from the list. |
| − | ''' | + | '''End Type''' - Click inside the box and choose end type from the list. |
| − | + | '''Services''' - Check this box to student's services. | |
| − | ''' | + | '''Overwrite''' - Overwrite the Existing Begin Date(s) with this date. (Checked=yes, Unchecked=no) |
| − | + | '''Overwrite''' - Overwrite the Existing End Date(s) with this date. (Checked=yes, Unchecked=no) | |
| − | [[ | + | To find definitions of commonly used column headers, follow this link: [[Common Column Headers]]. |
| − | + | ==Bottom== | |
| − | + | [[File:progcodefastload2.png]] | |
| − | ''' | + | '''Setup''' - Click to go back to the Setup box. |
| − | ''' | + | [[Standard Print Options | '''Print''']] - This will allow the user to print the report. |
| + | |||
| + | '''Help''' - Click to view written instructions and/or videos. | ||
| − | |||
| − | + | '''Q&A''' | |
| − | + | '''Q - Does program code QUA (Quarantine) and QCC (Quarantine Close Contact) submit anything to the state.''' | |
| − | + | '''A''' - There is no corresponding state record/data element to submit so nothing is sent to the state for the program code of QUA and QCC. | |
| + | *The program code does highlight the student in green on [[Post Attendance]] using the to/from dates to show they are in quarantine. | ||
| + | * There is also a Web Option, if set to True, that makes the popup say that you can`t mark this student absent since they are quarantined, for when users are entering absences. If there is no Web Option, then the users will get a popup that lets them go ahead and "Post anyway". | ||
| + | *If applicable in some districts, students that are coded with PCP (Parents Choice-Pandemic) will be highlighted in yellow. This code will be the same as QUA (Quarantine) and QCC (Quarantine Close Contact) in preventing posting absences for teachers. | ||
| − | |||
| − | |||
| − | |||
---- | ---- | ||
[[Student Master|'''Student Master''' Main Page]] | [[Student Master|'''Student Master''' Main Page]] | ||
---- | ---- | ||
[[WebPams|'''JCampus''' Main Page]] | [[WebPams|'''JCampus''' Main Page]] | ||
Latest revision as of 16:24, 20 November 2024
This program will provide the user a way to fast load program codes to students and also update the program code list.
Menu Location
Student > Loaders > Program Code Fast Loader
Setup Options
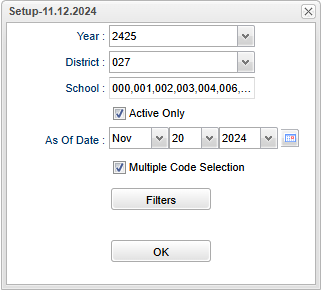
Year - Defaults to the current year. A prior year may be accessed by clicking in the field and making the appropriate selection from the drop down list.
District - Default value is based on the user’s security settings. The user will be limited to their district only.
School - Default value is based on the user’s security settings. If the user is assigned to a school, the school default value will be their school site code.
Active Only and As of Date - These choices will list only those students who are actively enrolled as of the date selected in the date field.
Multiple Code Selection - Allow multiple codes to be selected for each student selected.
OK - Click to continue.
To find definitions for standard setup values, follow this link: Standard Setup Options.
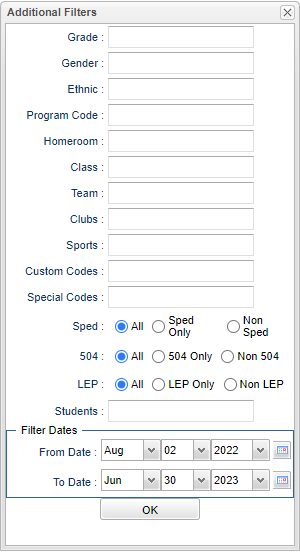
Grade - Leave blank or select all to include all grade levels. Otherwise, choose the desired grade level.
Gender - Leave blank or select all to include both genders. Otherwise, choose the desired gender.
Ethnic - Leave blank or select all to include all ethnicities. Otherwise, choose the desired enthnicity.
Program Code - Leave blank or select all to include all programs. Otherwise, choose the desired program.
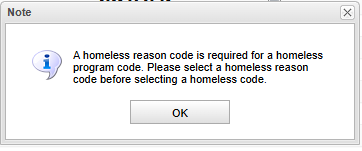
- If the user chooses codes 48, 49, 50 or 51, and the Homeless Reason is empty, the message below will display.
Homeroom - Leave blank or select all to include all homerooms. Otherwise, choose the desired homeroom.
Class - Leave blank or select all to include all classes. Otherwise, choose the desired class.
Team - Leave blank or select all to include all teams. Otherwise, choose the desired team.
Clubs - Leave blank if all clubs are to be included into the report. Otherwise, choose the desired club code.
Sports - Leave blank if all sports are to be included into the report. Otherwise, choose the desired sport code.
Custom Codes - Select Custom Codes created in the Custom Codes Management to filter the student list.
Special Codes - Leave blank if all special codes are to be included into the report. Otherwise, choose the desired special code.
Special Ed:
All - Select to view all students.
Sped Only - Select to view only Sped students.
Non Sped - Select to view only non Sped students.
LEP:
All - Select to view all students.
LEP Only - Select to view only LEP students.
Non LEP - Select to view only non LEP students.
504:
All - Select to view all students.
504 Only - Select to view only 504 students.
Non 504 - Select to view only non 504 students.
Students - This will generate a list of students to select from.
Filter Dates
From Date and To Date - This date is for filtering students who had a service on or after this date. From date can be blank, but the To Date must also be blank.
OK - Click to continue.
To find definitions for standard setup values, follow this link: Standard Setup Options.
Main
Left Column Headers
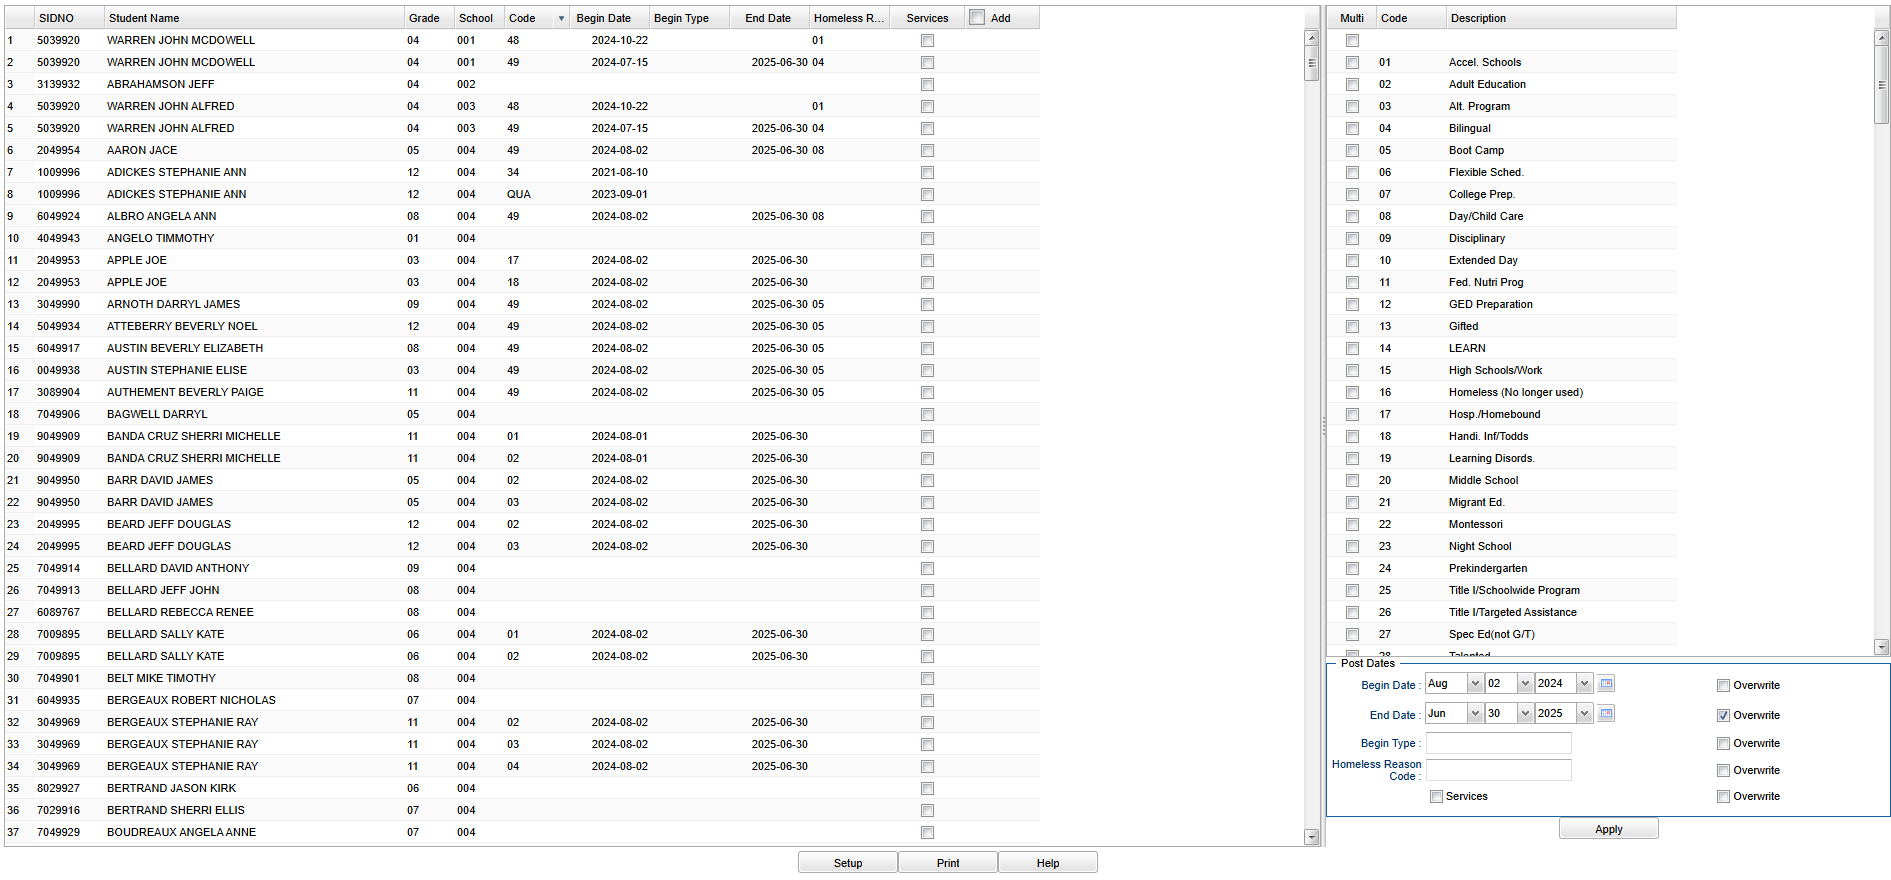
SIDNO - Student's identification number
Student Name - Student's full name
Grade - Student's grade of enrollment
School - Student's school of enrollment
Code - Student's program code (Click in the Code field and an asterisk will appear).
Begin Date - Student's program code begin date. You can edit the begin date by clicking the date field and changing it then move out of the field.
Begin Type - Student's program code type description.
End Date - Student's program code end date. You can edit the begin date by clicking the date field and changing it then move out of the field.
End Type - Student's program code type description.
To edit/add multiple Begin and/or End Dates:
- Click on the existing code and an asterisk will appear.
- Add the desired begin and/or end date and check the Overwrite checkbox in the lower right corner.
- Re-choose the original code and the begin and/or end date will display.
Add - Add new code.
To find definitions of commonly used column headers, follow this link: Common Column Headers.
Right Column Headers
Code - Choose the program code from the list on the right and the asterisk will change to that code. Choose the appropriate begin/end dates using the Post Dates at the bottom. This will indicate the timeline that the student was in the program.
Description - Description of program codes
Post Dates: -
Begin Date - This date is for the values posted as begin dates.
End Date - This date is for the values posted as end dates.
Begin Type - Click inside the box and choose begin type from the list.
End Type - Click inside the box and choose end type from the list.
Services - Check this box to student's services.
Overwrite - Overwrite the Existing Begin Date(s) with this date. (Checked=yes, Unchecked=no)
Overwrite - Overwrite the Existing End Date(s) with this date. (Checked=yes, Unchecked=no)
To find definitions of commonly used column headers, follow this link: Common Column Headers.
Bottom
Setup - Click to go back to the Setup box.
Print - This will allow the user to print the report.
Help - Click to view written instructions and/or videos.
Q&A
Q - Does program code QUA (Quarantine) and QCC (Quarantine Close Contact) submit anything to the state.
A - There is no corresponding state record/data element to submit so nothing is sent to the state for the program code of QUA and QCC.
- The program code does highlight the student in green on Post Attendance using the to/from dates to show they are in quarantine.
- There is also a Web Option, if set to True, that makes the popup say that you can`t mark this student absent since they are quarantined, for when users are entering absences. If there is no Web Option, then the users will get a popup that lets them go ahead and "Post anyway".
- If applicable in some districts, students that are coded with PCP (Parents Choice-Pandemic) will be highlighted in yellow. This code will be the same as QUA (Quarantine) and QCC (Quarantine Close Contact) in preventing posting absences for teachers.


