Difference between revisions of "Automatic Points Loader"
(→Video) |
|||
| (23 intermediate revisions by the same user not shown) | |||
| Line 1: | Line 1: | ||
__NOTOC__ | __NOTOC__ | ||
| − | This module will | + | '''This module will provide the user a way to mass assign point additions, or point reductions to students using the loader concept found in other loaders of JCampus.''' |
| − | ==== | + | ==Menu Location== |
| − | [[ | + | |
| + | '''Discipline''' > '''Loaders''' > '''Automatic Points Loader''' | ||
| + | |||
| + | ==Setup Options== | ||
| + | |||
| + | [[File:automaticsetup.png]] | ||
| + | |||
| + | '''Year''' - Defaults to the current year. A prior year may be accessed by clicking in the field and making the appropriate selection from the drop down list. | ||
| + | |||
| + | '''District''' - Default value is based on the user's security settings. It will be limited to their district only. | ||
| + | |||
| + | '''School''' - Default value is based on the user's security settings. If the user is assigned to a school, the school default value will be their school site code. | ||
| + | |||
| + | '''Grade''' - Leave blank or select all to include all grade levels. Otherwise, choose the desired grade level. | ||
| + | |||
| + | '''Gender''' - Leave blank or select all to include both genders. Otherwise, choose the desired gender. | ||
| + | |||
| + | '''Ethnic''' - Leave blank or select all to include all ethnicities. Otherwise, choose the desired ethnic. | ||
| + | |||
| + | '''Show Remote Scheduled''' - If this box is checked, then those students who come to your school from another school in the district will be listed in addition to regular students. | ||
| + | |||
| + | '''As of Date''' - This choice will list only those students who are actively enrolled as of the date selected in the date field. | ||
| + | |||
| + | '''Special Codes''' - Leave blank if all special codes are to be included into the report. Otherwise, choose the desired special code. | ||
| + | |||
| + | '''Team''' - Leave blank if all teams are to be included into the report. Otherwise, choose the desired team(s). | ||
| + | |||
| + | '''Sped:''' | ||
| + | |||
| + | '''All''' - Select to view all students. | ||
| + | |||
| + | '''Sped Only''' - Select to view only Sped students. | ||
| + | |||
| + | '''Non Sped''' - Select to view only non Sped students. | ||
| + | |||
| + | '''Transaction Type''' - Type of transaction that will be posted to the selected students. At the bottom of the setup, locate the '''Transaction Type''' area. If the user wishes to see the | ||
| + | items entered from Points Maintenance / Items, click the '''Purchase''' option. If the user wishes to simply enter points and will not be need any items from the Points Maintenance / Items | ||
| + | listing, click '''Adjustment'''. | ||
| + | |||
| + | '''Homeroom''' - Leave blank if all homerooms are to be included into the report. Otherwise, choose the desired homeroom(s). | ||
| + | |||
| + | '''Counselor''' - Responsible for scheduling, testing, student grades and transcripts. Leave blank if all counselors are to be included into the report. Otherwise click in the field to the | ||
| + | right of Counselor to select the desired counselor(s) to view. | ||
| + | |||
| + | '''Clubs''' - Leave blank if all clubs are to be included into the report. Otherwise, choose the desired club code. | ||
| + | |||
| + | '''Sports''' - Leave blank if all sports are to be included into the report. Otherwise, choose the desired sport code. | ||
| + | |||
| + | '''Note''': To further limit the student listing on the left side of the loader, use the '''Special Codes, Team Codes, Sped Only, Homeroom, Counselor, Club, and Sport''' fields to filter the | ||
| + | student listing. | ||
| + | |||
| + | '''OK''' - Click to continue. | ||
| + | |||
| + | To find definitions for standard setup values, follow this link: [[Standard Setup Options]]. | ||
| + | |||
| + | A listing of students will be on the left and points items on the right. | ||
| + | |||
| + | ==Main== | ||
| + | |||
| + | [[File:automaticmain.png]] | ||
| + | |||
| + | ===Column Headers=== | ||
| + | |||
| + | '''District''' - Student's district of enrollment | ||
| + | |||
| + | '''Sch''' - Student's school site number of enrollment | ||
| − | == | + | '''SIDNO''' - Student's identification number |
| + | |||
| + | '''Student Name''' - Student's full name | ||
| + | |||
| + | '''Positive''' - Student's total positive points | ||
| + | |||
| + | '''Negative''' - Student's total negative points | ||
| + | |||
| + | '''Adjustment''' - Value of points assigned | ||
| + | |||
| + | '''Adjustment Description''' - Description of the points earned/lost | ||
| + | |||
| + | ===Right Side Column Headers=== | ||
| + | |||
| + | '''Points''' - Positive or negative point value | ||
| + | |||
| + | '''Description''' - Description of points | ||
| + | |||
| + | To find definitions of commonly used column headers, follow this link: [[Common Column Headers]]. | ||
| + | |||
| + | '''Note''': Points items on the right may be empty for the first time entering this area, or may have Items listed if the user has set items to purchase up and the option of Purchase was | ||
| + | |||
| + | chosen at the setup box. | ||
| + | |||
| + | '''Tip''': Hide the WebPams navigation panel by clicking the separator bar between the navigation pane and the loader. This will give the user more room to see the columns associated with the | ||
| + | |||
| + | loader. | ||
| + | |||
| + | '''Adding a Purchase Item to multiple students''': | ||
| + | |||
| + | To do this, make sure '''Purchase''' was chosen on the setup box to see the items entered in Points Maintenance. | ||
| + | |||
| + | Locate the row of the desired student. Click in the matching cell under the Purchase column. The user will see an “'''x'''” will be placed here. Repeat for each desired to student to | ||
| + | |||
| + | purchase an item. | ||
| + | |||
| + | After marking the students who are purchasing an item, locate the desired item on the right and click on it. Each “'''x'''” will change to the purchase item and the matching point deduction. | ||
| + | |||
| + | '''Note''': Once posted, there is no way to remove other than doing an adjustment on the student as explained in the next section. | ||
| + | |||
| + | '''Adding an Adjustment to multiple students''': | ||
| + | |||
| + | To do this, the user can have set at the setup box either “'''Purchase'''” or “'''Adjustment'''”. | ||
| + | |||
| + | Click the '''Add Adjustment''' button at the bottom. Enter the number of points to be added or deducted. If a negative deduction is to be performed, click the “+/-“ button to place a | ||
| + | |||
| + | negative in front of the point value. | ||
| + | |||
| + | Enter a name of the adjustment such as “Honor Roll”, “Caught being good”, “Caught being bad”, etc… | ||
| + | |||
| + | Click the '''Add''' button. You will see the created item appear on the right in the listing of items with points. | ||
| + | |||
| + | Locate the row of the desired student(s). Click to place an “'''x'''” in the column labeled either '''Adjustment''' or '''Purchase'''. Then browse to the desired item on the right and click. | ||
| + | |||
| + | You will see the points posted to the student along with a description. | ||
| + | |||
| + | '''Note''': If a mistake was made, such as assigning points to an incorrect student, create an adjustment that is opposite of what was given, then assign to the student. Example: A student | ||
| − | + | is given an adjustment of -50 by mistake. Create an adjustment that adds 50 points back. | |
| + | ==Bottom== | ||
| − | + | [[File:automaticbottom.png]] | |
| − | + | '''Setup''' - Click to go back to the Setup box. | |
| − | [[ | + | '''[[Standard Print Options | Print]]''' - This will allow the user to print the report. |
| + | '''Help''' - Click to view written instructions and/or videos. | ||
| + | '''Add Adjustment''' - Add an adjustment to the screen on the right. Click on "Add Adjustment" tab and this box will pop up. | ||
| + | [[File:addadjustment.png]] | ||
| − | |||
| − | |||
| − | |||
| − | |||
| − | |||
| − | |||
| − | |||
| − | |||
| − | |||
| − | |||
| − | |||
| − | |||
| − | |||
| − | |||
| − | |||
| − | |||
| − | |||
| − | |||
| − | |||
| − | |||
| − | |||
| − | |||
| − | |||
| + | [[Points_System|'''Discipline Points System''' Page]] | ||
| + | [[Automatic_Points_List|'''Automatic Points List''' Page]] | ||
---- | ---- | ||
[[Discipline|'''Discipline''' Main Page]] | [[Discipline|'''Discipline''' Main Page]] | ||
| − | |||
---- | ---- | ||
[[WebPams|'''JCampus''' Main Page]] | [[WebPams|'''JCampus''' Main Page]] | ||
Latest revision as of 08:45, 6 June 2024
This module will provide the user a way to mass assign point additions, or point reductions to students using the loader concept found in other loaders of JCampus.
Menu Location
Discipline > Loaders > Automatic Points Loader
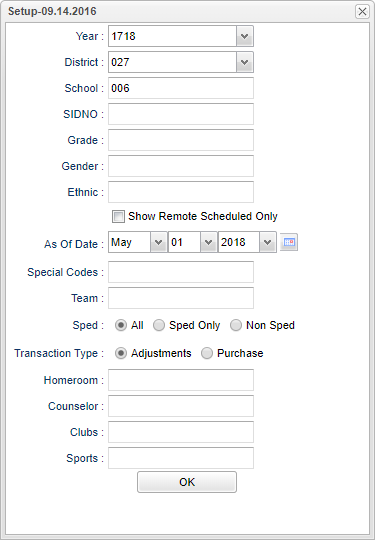
Setup Options
Year - Defaults to the current year. A prior year may be accessed by clicking in the field and making the appropriate selection from the drop down list.
District - Default value is based on the user's security settings. It will be limited to their district only.
School - Default value is based on the user's security settings. If the user is assigned to a school, the school default value will be their school site code.
Grade - Leave blank or select all to include all grade levels. Otherwise, choose the desired grade level.
Gender - Leave blank or select all to include both genders. Otherwise, choose the desired gender.
Ethnic - Leave blank or select all to include all ethnicities. Otherwise, choose the desired ethnic.
Show Remote Scheduled - If this box is checked, then those students who come to your school from another school in the district will be listed in addition to regular students.
As of Date - This choice will list only those students who are actively enrolled as of the date selected in the date field.
Special Codes - Leave blank if all special codes are to be included into the report. Otherwise, choose the desired special code.
Team - Leave blank if all teams are to be included into the report. Otherwise, choose the desired team(s).
Sped:
All - Select to view all students.
Sped Only - Select to view only Sped students.
Non Sped - Select to view only non Sped students.
Transaction Type - Type of transaction that will be posted to the selected students. At the bottom of the setup, locate the Transaction Type area. If the user wishes to see the items entered from Points Maintenance / Items, click the Purchase option. If the user wishes to simply enter points and will not be need any items from the Points Maintenance / Items listing, click Adjustment.
Homeroom - Leave blank if all homerooms are to be included into the report. Otherwise, choose the desired homeroom(s).
Counselor - Responsible for scheduling, testing, student grades and transcripts. Leave blank if all counselors are to be included into the report. Otherwise click in the field to the right of Counselor to select the desired counselor(s) to view.
Clubs - Leave blank if all clubs are to be included into the report. Otherwise, choose the desired club code.
Sports - Leave blank if all sports are to be included into the report. Otherwise, choose the desired sport code.
Note: To further limit the student listing on the left side of the loader, use the Special Codes, Team Codes, Sped Only, Homeroom, Counselor, Club, and Sport fields to filter the student listing.
OK - Click to continue.
To find definitions for standard setup values, follow this link: Standard Setup Options.
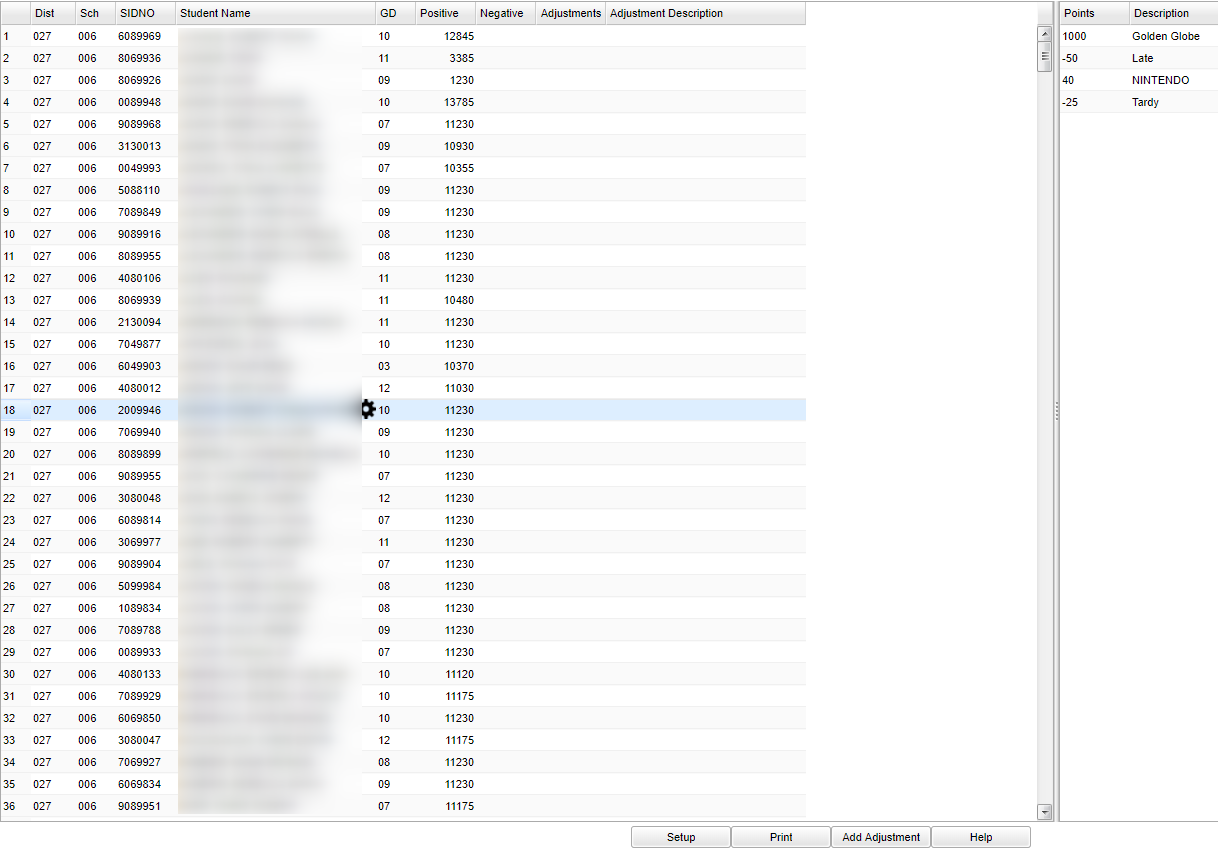
A listing of students will be on the left and points items on the right.
Main
Column Headers
District - Student's district of enrollment
Sch - Student's school site number of enrollment
SIDNO - Student's identification number
Student Name - Student's full name
Positive - Student's total positive points
Negative - Student's total negative points
Adjustment - Value of points assigned
Adjustment Description - Description of the points earned/lost
Right Side Column Headers
Points - Positive or negative point value
Description - Description of points
To find definitions of commonly used column headers, follow this link: Common Column Headers.
Note: Points items on the right may be empty for the first time entering this area, or may have Items listed if the user has set items to purchase up and the option of Purchase was
chosen at the setup box.
Tip: Hide the WebPams navigation panel by clicking the separator bar between the navigation pane and the loader. This will give the user more room to see the columns associated with the
loader.
Adding a Purchase Item to multiple students:
To do this, make sure Purchase was chosen on the setup box to see the items entered in Points Maintenance.
Locate the row of the desired student. Click in the matching cell under the Purchase column. The user will see an “x” will be placed here. Repeat for each desired to student to
purchase an item.
After marking the students who are purchasing an item, locate the desired item on the right and click on it. Each “x” will change to the purchase item and the matching point deduction.
Note: Once posted, there is no way to remove other than doing an adjustment on the student as explained in the next section.
Adding an Adjustment to multiple students:
To do this, the user can have set at the setup box either “Purchase” or “Adjustment”.
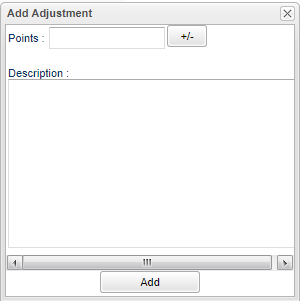
Click the Add Adjustment button at the bottom. Enter the number of points to be added or deducted. If a negative deduction is to be performed, click the “+/-“ button to place a
negative in front of the point value.
Enter a name of the adjustment such as “Honor Roll”, “Caught being good”, “Caught being bad”, etc…
Click the Add button. You will see the created item appear on the right in the listing of items with points.
Locate the row of the desired student(s). Click to place an “x” in the column labeled either Adjustment or Purchase. Then browse to the desired item on the right and click.
You will see the points posted to the student along with a description.
Note: If a mistake was made, such as assigning points to an incorrect student, create an adjustment that is opposite of what was given, then assign to the student. Example: A student
is given an adjustment of -50 by mistake. Create an adjustment that adds 50 points back.
Bottom
Setup - Click to go back to the Setup box.
Print - This will allow the user to print the report.
Help - Click to view written instructions and/or videos.
Add Adjustment - Add an adjustment to the screen on the right. Click on "Add Adjustment" tab and this box will pop up.


