Difference between revisions of "Attendance Rollbook"
| (127 intermediate revisions by the same user not shown) | |||
| Line 1: | Line 1: | ||
__NOTOC__ | __NOTOC__ | ||
| − | + | '''This program will provide an administrator a way to print teacher's rollbook by section. Teachers will be able to print their attendance rollbooks. If a Bell Schedule is set up for a specific school, by using [[Create a Bell Schedule]], the Attendance Rollbook will use those period time frames for the attendance.''' | |
| − | [[ | ||
==Menu Location== | ==Menu Location== | ||
| − | + | Staff - '''Attendance > Lists > Attendance Rollbook''' | |
| + | Teachers - '''Classroom > Reports > Attendance > Attendance Rollbook''' | ||
| − | + | ==Setup Options (For Staff Only)== | |
| − | + | [[File:attendrollbooksetup4.png]] | |
| − | + | '''Year''' - Defaults to the current year. A prior year may be accessed by clicking in the field and making the appropriate selection from the drop down list. | |
| − | ''' | + | '''District''' - Default value is based on the user’s security settings. The user will be limited to their district only. |
| + | '''School''' - Default value is based on the user’s security settings. If the user is assigned to a school, the school default value will be their school site code. | ||
| − | + | '''Grade''' - Leave blank or select all to include all grade levels. Otherwise, choose the desired grade level. | |
| + | '''Class Period''' - A numeric value that indicated the period of the day a course is offered according to the Master Schedule Editor. To select all class periods leave the field blank or | ||
| + | click in the field and select the check box at the top of the list of class periods; to select one or more class periods click in the field and select the desired class period(s) from the | ||
| + | popup list. | ||
| − | + | '''Students''' - Click inside the box for a list of students to choose. | |
| − | + | '''Order To List''' - Allows for the list to be sorted in the desired way upon clicking OK. | |
| − | + | '''From Date and To Date''' - A set of dates that limits the selection of records for the report to a beginning date (from) and an ending date (to) range. | |
| − | |||
| + | '''OK''' - Click to continue. | ||
| − | + | To find definitions for standard setup values, follow this link: [[Standard Setup Options]]. | |
| − | + | ==Setup Options (For Teacher Only)== | |
| − | + | [[File:attenrollbooksetup2.png]] | |
| + | '''Year''' - Defaults to the current year. A prior year may be accessed by clicking in the field and making the appropriate selection from the drop down list. | ||
| − | ''' | + | '''District''' - Default value is based on the user’s security settings. The user will be limited to their district only. |
| − | + | '''School''' - Default value is based on the user’s security settings. If the user is assigned to a school, the school default value will be their school site code. | |
| + | '''Grade''' - Leave blank or select all to include all grade levels. Otherwise, choose the desired grade level. | ||
| − | ''' | + | '''Class Period''' - A numeric value that indicated the period of the day a course is offered according to the Master Schedule Editor. To select all class periods leave the field blank or |
| + | click in the field and select the check box at the top of the list of class periods; to select one or more class periods click in the field and select the desired class period(s) from the | ||
| + | popup list. | ||
| − | + | '''Section''' - Select the Section(s) for the Teacher Order Option. | |
| + | '''Order To List''' - Allows for the list to be sorted in the desired way upon clicking OK. | ||
| + | '''From Date and To Date''' - A set of dates that limits the selection of records for the report to a beginning date (from) and an ending date (to) range. | ||
| + | |||
| + | '''OK''' - Click to continue. | ||
| + | |||
| + | To find definitions for standard setup values, follow this link: [[Standard Setup Options]]. | ||
| + | |||
| + | The Attendance Rollbook chart will display. | ||
| + | |||
| + | ==Main== | ||
| + | |||
| + | [[File:attrollbook3.png]] | ||
| + | |||
| + | ===Column Headers=== | ||
| + | |||
| + | '''Teacher''' - Click on Teacher name to highlight the row and then click on print to view the [[attendance rollbook]]. NOTE that the program looks at students who have exited previously and places them at the bottom of the printout. | ||
| + | |||
| + | '''GD''' - Course grade | ||
| + | |||
| + | '''PD''' - Class period | ||
| + | |||
| + | '''Course''' - Course name | ||
| + | |||
| + | '''Section''' - Section number | ||
| + | |||
| + | To find definitions of commonly used column headers, follow this link: [[Common Column Headers]] | ||
| + | |||
| + | ==Bottom== | ||
| + | |||
| + | [[File:attrollbookbottom.png]] | ||
| + | |||
| + | '''Setup''' - Click to go back to the Setup box. | ||
| + | |||
| + | [[Standard Print Options | '''Print''']] - This will allow the user to print the report. | ||
| + | |||
| + | '''Help''' - Click to view written instructions and/or videos. | ||
| − | |||
| Line 52: | Line 95: | ||
---- | ---- | ||
[[Attendance|'''Attendance''' Main Page]] | [[Attendance|'''Attendance''' Main Page]] | ||
| − | + | ---- | |
| + | [[Classroom|'''Classroom''' Main Page]] | ||
---- | ---- | ||
[[WebPams|'''JCampus''' Main Page]] | [[WebPams|'''JCampus''' Main Page]] | ||
Latest revision as of 15:12, 5 June 2024
This program will provide an administrator a way to print teacher's rollbook by section. Teachers will be able to print their attendance rollbooks. If a Bell Schedule is set up for a specific school, by using Create a Bell Schedule, the Attendance Rollbook will use those period time frames for the attendance.
Menu Location
Staff - Attendance > Lists > Attendance Rollbook
Teachers - Classroom > Reports > Attendance > Attendance Rollbook
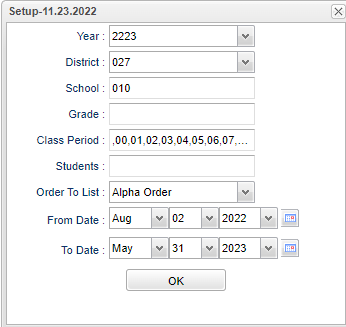
Setup Options (For Staff Only)
Year - Defaults to the current year. A prior year may be accessed by clicking in the field and making the appropriate selection from the drop down list.
District - Default value is based on the user’s security settings. The user will be limited to their district only.
School - Default value is based on the user’s security settings. If the user is assigned to a school, the school default value will be their school site code.
Grade - Leave blank or select all to include all grade levels. Otherwise, choose the desired grade level.
Class Period - A numeric value that indicated the period of the day a course is offered according to the Master Schedule Editor. To select all class periods leave the field blank or click in the field and select the check box at the top of the list of class periods; to select one or more class periods click in the field and select the desired class period(s) from the popup list.
Students - Click inside the box for a list of students to choose.
Order To List - Allows for the list to be sorted in the desired way upon clicking OK.
From Date and To Date - A set of dates that limits the selection of records for the report to a beginning date (from) and an ending date (to) range.
OK - Click to continue.
To find definitions for standard setup values, follow this link: Standard Setup Options.
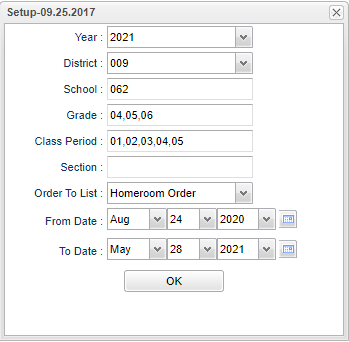
Setup Options (For Teacher Only)
Year - Defaults to the current year. A prior year may be accessed by clicking in the field and making the appropriate selection from the drop down list.
District - Default value is based on the user’s security settings. The user will be limited to their district only.
School - Default value is based on the user’s security settings. If the user is assigned to a school, the school default value will be their school site code.
Grade - Leave blank or select all to include all grade levels. Otherwise, choose the desired grade level.
Class Period - A numeric value that indicated the period of the day a course is offered according to the Master Schedule Editor. To select all class periods leave the field blank or click in the field and select the check box at the top of the list of class periods; to select one or more class periods click in the field and select the desired class period(s) from the popup list.
Section - Select the Section(s) for the Teacher Order Option.
Order To List - Allows for the list to be sorted in the desired way upon clicking OK.
From Date and To Date - A set of dates that limits the selection of records for the report to a beginning date (from) and an ending date (to) range.
OK - Click to continue.
To find definitions for standard setup values, follow this link: Standard Setup Options.
The Attendance Rollbook chart will display.
Main
Column Headers
Teacher - Click on Teacher name to highlight the row and then click on print to view the attendance rollbook. NOTE that the program looks at students who have exited previously and places them at the bottom of the printout.
GD - Course grade
PD - Class period
Course - Course name
Section - Section number
To find definitions of commonly used column headers, follow this link: Common Column Headers
Bottom
Setup - Click to go back to the Setup box.
Print - This will allow the user to print the report.
Help - Click to view written instructions and/or videos.


