Difference between revisions of "Flex Card Grade Entry"
(→Video) |
|||
| (110 intermediate revisions by the same user not shown) | |||
| Line 1: | Line 1: | ||
| − | + | '''This program will provide teachers a way to enter grades in the Flex Cards. Flex Cards can be created in the [[Flex Card Template Editor]] and mass printed in the [[Flex Card Mass Print]].''' | |
| − | |||
| − | + | '''NOTE: Using an emoji in the Comments section will prevent the Flex Card from printing.''' | |
| + | '''User Management Permissions Needed''' | ||
| − | ''' | + | *In [[User Management]], you can set the security to '''NA''', '''RO''' or '''RW''' for Flex Card Grade Entry in the '''Program''' column on the row of '''Grades'''. |
| + | :'''NA''' will stop user from entering the program with a pink screen stating "You do not have permission to access this application". | ||
| + | :'''RO''' will let you in the program but will have the grading periods blocked with pink panels. NOTE that pink panels will also show in GP1-GP4 if they are not checked to be open in the [[Flex Card Template Editor]]. | ||
| + | :'''RW''' will let you in the program to enter grades and perform all functions. | ||
| + | *In [[User Management]], you can also set the security action "Non-TE can access other Flex Cards" to "Yes", "No" or "Read Only". | ||
| + | *Use [[User Management]] Inactive Fast Loader to also block teachers from opening this program all together. | ||
| + | '''Grading Period Lock Settings''' | ||
| − | ''' | + | *[[Grading Period Lock]] will override any checks set in the [[Flex Card Template Editor]] for grade entries for grading periods. |
| + | *In [[Grading Period Lock]], viewing of the '''courses list''' and '''students list''' or '''posting of grades''' can be denied by adding checks to the '''Deny''' column. | ||
| + | ==Menu Location== | ||
| + | '''Grades > Entry > Flex Card Grade Entry''' | ||
| − | + | ==Setup Options== | |
| + | [[File:fcge.png]] | ||
| + | '''Year''' - Defaults to the current year. A prior year may be accessed by clicking in the field and making the appropriate selection from the drop down list. | ||
| − | ''' | + | '''District''' - Default value is based on the user’s security settings. The user will be limited to their district only. |
| − | + | '''School''' - Default value is based on the user’s security settings. If the user is assigned to a school, the school default value will be their school site code. | |
| − | + | '''Teacher''' - The teacher name should be listed based on security unless the user is an administrator, then all teachers are available for selection. Select the desired teacher to view. | |
| − | + | '''Show Transfer Grades''' - Check to allow transfer grades from other schools to display. | |
| − | + | '''OK''' - Click to continue. | |
| − | + | To find definitions for standard setup values, follow this link: [[Standard Setup Options]]. | |
| + | ==Main== | ||
| + | [[File:fcge1.png]] | ||
| + | #Select the desired section to view from the '''Courses''' drop down. | ||
| + | #Select the desired student to enter grades for from the '''Students''' drop down. | ||
| + | #Select the desired tabs to enter grades. | ||
| + | #Finally, either check the appropriate box or click in the appropriate cell to enter a grade for the student. | ||
| + | #Once all grades are entered for all tabs, click the '''Save''' button at the bottom of the screen. | ||
| + | #Print - This will allow the user to print the report. | ||
| + | ::*This is the option to print in home language. It must be created in the language needed in the [[Flex Card Template Editor]] for 'Print in Home language' to work. | ||
| + | ::[[File:FlexCardGradeEntryPrintHomeLanguage.png]] | ||
| − | |||
| − | + | '''End of the Year''' | |
| − | + | If ''' Show Recommended Grade''' is checked on the set up box of [[Flex Card Mass Print]], then "Grade Placement for Next Year" will display on the flex report card. The words "Grade Placement for Next Year" is hard coded and cannot be changed. The Grade Placement statements are also hard coded, so if additional placement statements are needed, it will require a request ticket. | |
| − | |||
| − | |||
| − | |||
| − | |||
| − | |||
| − | |||
| − | |||
| − | |||
| − | |||
| − | |||
| + | From the '''Comment''' tab, choose from a pick list of what grade the student will be in next year. If the Comment tab is not showing, check the '''Show Comments''' checkbox in [[Flex Card Template Editor]]. Also, for the Alternate page, hide Section 6 and for the two page, hide Section 6 and 7. | ||
| + | ---- | ||
| + | [[Teacher|'''Teacher''' Main Page]] | ||
| + | ---- | ||
| + | [[Grades|'''Grades''' Main Page]] | ||
---- | ---- | ||
| − | + | [[WebPams|'''JCampus''' Main Page]] | |
Latest revision as of 08:49, 6 June 2024
This program will provide teachers a way to enter grades in the Flex Cards. Flex Cards can be created in the Flex Card Template Editor and mass printed in the Flex Card Mass Print.
NOTE: Using an emoji in the Comments section will prevent the Flex Card from printing.
User Management Permissions Needed
- In User Management, you can set the security to NA, RO or RW for Flex Card Grade Entry in the Program column on the row of Grades.
- NA will stop user from entering the program with a pink screen stating "You do not have permission to access this application".
- RO will let you in the program but will have the grading periods blocked with pink panels. NOTE that pink panels will also show in GP1-GP4 if they are not checked to be open in the Flex Card Template Editor.
- RW will let you in the program to enter grades and perform all functions.
- In User Management, you can also set the security action "Non-TE can access other Flex Cards" to "Yes", "No" or "Read Only".
- Use User Management Inactive Fast Loader to also block teachers from opening this program all together.
Grading Period Lock Settings
- Grading Period Lock will override any checks set in the Flex Card Template Editor for grade entries for grading periods.
- In Grading Period Lock, viewing of the courses list and students list or posting of grades can be denied by adding checks to the Deny column.
Menu Location
Grades > Entry > Flex Card Grade Entry
Setup Options
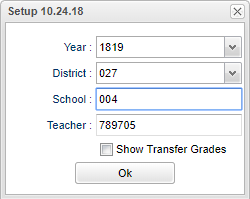
Year - Defaults to the current year. A prior year may be accessed by clicking in the field and making the appropriate selection from the drop down list.
District - Default value is based on the user’s security settings. The user will be limited to their district only.
School - Default value is based on the user’s security settings. If the user is assigned to a school, the school default value will be their school site code.
Teacher - The teacher name should be listed based on security unless the user is an administrator, then all teachers are available for selection. Select the desired teacher to view.
Show Transfer Grades - Check to allow transfer grades from other schools to display.
OK - Click to continue.
To find definitions for standard setup values, follow this link: Standard Setup Options.
Main
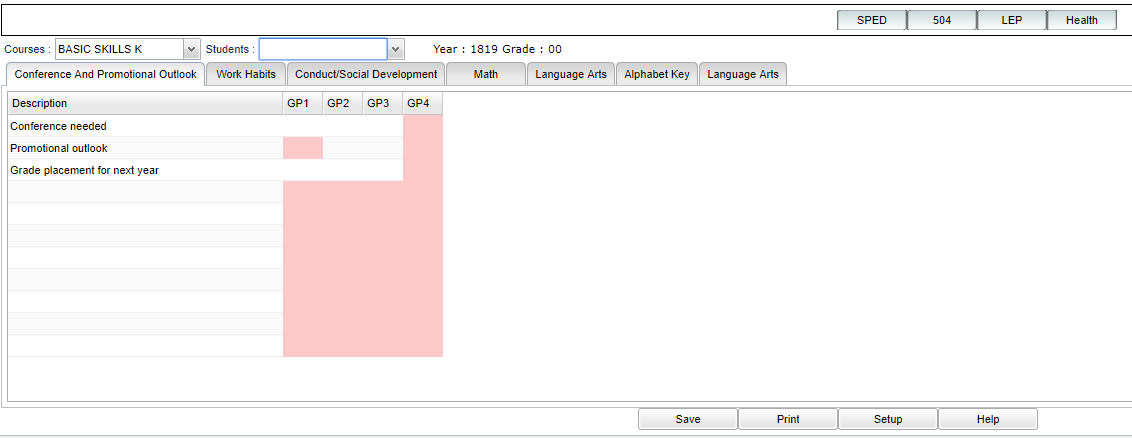
- Select the desired section to view from the Courses drop down.
- Select the desired student to enter grades for from the Students drop down.
- Select the desired tabs to enter grades.
- Finally, either check the appropriate box or click in the appropriate cell to enter a grade for the student.
- Once all grades are entered for all tabs, click the Save button at the bottom of the screen.
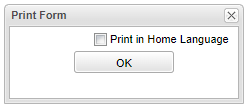
- Print - This will allow the user to print the report.
- This is the option to print in home language. It must be created in the language needed in the Flex Card Template Editor for 'Print in Home language' to work.

End of the Year
If Show Recommended Grade is checked on the set up box of Flex Card Mass Print, then "Grade Placement for Next Year" will display on the flex report card. The words "Grade Placement for Next Year" is hard coded and cannot be changed. The Grade Placement statements are also hard coded, so if additional placement statements are needed, it will require a request ticket.
From the Comment tab, choose from a pick list of what grade the student will be in next year. If the Comment tab is not showing, check the Show Comments checkbox in Flex Card Template Editor. Also, for the Alternate page, hide Section 6 and for the two page, hide Section 6 and 7.

