Difference between revisions of "Travel Time Report"
| (33 intermediate revisions by the same user not shown) | |||
| Line 1: | Line 1: | ||
| + | __NOTOC__ | ||
'''This report will provide a user with the amount of time it takes for a staff member to scan out of one location and scan into the next location.''' | '''This report will provide a user with the amount of time it takes for a staff member to scan out of one location and scan into the next location.''' | ||
| + | ==Menu Location== | ||
| − | === ''' | + | '''Human Resources/Attendance''' > '''Entry''' > '''HR Location Scanning/Location Scanning''' > '''Action''' > '''Staff''' > '''Travel Time Report'''. |
| + | |||
| + | ==Setup Options== | ||
| + | |||
| + | [[File:traveltimesetup.png]] | ||
| + | |||
| + | '''Year''' - Defaults to the current year. A prior year may be accessed by clicking in the field and making the appropriate selection from the drop down list. | ||
| + | |||
| + | '''District''' - Default value is based on the user’s security settings. The user will be limited to their district only. | ||
| + | |||
| + | '''Date''' - Current date | ||
| + | |||
| + | '''OK''' - Click to continue. | ||
| + | |||
| + | To find definitions for standard setup values, follow this link: [[Standard Setup Options]]. | ||
| + | |||
| + | ==Main== | ||
| + | |||
| + | [[File:ttreport.png]] | ||
| + | |||
| + | '''District''' - District number | ||
| + | |||
| + | '''Staff ID''' - Staff member's identification number | ||
| + | |||
| + | '''Last Name''' - Staff member's last name | ||
| + | |||
| + | '''First Name''' - Staff member's first name | ||
| + | |||
| + | '''Suffix''' - Staff member's generational suffix | ||
| + | |||
| + | '''Checked in Minutes''' - What time staff member scanned in | ||
| + | |||
| + | '''Travel Minutes''' - Staff member's travel time to the next assigned site | ||
| + | |||
| + | '''Mileage''' - Number of miles traveled. This data comes from the [[Sponsor Site Editor]]>Action>Mileage. | ||
| + | |||
| + | |||
| + | The Travel Time report will appear on the screen. | ||
| + | |||
| + | The report will show the number of minutes and mileage the employee was scanned in at a site and the number of travel minutes to the next assigned site. | ||
| + | |||
| + | To find definitions of commonly used column headers, follow this link: [[Common Column Headers]]. | ||
| + | |||
| + | ==Bottom== | ||
| + | |||
| + | [[File:traveltimebottom.png]] | ||
| + | |||
| + | '''Setup''' - Click to go back to the Setup box. | ||
| + | |||
| + | '''[[Standard Print Options | Print]]''' - This will allow the user to print the report. | ||
| + | |||
| + | '''Help''' - Click to view written instructions and/or videos. | ||
| + | |||
| + | |||
| + | ---- | ||
| + | [[Attendance|'''Attendance''' Main Page]] | ||
| + | ---- | ||
| + | [[WebPams|'''JCampus''' Main Page]] | ||
Latest revision as of 12:10, 6 June 2024
This report will provide a user with the amount of time it takes for a staff member to scan out of one location and scan into the next location.
Menu Location
Human Resources/Attendance > Entry > HR Location Scanning/Location Scanning > Action > Staff > Travel Time Report.
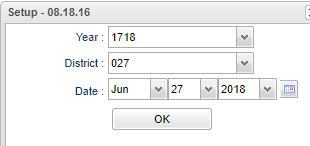
Setup Options
Year - Defaults to the current year. A prior year may be accessed by clicking in the field and making the appropriate selection from the drop down list.
District - Default value is based on the user’s security settings. The user will be limited to their district only.
Date - Current date
OK - Click to continue.
To find definitions for standard setup values, follow this link: Standard Setup Options.
Main
District - District number
Staff ID - Staff member's identification number
Last Name - Staff member's last name
First Name - Staff member's first name
Suffix - Staff member's generational suffix
Checked in Minutes - What time staff member scanned in
Travel Minutes - Staff member's travel time to the next assigned site
Mileage - Number of miles traveled. This data comes from the Sponsor Site Editor>Action>Mileage.
The Travel Time report will appear on the screen.
The report will show the number of minutes and mileage the employee was scanned in at a site and the number of travel minutes to the next assigned site.
To find definitions of commonly used column headers, follow this link: Common Column Headers.
Bottom
Setup - Click to go back to the Setup box.
Print - This will allow the user to print the report.
Help - Click to view written instructions and/or videos.
