Difference between revisions of "Group Manager"
(→Menu) |
|||
| (22 intermediate revisions by the same user not shown) | |||
| Line 1: | Line 1: | ||
__NOTOC__ | __NOTOC__ | ||
| − | ''' | + | ''' This program currently provides a way to create unique groups of employees for Dashboard.''' |
| − | ''' | + | '''In the future, this program will also allow the user to quickly send messages to the desired group of employees.''' |
| + | |||
| + | |||
| + | '''Permissions are required, in [[User Management]], to use this program.''' | ||
[[File:permgroupmgr.png]] | [[File:permgroupmgr.png]] | ||
| − | ==Menu== | + | ==Menu Location== |
| − | |||
| − | |||
| − | + | '''Communication > Loaders > Group Manager''' | |
==Setup Options== | ==Setup Options== | ||
| Line 22: | Line 23: | ||
'''School''' - Default value is based on the user's security settings. If the user is assigned to a school, the school default value will be their school site code. The user will not be able to change this value. If the user is a supervisor or other district office employee with access to the Student Information System, they will be able to run programs for one school, a small group of schools, or all schools in your district. | '''School''' - Default value is based on the user's security settings. If the user is assigned to a school, the school default value will be their school site code. The user will not be able to change this value. If the user is a supervisor or other district office employee with access to the Student Information System, they will be able to run programs for one school, a small group of schools, or all schools in your district. | ||
| − | '''Object Code''' - | + | '''Object Code''' - Click in the box and choose Object Code. |
| − | '''Function Code''' - | + | '''Function Code''' - Click in the box and choose Function Code. |
| − | '''Level''' - | + | '''Level''' - Choose a level of either District, School or User. |
| − | '''Group''' - | + | '''Group''' - Choose a group if only that is what the user wants to see in the report. Groups must have previously been assigned. |
To find definitions for standard setup values, follow this link: [[Standard Setup Options]]. | To find definitions for standard setup values, follow this link: [[Standard Setup Options]]. | ||
| Line 44: | Line 45: | ||
'''Staff ID''' - Employees identification number. | '''Staff ID''' - Employees identification number. | ||
| − | '''Object Code''' - | + | '''Object Code''' - Object Code of the staff member as indicated in the [[Human Resources]]. |
| − | '''Function Code''' - | + | '''Function Code''' - Function Code of the staff member as indicated in the [[Human Resources]]. |
| − | '''Group 1 through Group 15''' - | + | '''Group 1 through Group 15''' - These columns will display the group(s) that the staff member has been added to. |
===Right Column Headers=== | ===Right Column Headers=== | ||
| Line 54: | Line 55: | ||
'''Delete''' - Click in the box to delete information in this row. | '''Delete''' - Click in the box to delete information in this row. | ||
| − | '''Name''' - | + | '''Name''' - Name of the group |
| − | '''Level''' - | + | '''Level''' - The level that was chosen when the group was created to indicate whether it is a District, School or User level. |
| − | '''School''' - | + | '''School''' - The school that was chosen when the group was created to indicate the school site. |
| − | '''Publish''' - | + | '''Publish''' - Choose to allow other staff to be able to see the group in addition to the person who created it. Not needed for User. |
| − | '''Create User''' - | + | '''Create User''' - The user that created the group |
'''Edit''' - Click in the box to edit information in this row. | '''Edit''' - Click in the box to edit information in this row. | ||
| Line 78: | Line 79: | ||
'''Help''' - Click to view written instructions and/or videos. | '''Help''' - Click to view written instructions and/or videos. | ||
| − | '''Add Group''' - | + | '''Add Group''' - Click to create a new group to the choices on the right side of the screen. |
Latest revision as of 10:44, 31 July 2023
This program currently provides a way to create unique groups of employees for Dashboard.
In the future, this program will also allow the user to quickly send messages to the desired group of employees.
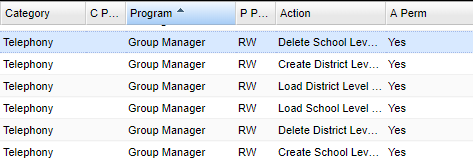
Permissions are required, in User Management, to use this program.
Menu Location
Communication > Loaders > Group Manager
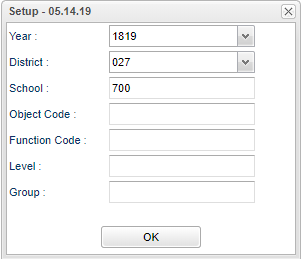
Setup Options
Year - Defaults to the current year. A prior year may be accessed by clicking in the field and making the appropriate selection from the drop down list.
District - Default value is based on the user's security settings. The user will be limited to their district only.
School - Default value is based on the user's security settings. If the user is assigned to a school, the school default value will be their school site code. The user will not be able to change this value. If the user is a supervisor or other district office employee with access to the Student Information System, they will be able to run programs for one school, a small group of schools, or all schools in your district.
Object Code - Click in the box and choose Object Code.
Function Code - Click in the box and choose Function Code.
Level - Choose a level of either District, School or User.
Group - Choose a group if only that is what the user wants to see in the report. Groups must have previously been assigned.
To find definitions for standard setup values, follow this link: Standard Setup Options.
Main
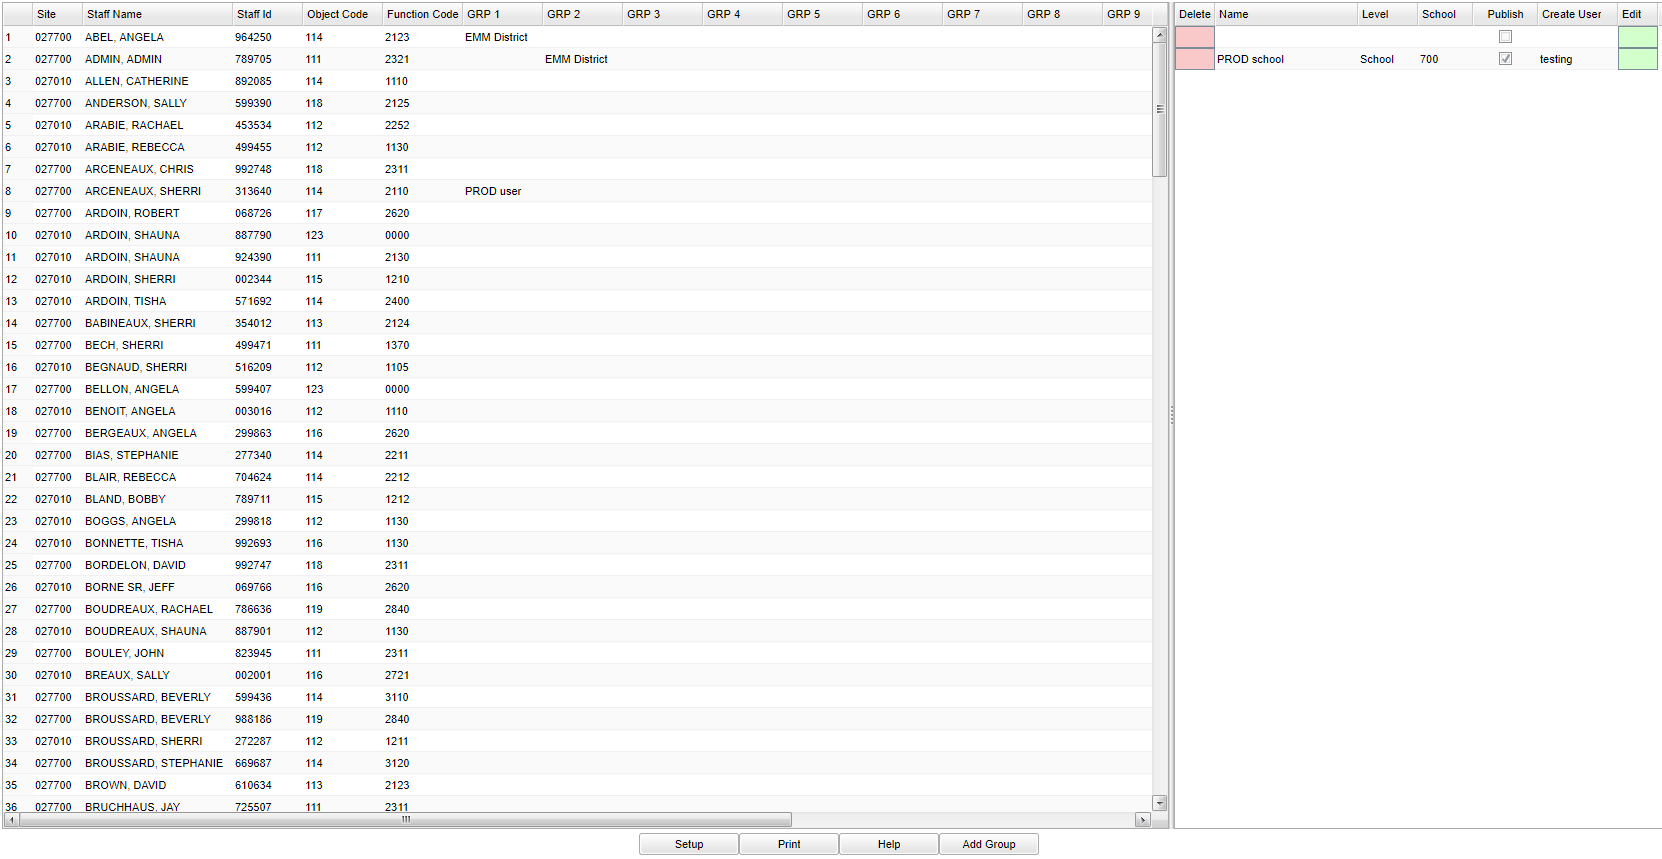
Left Column Headers
Site - Site number of school.
Staff Name - Employees name.
Staff ID - Employees identification number.
Object Code - Object Code of the staff member as indicated in the Human Resources.
Function Code - Function Code of the staff member as indicated in the Human Resources.
Group 1 through Group 15 - These columns will display the group(s) that the staff member has been added to.
Right Column Headers
Delete - Click in the box to delete information in this row.
Name - Name of the group
Level - The level that was chosen when the group was created to indicate whether it is a District, School or User level.
School - The school that was chosen when the group was created to indicate the school site.
Publish - Choose to allow other staff to be able to see the group in addition to the person who created it. Not needed for User.
Create User - The user that created the group
Edit - Click in the box to edit information in this row.
To find definitions of commonly used column headers, follow this link: Common Column Headers.
Bottom
Setup - Click to go back to the Setup box.
Print - This will allow the user to print the report.
Help - Click to view written instructions and/or videos.
Add Group - Click to create a new group to the choices on the right side of the screen.


