Difference between revisions of "Student Absentee Statistics"
| (11 intermediate revisions by the same user not shown) | |||
| Line 5: | Line 5: | ||
[[File:statisticsmenu.png]] | [[File:statisticsmenu.png]] | ||
| − | |||
On the left navigation panel, select '''Attendance''' > '''Count''' > '''Student Absentee Statistics'''. | On the left navigation panel, select '''Attendance''' > '''Count''' > '''Student Absentee Statistics'''. | ||
| Line 11: | Line 10: | ||
==Setup Options== | ==Setup Options== | ||
| − | [[File: | + | [[File:studabsstatssetup2.png]] |
'''Year''' - Defaults to the current year. A prior year may be accessed by clicking in the field and making the appropriate selection from the drop down list. | '''Year''' - Defaults to the current year. A prior year may be accessed by clicking in the field and making the appropriate selection from the drop down list. | ||
| − | '''District''' - Default value is based on | + | '''District''' - Default value is based on the user’s security settings. The user will be limited to their district only. |
| + | |||
| + | '''School''' - Default value is based on the user’s security settings. If the user is assigned to a school, the school default value will be their school site code. | ||
| + | |||
| + | '''Grade''' - Leave blank or select all to include all grades. Otherwise, choose the desired grade. | ||
| − | ''' | + | '''Custom Codes''' - Select the Custom Codes created in the Custom Code Management to filter the student list. |
| − | |||
| − | |||
'''From Date''' and the '''To Date''' - Enter to determine the dates that you want to check. Use either the month/day/year fields or the calendar icon. | '''From Date''' and the '''To Date''' - Enter to determine the dates that you want to check. Use either the month/day/year fields or the calendar icon. | ||
'''Late From''' and '''Late To''' - Enter to determine the time frame of which the students is late. | '''Late From''' and '''Late To''' - Enter to determine the time frame of which the students is late. | ||
| + | |||
| + | '''Skip Code''' - Click inside the box for a list of codes to choose from. | ||
'''Print School Name''' - Select if you want the school name to appear on the report. | '''Print School Name''' - Select if you want the school name to appear on the report. | ||
| Line 33: | Line 36: | ||
'''Reward''' - Select and choose a Reward message to correspond to the student list on the report. | '''Reward''' - Select and choose a Reward message to correspond to the student list on the report. | ||
| − | '''OK''' - Click to continue | + | '''OK''' - Click to continue. |
To find definitions for standard setup values, follow this link: [[Standard Setup Options]]. | To find definitions for standard setup values, follow this link: [[Standard Setup Options]]. | ||
| Line 39: | Line 42: | ||
==Main== | ==Main== | ||
| − | [[File: | + | [[File:studabsenteestats.png]] |
===Column Headers=== | ===Column Headers=== | ||
'''Student''' - Student's name | '''Student''' - Student's name | ||
| + | |||
| + | '''iGear''' - For additional student information click on the iGear to the right of student name. | ||
'''Grade''' - Student's grade of enrollment | '''Grade''' - Student's grade of enrollment | ||
| Line 71: | Line 76: | ||
[[File:statisticsbottom.png]] | [[File:statisticsbottom.png]] | ||
| − | '''Setup''' - | + | '''Setup''' - Click to go back to the Setup box. |
| − | ''' | + | '''[[Standard Print Options | Print]]''' - This will allow the user to print the report. |
| − | '''Print Letters''' - | + | '''Print Letters''' - Click and a print servlet window will appear. Click the printer icon at the top right and another print servlet will appear. Then, click the print button at the top left to print the report. |
'''Print Reward''' - Check student's names for reward messages. | '''Print Reward''' - Check student's names for reward messages. | ||
| − | '''Help''' - | + | '''Help''' - Click to view written instructions and/or videos. |
| + | |||
| − | |||
---- | ---- | ||
Latest revision as of 09:49, 5 May 2022
This report displays the number of times a student has been absent for certain categories by time frame.
Menu Location
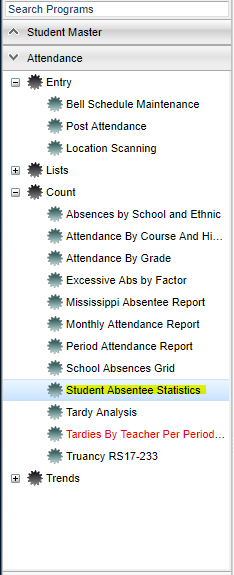
On the left navigation panel, select Attendance > Count > Student Absentee Statistics.
Setup Options
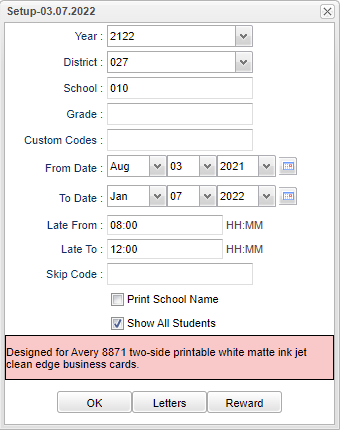
Year - Defaults to the current year. A prior year may be accessed by clicking in the field and making the appropriate selection from the drop down list.
District - Default value is based on the user’s security settings. The user will be limited to their district only.
School - Default value is based on the user’s security settings. If the user is assigned to a school, the school default value will be their school site code.
Grade - Leave blank or select all to include all grades. Otherwise, choose the desired grade.
Custom Codes - Select the Custom Codes created in the Custom Code Management to filter the student list.
From Date and the To Date - Enter to determine the dates that you want to check. Use either the month/day/year fields or the calendar icon.
Late From and Late To - Enter to determine the time frame of which the students is late.
Skip Code - Click inside the box for a list of codes to choose from.
Print School Name - Select if you want the school name to appear on the report.
Show All Students - Select to show all students enrolled at the school.
Letters - Select and choose the letter to correspond to the student list on the report.
Reward - Select and choose a Reward message to correspond to the student list on the report.
OK - Click to continue.
To find definitions for standard setup values, follow this link: Standard Setup Options.
Main
Column Headers
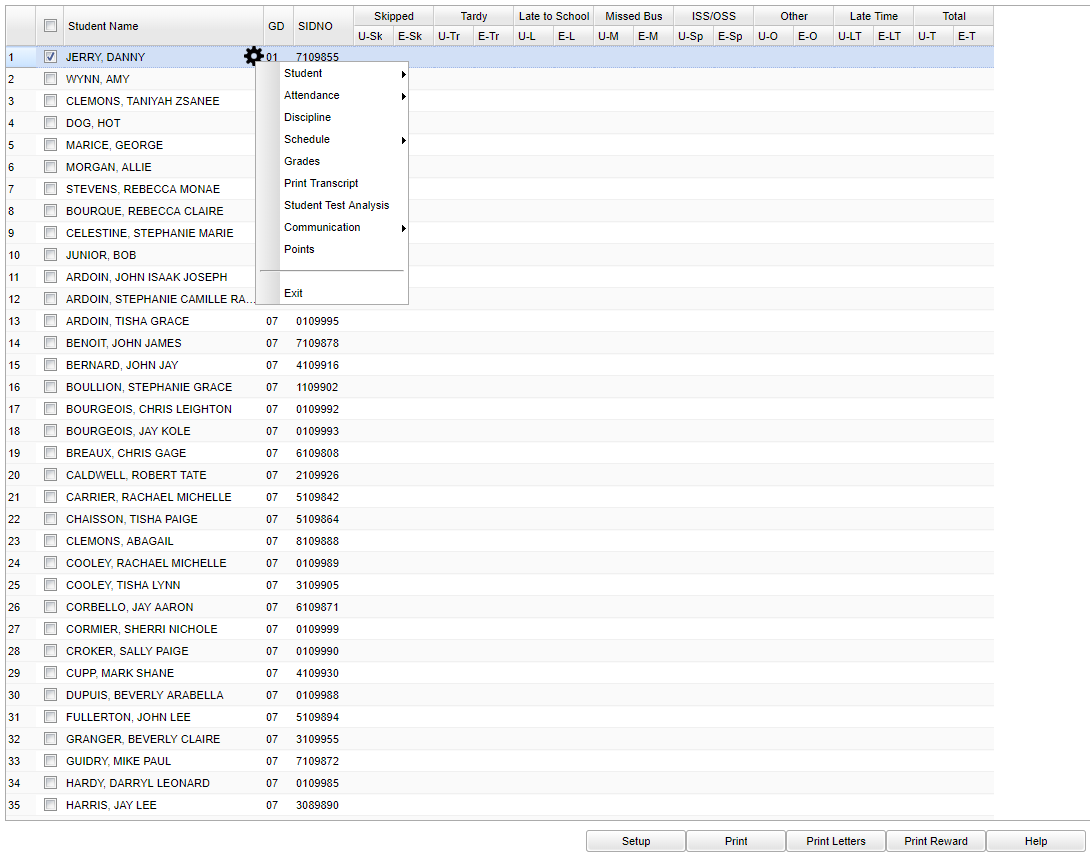
Student - Student's name
iGear - For additional student information click on the iGear to the right of student name.
Grade - Student's grade of enrollment
SIDNO - Student's identification number
Skipped - Skipped counts will show in the U - Unexcused or E - Excused columns
Tardy - Tardy counts will show in the U - Unexcused or E - Excused columns
Late to School - Late to school counts will show in the U - Unexcused or E - Excused columns
Missed Bus - Missed bus counts will show in the U - Unexcused or E - Excused columns
ISS/OSS - ISS/OSS - Counts will show in the U - Unexcused or E - Excused columns
Other - Other counts will show in the U - Unexcused or E - Excused columns
Late Time - Late time counts will show in the U - Unexcused or E - Excused columns
Total - Total counts will show in the U - Unexcused or E - Excused columns
To find definitions of commonly used column headers, follow this link: Common Column Headers.
Bottom
Setup - Click to go back to the Setup box.
Print - This will allow the user to print the report.
Print Letters - Click and a print servlet window will appear. Click the printer icon at the top right and another print servlet will appear. Then, click the print button at the top left to print the report.
Print Reward - Check student's names for reward messages.
Help - Click to view written instructions and/or videos.


