Difference between revisions of "JCall Reporting"
| Line 63: | Line 63: | ||
NOTE: The drop-down report will now allow the actual message to wrap, allowing the user to review the entire message. | NOTE: The drop-down report will now allow the actual message to wrap, allowing the user to review the entire message. | ||
| − | To find definitions of commonly used column headers, follow this link: | + | To find definitions of commonly used column headers, follow this link: [[Common Column Headers]]. |
==Bottom== | ==Bottom== | ||
Revision as of 04:43, 10 October 2018
This program will allow a school to view all calls/emails/texts generated by the JCall system. It is much simpler with the data it shows from the JComm Call Overview Report. It will break down the calls/emails and show you who created the message, when it was created, when it was scheduled to be delivered, the type of the call, and how many calls were processed. Clicking on the row will give you a graphical breakdown of the messages and how many were delivered, unanswered, and machine answered.
Menu Location
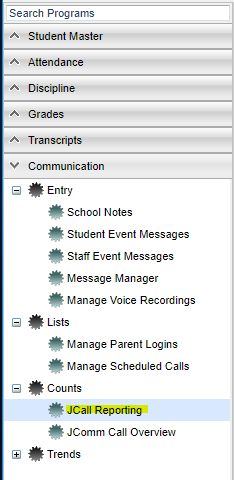
On the left navigation panel, select Communication > Counts > JCall Reporting.
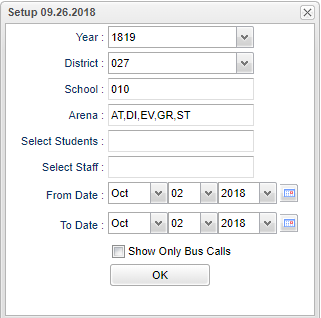
Setup Options
Year - Defaults to the current year. A prior year may be accessed by clicking in the field and making the appropriate selection from the drop down list.
District - Default value is based on your security settings. You will be limited to your district only.
School - Default value is based on your security settings. If you are assigned to a school, the school default value will be your school site code. You will not be able to change this value. If you are a supervisor or other district office employee with access to the Student Information System, you will be able to run programs for one school, a small group of schools, or all schools in your district.
Arena - Select the arena to view in the report. AT - attendance, GR - grades, DI - discipline, EV - event, ST - Staff
Select Student - Click in box to select students.
Select Staff - Click in box to select staff member(s).
From Date and To Date - A set of dates that limits the selection of records for the report to a beginning date (from) and an ending date (to) range.
Show Only Bus Calls - Select to show only calls/texts marked as `bus calls`. Bus numbers were previously chosen in the set up box of the Student Event Messages under Filters (AM or PM bus) when the call/text was sent out.
OK Click to continue
To find definitions for standard setup values, follow this link: Standard Setup Options.
Main
Column Headers
For other columns not listed in the common column list:
Schedule Date -- The date the message was scheduled to be delivered.
Create Date -- The date the message was created.
Created By -- The person or program that created the message.
Call Description -- A short description of the call being made (Usually only applies to event calls).
Arena -- The category that a message is associated with. AT = Attendance, DI = Discipline, GR = Grades, EV = Events, and ST = Staff.
Code -- Arenas are then broken into numerical subcategories. i.e. AT014 is a tardy attendance call.
Call Type -- This field denotes whether the message is Text To Voice, Voice Recorded, SMS Text Message or Email.
Calls Processed -- The number of messages processed and sent out. Click on the number to view the students who were called and other details. Calls may be listed with zero calls processed. This may be because the calls have not been completed or because the district has blocked that type of call from being delivered. Check Communication Configuration settings.
NOTE: The drop-down report will now allow the actual message to wrap, allowing the user to review the entire message.
To find definitions of commonly used column headers, follow this link: Common Column Headers.
Bottom
Setup - This allows you to change the values on the setup box without exiting the program.
Print - To find the print instructions, follow this link: Standard Print Options.
Help - This button links to the JCampus video and written instructions.
Refresh - Click this button to update the list on the screen with the latest data.

