Difference between revisions of "Scan Error Report"
(→Main) |
|||
| Line 53: | Line 53: | ||
'''Create Date''' - | '''Create Date''' - | ||
| − | To find definitions of commonly used column headers, follow this link: | + | To find definitions of commonly used column headers, follow this link: [[Common Column Headers]]. |
==Bottom== | ==Bottom== | ||
Revision as of 10:03, 9 October 2018
This report will provide a user with a list of staff members who have scanned into a location, but have not scanned out. The staff member will have an odd number of scans. You will be able to add the scan out information via this report.
How To:
Menu Location
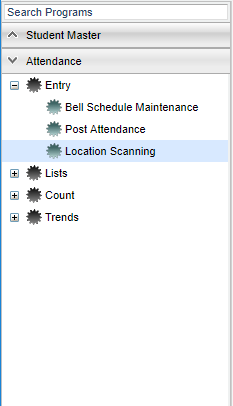
On the left navigation panel, select Attendance > Entry > Location Scanning.
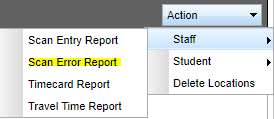
Go to Action, Staff, and click on Scan Error Report.
Setup Options
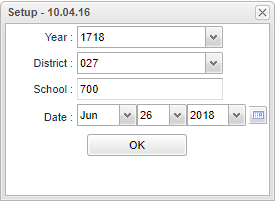
Year - Defaults to the current year. A prior year may be accessed by clicking in the field and making the appropriate selection from the drop down list.
District - Default value is based on your security settings. You will be limited to your district only.
School - Default value is based on your security settings. If you are assigned to a school, the school default value will be your school site code. You will not be able to change this value. If you are a supervisor or other district office employee with access to the Student Information System, you will be able to run programs for one school, a small group of schools, or all schools in your district.
Date - Current date
OK - Click to continue
To find definitions for standard setup values, follow this link: Standard Setup Options.
Main
District - District number
School - School site number
Staff ID - Staff identification number
Last Name - Last name of staff member
First Name - First name of staff member
Suffix - Staff member generational suffix
Location - A list of employees will be displayed with the location(s) they scanned into with a date and time.
Create User -
Create Date -
To find definitions of commonly used column headers, follow this link: Common Column Headers.
Bottom
Setup - Click to go back to the Setup box.
Print - To find the print instructions, follow this link: Standard Print Options.
HELP - Click the Help button on the bottom of the page to view written instructions and/or videos.
- A list of employees will be displayed that have NOT scanned out.
- The entries in this list can be edited with a scan out time which will remove them from this report.
- To remove an entry, click in the ADD field.
- An Add New Scan popup will appear.
- Click in the Location field and make a selection from the list of available locations.
- The popup will display the current time. This will be the time of the scan out that will be inserted into this person's record.
- To edit the time out, click in the time field on the popup and enter the time at which the employee scanned out.
- When you click OK this record is no longer an error and will be automatically removed from this error report.
- You are finished when all of the records have been removed from this report.


