Difference between revisions of "Diagnosis Coder"
| Line 32: | Line 32: | ||
'''Only Undiagnosed''' - Select to limit student list to those who do not have a diagnosis. If this is left unchecked, all students with a consult record will be listed on the loader screen. | '''Only Undiagnosed''' - Select to limit student list to those who do not have a diagnosis. If this is left unchecked, all students with a consult record will be listed on the loader screen. | ||
| − | '''NOTE''' - Only students with a "Consult Record" will show '''whether you check or do not check the Only Undiagnosed box'''. | + | *'''NOTE''' - Only students with a "Consult Record" will show '''whether you check or do not check the Only Undiagnosed box'''. |
'''Dx Code''' - Click in the cell to the right to get a list of Diagnosis Codes. Click in the square to left of “Value” to select all code numbers and the corresponding description. You may select one or more of the Diagnosis Codes and Descriptions needed by clicking in the check box to the left of the Code number. Click '''OK''' to enter the selections in the '''Dx Code'''. | '''Dx Code''' - Click in the cell to the right to get a list of Diagnosis Codes. Click in the square to left of “Value” to select all code numbers and the corresponding description. You may select one or more of the Diagnosis Codes and Descriptions needed by clicking in the check box to the left of the Code number. Click '''OK''' to enter the selections in the '''Dx Code'''. | ||
| − | '''NOTE''' - The ''Dx Codes'' displayed will be determined by the dates entered in the '''Consults From''' and the '''Consults To''' date boxes. For dates prior to '''October 1, 2015''', the ICD 9 codes will be displayed. For dates on or after '''October 1, 2015''', the ICD 10 codes will be displayed. '''Selecting the ''Consult'' date range prior to entering the DX codes will make this process go smoother.''' | + | *'''NOTE''' - The ''Dx Codes'' displayed will be determined by the dates entered in the '''Consults From''' and the '''Consults To''' date boxes. For dates prior to '''October 1, 2015''', the ICD 9 codes will be displayed. For dates on or after '''October 1, 2015''', the ICD 10 codes will be displayed. '''Selecting the ''Consult'' date range prior to entering the DX codes will make this process go smoother.''' |
'''Consults From''' - Select the "From" date by either selecting the month, day, and year individually or by clicking on the calendar to the right of the "Consults From" | '''Consults From''' - Select the "From" date by either selecting the month, day, and year individually or by clicking on the calendar to the right of the "Consults From" | ||
| Line 42: | Line 42: | ||
'''Consults To''' - Select the "To" date by either selecting the month, day, and year individually or by clicking on the calendar to the right of the "Consults To" | '''Consults To''' - Select the "To" date by either selecting the month, day, and year individually or by clicking on the calendar to the right of the "Consults To" | ||
| − | '''NOTE''' - The ''Consult'' date ranges '''CANNOT''' span the October 1, 2015 date. If ''Consult From'' date is prior to October 1, 2015, then the ''Consult To'' date will also have to be prior to October 1, 2015. Changing the ''Consult'' date ranges may require that you re-enter the ''Dx Codes''. | + | *'''NOTE''' - The ''Consult'' date ranges '''CANNOT''' span the October 1, 2015 date. If ''Consult From'' date is prior to October 1, 2015, then the ''Consult To'' date will also have to be prior to October 1, 2015. Changing the ''Consult'' date ranges may require that you re-enter the ''Dx Codes''. |
'''Ok''' - Click to continue | '''Ok''' - Click to continue | ||
Revision as of 01:55, 25 May 2018
This program is for entering diagnosis codes for a consultation.
Main
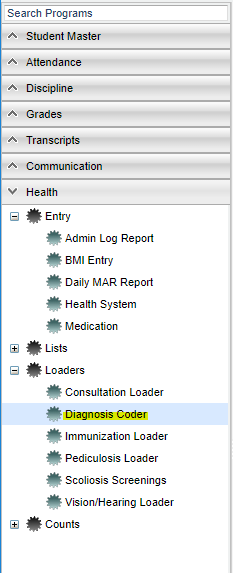
On the left navigation panel, select Health > Loaders > Diagnosis Coder.
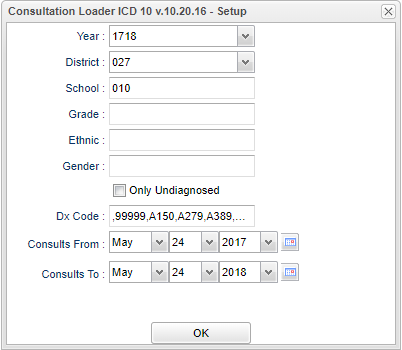
Setup Options
To find definitions for standard setup values, follow this link: Standard Setup Options. Year - Defaults to the current year. A prior year may be accessed by clicking in the field and making the appropriate selection from the drop down list.
District - Default value is based on your security settings. You will be limited to your district only.
School - Default value is based on your security settings. If you are assigned to a school, the school default value will be your school site code. You will not be able to change this value. If you are a supervisor or other district office employee with access to the Student Information System, you will be able to run programs for one school, a small group of schools, or all schools in your district.
Grade - Grade level of students whose records need to be edited or whose names are to be included on a report. Leave the field blank if all grade levels are to be included. Otherwise, click in the field to the right of Grade(s) to select the desired grade level(s) to be included.
Special Code - Special Codes must have been entered into the Student Master record for students. Leave blank if all special codes are to be included into the report. Otherwise click in the field to the right of Special Codes to select the desired special code(s) to view.
Program Code - Leave blank if all program codes are to be included into the report. Otherwise click in the field to the right of Program Codes to select the desired program code(s) to view.
Gender - Gender of students whose records need to be edited or whose names are to be included on a report. Leave the field blank if both genders are to be included. Otherwise, click in the field to the right of Gender to select the desired gender to be included.
Ethnic - Ethnicity of students whose records need to be edited or whose names are to be included on a report. Leave the field blank if all ethnics are to be included. Otherwise, click in the field to the right of Ethnic to select the desired ethnic(s) to be included.
Only Undiagnosed - Select to limit student list to those who do not have a diagnosis. If this is left unchecked, all students with a consult record will be listed on the loader screen.
- NOTE - Only students with a "Consult Record" will show whether you check or do not check the Only Undiagnosed box.
Dx Code - Click in the cell to the right to get a list of Diagnosis Codes. Click in the square to left of “Value” to select all code numbers and the corresponding description. You may select one or more of the Diagnosis Codes and Descriptions needed by clicking in the check box to the left of the Code number. Click OK to enter the selections in the Dx Code.
- NOTE - The Dx Codes displayed will be determined by the dates entered in the Consults From and the Consults To date boxes. For dates prior to October 1, 2015, the ICD 9 codes will be displayed. For dates on or after October 1, 2015, the ICD 10 codes will be displayed. Selecting the Consult date range prior to entering the DX codes will make this process go smoother.
Consults From - Select the "From" date by either selecting the month, day, and year individually or by clicking on the calendar to the right of the "Consults From"
Consults To - Select the "To" date by either selecting the month, day, and year individually or by clicking on the calendar to the right of the "Consults To"
- NOTE - The Consult date ranges CANNOT span the October 1, 2015 date. If Consult From date is prior to October 1, 2015, then the Consult To date will also have to be prior to October 1, 2015. Changing the Consult date ranges may require that you re-enter the Dx Codes.
Ok - Click to continue
Diagnosis Screen Features
- Names will be populated from Health/Health System/Consultations.
- The screen will be divided into two sections.
- Student list on the left with the Date Screened, Time, Unit, Dx Code, Diagnosis Description, Reason, and Action.
- Diagnosis Codes and descriptions will be listed on the right. This list will be based on the selections for the Consult From and Consult To dates in the setup box.
- To enter a new Dx Code for a single student click in the Dx CODE cell to the right of the student's name. An asterisk will appear in the cell. Select the code from the list on the right side of the screen. The asterisk will be replaced with the code and the code description.
- To enter a new Dx Code for multiple students with the same diagnosis, click in the Dx CODE cell to the right of each student's name. An asterisk will appear in the cells. Select the code from the list on the right side of the screen. The asterisks will be replaced with the Dx Code and the code description.
- The Reason cell can be populated by clicking in the cell and typing the information in the edit window that will pop up.
- To find the print instructions, follow this link: Standard Print Options.

