Difference between revisions of "GPA History Report"
| Line 37: | Line 37: | ||
*[[File:Update_GPA_setup.png]] | *[[File:Update_GPA_setup.png]] | ||
A message will be displayed indicating the processing is taking place. The processing will take several minutes. | A message will be displayed indicating the processing is taking place. The processing will take several minutes. | ||
| − | When done, close the Update GPA setup box. This will return the user to the | + | When done, close the Update GPA setup box. This will return the user to the GPA History Report setup box. |
| − | |||
| − | |||
| − | |||
Revision as of 10:47, 25 November 2015
This program will produce a list of students and their historical GPAs.
On the left navigation panel, select Transcript, List and GPA History Report.
Setup Box Options
To find definitions for standard setup values, follow this link: Standard Setup Options.
For other set up values not listed in the standard set up list:
- Age From/To - Choose to limit the age(s) of the students to be included.
- Minimum Units: If desired, the user can set to limit the ranking to students with a set number of Carnegie Units.
- GPA Display Type: Set to report desired GPA type.
- Special Ed Exclusion: Click to exclude from the ranking students with a specified Special Code in Student Master. For example, the user may want to exclude students with a special code of OM2 NonDiploma.
- Include Early Graduates - Selecting this will include the students who are graduating early.
- Exclude NR Students - Students with an entry code of PP, NR, EV will not be ranked if this is checked.
- Include Replaced Grades - Selecting this will include the grades that were replaced on the transcripts.
- View Previous Ranks - Selecting this option will not recalculate the ranks of the students.
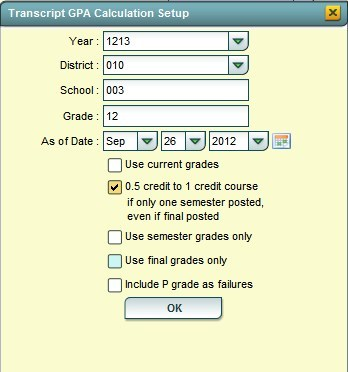
- Update GPA
- Use Current Grades: Select if semester / final grades from the current year are to be included in the cumulative gpa calculation.
- 0.5 credit to 1 credit course….: Usually selected. If a single semester of a full credit course is taken, the final will be given with only a .5 credit to match.::8Use semester grades only: Select if district calculates cumulative gpa only on grades that are in the semester category of a transcript. NOTE: Check Use semester grades only OR Use final grades only but do not check both.
- Use final grades only: Select if district calculates cumulative gpa only on grades that are in the final category of a transcript.
- Include P grade as failures: In some circumstances, students opt to use a "P" grade for Passing, as opposed to the typical A, B, C, for placement courses, Driver's Education, etc. The student’s transcript will show 1 credit for the course, but the "P" will not calculate into the student’s gpa. But by checking this option, "P" grades will be counted as a failing grade. Normally schools do not select this option.
- Selecting this option will take a P grade and count is as 0 quality points just like an F grade. Normally, schools want a P to simply be left out of the calculation since it has no quality points.
Click the OK button to begin the calculation.
A message will be displayed indicating the processing is taking place. The processing will take several minutes. When done, close the Update GPA setup box. This will return the user to the GPA History Report setup box.
Click the OK to advance to the next page.
Column Headers
To find definitions of commonly used column headers, follow this link: Common Column Headers.
For other columns not listed in the common column list:
To Print this Report
Click the Print button at the bottom of the screen.
A popup will appear with a set of document print options--PDF, XLS, CSV, HTML.
The default print option will be PDF.
Click the print button on this popup and a print preview window will appear.
To get the print icon on this window, hover the mouse in the bottom right area of the preview. A grey rectangle will appear with several icons.
Click the print icon at the right end of this rectangle. Another print preview will appear.
Click the print button at the top left to print the report. Close the print preview.
