Difference between revisions of "EOY Dual Grades Label"
From EDgearWiki
Jump to navigationJump to search| Line 21: | Line 21: | ||
[[File:EOY.PNG]] | [[File:EOY.PNG]] | ||
| − | |||
'''Post''': There are three selections that can be made by clicking in the radio button to the left of: | '''Post''': There are three selections that can be made by clicking in the radio button to the left of: | ||
| Line 53: | Line 52: | ||
*Click the print button at the bottom of the screen. | *Click the print button at the bottom of the screen. | ||
*To get the print icon on this window, hover the mouse in the bottom right area of the preview. A grey rectangle will appear with several icons. Click the print icon at the right end of this rectangle. Another print preview will appear; click the print button at the top left to print the report. | *To get the print icon on this window, hover the mouse in the bottom right area of the preview. A grey rectangle will appear with several icons. Click the print icon at the right end of this rectangle. Another print preview will appear; click the print button at the top left to print the report. | ||
| + | |||
| + | |||
| + | |||
| + | |||
| + | ---- | ||
| + | '''[[WebPams|JCampus]] / [[Grades]]''' | ||
Revision as of 16:10, 15 October 2015
Video How-to
How-to run the EOY Dual Grades Label
On the left navigation panel, select Grades, Lists and EOY Dual Grades Label.
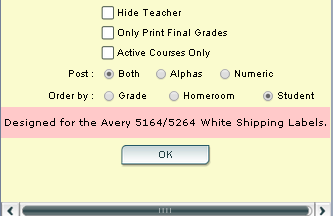
Designed for the Avery 5164/5264 White Shipping Labels
Setup Box Options
To find definitions for standard setup values, follow this link: Standard Setup Options.
Other set up values not listed in the standard set up list:
- Hide Teacher-Click in the box to the left of the Hide Teacher. This will remove the teachers name from the label.
- Only Print Final Grades-Click in the box to the left of the Only Print Final Grades. This will print only the final grades for the student on the label.
- Active Courses Only-Click in the box to the left of the Active Courses Only. This will print only the Active Courses for the student on the label.
Post: There are three selections that can be made by clicking in the radio button to the left of:
- Both-Used to print both the Alpha and Numeric
grade on the label.
- Alphas-Used to print only the Alpha grade on the label.
- Numeric-Used to print only the Numeric grade on the label.
Ordered by: There are three selections that can be made by clicking in the radio button to the left of:
- Grade-By clicking in the radio button to the left of grade the labels, the labels will print in Grade order.
- Homeroom-By clicking in the radio button to the left of grade the labels, the labels will print in Homeroom order.
- Student-By clicking in the radio button to the left of grade the labels, the labels will print in Student order.
Click OK-To run the program.
A list will populate with the following Headers.
- Selection Box-Box used to select all students at one time.
- Grade-Grade of the student.
- Student Name-Name of the student.
- Sidno-Student ID number.
- Hm Teacher-Homeroom teacher of the student.
- Entry Date-Entry date into the school for the student.
- Leave Date-Leave date from the school for the student.
- Year-School year.
- District-State district number
- School-School number.
To print this report:
- Select a student(s) by clicking in the box to the left of the students name. If all students are desired, click in the box in the header.
- Click the print button at the bottom of the screen.
- To get the print icon on this window, hover the mouse in the bottom right area of the preview. A grey rectangle will appear with several icons. Click the print icon at the right end of this rectangle. Another print preview will appear; click the print button at the top left to print the report.
