HR Location Scanning
This program shows the scanning of staff to report that they have passed a location point on the school campus.
Menu Location
Human Resources > Entry > HR Location Scanning
Setup Options
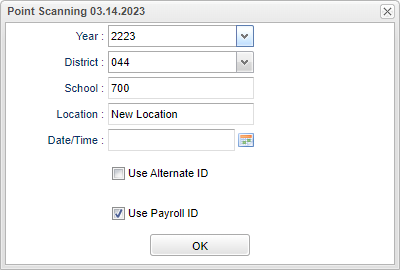
Year - Defaults to the current year. A prior year may be accessed by clicking in the field and making the appropriate selection from the drop down list.
District - Default value is based on the user's security settings. It will be limited to the user's district only.
School - Default value is based on the user’s security settings. If the user is assigned to a school, the school default value will be their school site code.
Location - Click to select a previously used location. If the desired location is not listed, close the pick list and begin to type the name of the new location. This will add the new location to the pick list. To delete a location use Action > Delete Location located at the top right corner of the screen.
Time/Date - Time and date of when employee was scanned.
Use Alternate ID - This uses the interface ID for student and staff for scan matching.
Use Payroll ID - This option allows the system to use the staff members payroll ID as a scannable ID.
Ok - Click to continue.
Main
Search:
- First name or last name
- Home, cell or work phone numbers for Parent, Guardian, Emergency and Student
- ID Number
- Employee Birth Date
- Payroll ID Number
- State ID
D - Delete
Name - Employee's name.
Staff ID - Employee's identification number.
Date/Time - Date and time of employee scanning.
Location - Location of employee scanning.
Scan In Reason - Scan in reason.
Scan Out Reason - Scan out reason.
S - Save
Change Date - Date information was changed.
Change Who - Who changed information.
Top
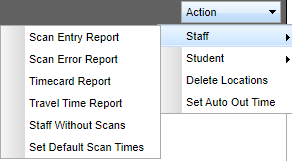
- Scan Entry Report
- Scan Error Report
- Timecard Report
- Travel Time Report
- Staff Without Scans
- Set Default Scan Times
Set Auto Out Time is available if the user has the proper security. This will set a time to automatically sign all staff members out at a certain time.
- Go to User Management, add Category "Attendance", Program "Location Scanning", Action "Set Auto Out Time" to "Read Write". This will allow the menu item to show to be able to set the time.
Bottom
Setup - Click to go back to the Setup box.
Print - This will allow the user to print the report.
Scan - The scanning of staff to report that they have passed a point.
Help - Click to view written instructions and/or videos.
How-to
- After clicking OK, type in the staff`s ID number and then click Enter on the keyboard.
- SAVE: It will show `Saved` when the record saves and then a fading window.
- NOT SAVED: It will show a `Record Did Not Save. Please try again` along with the error on why it would not save.
- Close that window and a chart will appear.
- If the staff member has a Separation Date, scanning will not work as the Separation Date overrides the Employee Begin/End Contract Dates.


