Excessive Abs by Factor
This program will provide a way for the user to generate a report or parent letters based on excessive absences by factor for the school. There is a Communicate button, on the count cell click that a user could manually send calls and/or emails to students with a specific number of days absent.
Menu Location
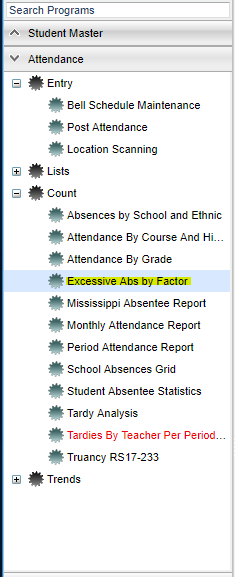
On the left navigation panel, select Attendance > Count > Excessive Absences by Factor.
Setup Options
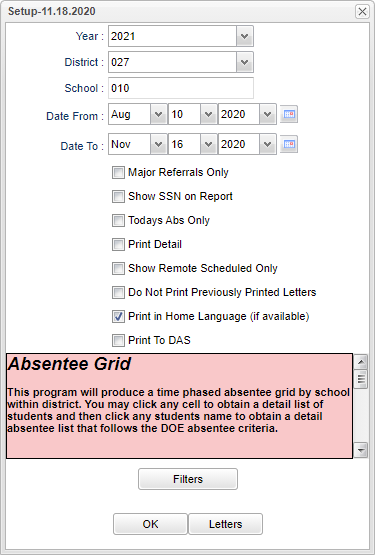
Year - Defaults to the current year. A prior year may be accessed by clicking in the field and making the appropriate selection from the drop down list.
District - Default value is based on the user’s security settings. The user will be limited to their district only.
School - Default value is based on the user’s security settings. If the user is assigned to a school, the school default value will be their school site code.
From Date and To Date - A set of dates that limits the selection of records for the report to a beginning date (from) and an ending date (to) range.
Major referrals Only - These students have been referred to the office (code 06) using "Action Taken By Teacher" on referral page 2 or on which administrators have taken action by adding information on the Admin page of the referral using "Action Taken by Administrator".
Show SSN on report - Choose this box to show the social security number on the report.
Today's Abs Only - Choose this box to limit the list of students to those who have records on the to date.
Print Detail - Prints attendance history with the letters.
Show Remote Scheduled Only
- If your school does NOT offer any remote classes, this feature does not apply.
- As a school that offers remote classes, by checking this box the list of students will be those from other schools in your district that attend classes on your campus. Students from your school will not be on the list if this box is checked.
Do Not Print Previously Printed Letters - This indicates whether a letter will be printed.
- Choose this box to uncheck the students who HAVE previously had a letter printed for this letter name.
- All students who HAVE NOT had a letter previously printed, for this letter name, will already have a check mark to indicate that a letter will be printed.
Print in Home Language (if available) - If the student has a language that is the main language of the household it will be documented in Student Master in the Country Entry, Home Language field. The letter will not be translated so it must be written in the designated language. This will indicate which letter version to use of the letter that was created in Letter Maintenance.
Print to DAS - Print the letter to the Student Progress Center. (This option will not be available if Print to DAS is not enabled.)
Filters
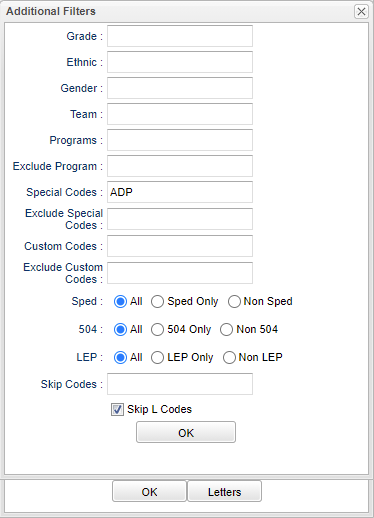
Grade - Leave blank or select all to include all grades. Otherwise, choose the desired grade.
Ethnic - Leave blank or select all to include all ethnicities. Otherwise, choose the desired ethnicity.
Gender - Leave blank or select all to include all genders. Otherwise, choose the desired gender.
Team - Leave blank if all team names are to be included into the report. Otherwise, choose the desired team.
Programs - Leave blank if all program codes are to be included into the report. Otherwise, choose the desired program code.
Exclude Program Codes - Click in the field to select the desired program code(s) to exclude.
Special Codes - Leave blank if all special codes are to be included into the report. Otherwise, choose the desired special code.
Exclude Special Codes - Click in the field to select the desired special code(s) to exclude.
Custom Codes - Select Custom Codes created in the Custom Code Management to filter the student list.
Exclude Custom Codes -Click in the field to select the desired custom code(s) to exclude.
Special Ed:
All - Select to view all students.
Sped Only - Select to view only Sped students.
Non Sped - Select to view only non Sped students.
504:
All - Select to view all students.
504 Only - Select to view only 504 students.
Non 504 - Select to view only non 504 students.
LEP:
All - Select to view all students.
LEP Only - Select to view only LEP students.
Non LEP - Select to view only non LEP students.
Skip Codes - Click in the box for a list of codes.
Skip L Codes - Check this box to skip leave codes.
OK - Click to continue.
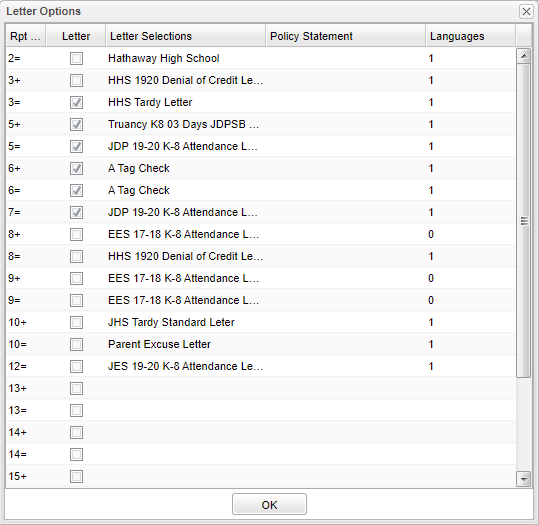
Letters - Select to display a popup window to choose a letter that corresponds to the number of absences.
- So click in the checkbox in the Letter column on the row with the number of absences needed. Then click on the same row in the blank space under the Letter Selections column to display a 'Select a Letter' popup box. Check the letter name needed and click OK. NOTE that letters must have been previously created in Letter Maintenance. The user may also 'Preview" the letter chosen by choosing that option.
Rpt Cols - Days missed - Ex: 2= means 2 days only, 3+ means 3 or more days until the next number available
Letter - When checked use this letter for printing.
Letter Selections - Name of letter to use for printing.
Policy Statement - Name of Policy Statement to use for printing.
Language - The count of the languages of the letter.
OK - Click to continue.
To find definitions for standard setup values, follow this link: Standard Setup Options.
Main
Column Headers
Sch - School number
School Name - Name of the school
Number followed by an equal (Ex. 2=) - Total number of absences that are equal to 2
Number followed by a plus (Ex. 3+) - Total number of absences that are equal to 3 and less than 5
Total - Total number of absences of all columns
To find definitions of commonly used column headers, follow this link: Common Column Headers.
To view absentees, click on the number in the columns to view student information. Here you will be able to print this list of students, attendance letters, FINS Letters, and attendance history. Students who are checked (highlighted) will indicate that they need to be sent a letter.
Column Headers
Student Name - Student's name.
Sidno - Student's identification number.
Eth - Student's ethnicity.
Gen - Student's gender.
GD - Student's grade of enrollment.
Homeroom Teacher - Student's homeroom teacher.
EDate - Student's entry date into the school.
ECode - Student's entry code into the school.
Email - Email (Father's, Mother's, or Guardian's).
Abs - Total number of absences.
Sped - Is student Sped.
504 - Is student 504.
Program - Student's program codes.
Sch - Student's school of enrollment.
Birth Date - Student's birth date.
Age - Student's age at time of las attendance.
Address 1 - Student's mailing address line 1.
Apt/Lot/Ste - Student's mailing address line 2.
City - Student's mailing address city.
State - Student's mailing address state.
Zip - Student's mailing address zip.
GHomePhn - Student's guardian's home phone number.
FHomePhn - Student's father's home phone number.
MHomePhn - Student's mother's home phone number.
EHomePhn - Student's 911 emergency contact's home phone number.
HPhn - Student's main home phone number.
Bottom
Print Letters - This is the letter selected from the setup box.
Print Labels - This will print mailing labels.
Print - This will allow the user to print the report.
Print FINS Letter
Court Referral Letter - This letter is for the juvenile system.
Mandatory Conference Letter - This letter is sent to the parent/guardian.
Use Today's Date - Check the box to print today's date. If the box is not checked, the date will be left blank.
Print History - This is a printout to show all of the absences for the student.
Print FINS Referral Checklist (Family In Need of Services) - This letter will show the student's attendance, discipline and grades. This will only show (U) unexcused Full Day absences on the letter. It will not show check ins/outs nor total them up.
Communicate - This will allow Communication via automated call or email. There is a security requirement to use the Communicate button that needs to be set up in User Management by your district's administrator. To set up the security, you need a category of Telephony and a program of Communicate Button.
Bottom
Setup - Click to go back to the Setup box.
Print Letters - Print letters for the group(s) specified in the Letters window of the setup.
Print Labels - Designed for the Avery 8160 White Address Label.
Print - This will allow the user to print the report.
Help - Click to view written instructions and/or videos.


