Staff Message - Record Voice
From EDgearWiki
Jump to navigationJump to searchVideo
Staff Event Messages - Record Voice video
Emergency Call
To place an emergency call to send out to students and staff, click on the phone in the top right corner of the screen.
Next, select either Student or Staff.
This will skip having to browse the navigation panel of JCampus and go directly to Setup Box 1 described below.The only staff members that have permission to make Emergency call(s), which is hard coded in the JCall system, are Admin (AD and 700), Principals (PR, S0), Assistant Principals (AP), and Superintendent (SI). A 911 call manually cannot be input when creating a new message and is only available through the emergency call button.
Setup 1
- Select the desired Year.
- District and School should be defaulted based on security. If security permits, click in the School field to select the desired school.
- Object Code to choose an object code of the staff member to call. This field relates to Human Resource. Leave blank to call all staff members regardless of object code.
- Function Code to choose a function code of the staff members to call. This field relates to Human Resource. Leave blank to call all staff members regardless of function code.
- Select Call Groups: Click here to limit the staff members by a selected group.
- Note: Staff Groups are defined by using the Call Group Loader
- Phone Type: Click to select the type of phone number to communicate to. Leave blank to call all phone types.
- Home Site Only: Selecting this option will limit the message to only those staff members who are "home based" at the school site. Deselecting will include Itinerant staff as recipients.
- Select Individual Staff will list all staff members that meet the criteria of the options selected above. Within the list, select the staff to call. Leave blank to call all staff members based on the criteria of the options selected above.
- Click Next to move to the next step in the create message process.
Setup 2
- If the message is to be scheduled for a future date/time, check the Schedule Call box, then select the date and time.
- Schedule Time End will end your calls from going out past a certain time. In Communication Configuration, calls are set for start and stop times for the district as a whole. This will override and allow you to set it at an earlier time, if needed.
- If the user wishes to send the message out now, leave the Schedule Call box unchecked.
- If no date and time is selected, the message will go out in the next call interval.
- Click Next to move to the next step in the create message process.
Setup Box 3
- Select Record Voice Message and click Next.
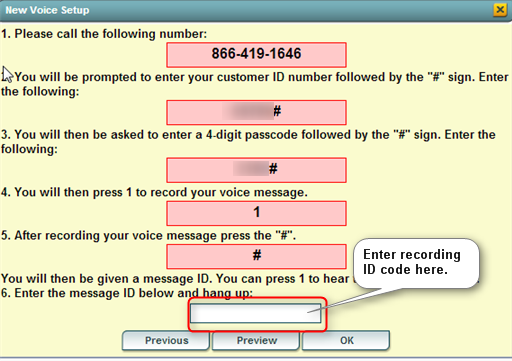
- The New Voice Message window will display. Follow the six steps on the screen. At the end of recording process, a recording ID code will be given.
- Write down the code, then enter the recording ID code in the field labeled "6. Enter the message ID below and hang up:" as shown below.
- After entering the recording ID code, hang up the phone used to make the recording.
- Click OK. A dialog box showing number of messages to deliver as well as "Yes" or "No" choices will be displayed.
- Click Yes to continue with the message delivery, or click No to return to the recording options.
- If Yes is clicked, a listing of the person's slated for message delivery is shown on the screen.
Results
- A list of faculty that is scheduled to receive the message will be displayed on the screen. Print or save this report at this time if desired.

