Prescription Details
From EDgearWiki
Jump to navigationJump to searchThe "Prescription Details" screen shows the details of a student's prescription medication. The data comes from when the medication was added using the Add New button on the Medication screen.
Getting Started
- In the left navigation panel, click on Health.
- In the Entry grouping, click Medication.
Setup Options
- Year: Select the school year.
- District: This will default to the district's number based on the login of the user.
- School: This will default to the school associated with the user. If the user is associated with multiple sites, other school sites can be selected.
- Show: By default, the selection of Active Prescriptions is displayed, which filters out prescriptions no longer in effect.
- To see all prescriptions, whether active or inactive, select All Prescriptions.
- Click the OK button to begin the Medication program.
Accessing Prescription Details
- A listing of students with prescriptions will be displayed on the screen.
- Click on the name of a student. A gray menu will appear. Select the second option, Prescription Details.
- A window showing the details of the prescription
- Most of the fields cannot be changed.
- If Time of Day is set to Multiple, click the Edit button to see the multiple scheduled times the medication is to be administered.
- Desired Effects, Adverse Effects, Special Instr can be changed and saved on this screen.

- Special Instructions-These instructions will now appear above the calendar for Administer Medication.
- To store the changes made in these cells, click the OK button.
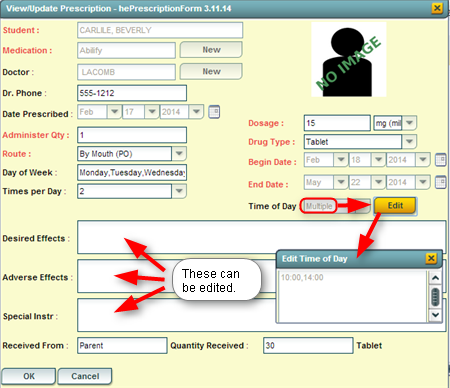
- To close the Prescription Details screen, click the Cancel button, or click the x in the yellow box in the upper right.
