Beginning Balance
From EDgearWiki
Jump to navigationJump to searchThese instructions will provide the steps for creating a new account and editing existing beginning balance records. Only after receiving permission from the district finance department should a user edit these values. Changing beginning balances will have an effect on all monthly reports from the beginning of the year to the most recent month for which all reports have been submitted to the district office.
- Select Funds from the area on the left side of the screen.
- Under Entry select Post Transaction.
- The default District and School information will be based on your security settings.
- NOTE If you are a district user, you will need to make a school selection.
- Complete the Setup box and click Ok.
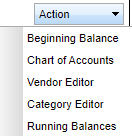
- Click the Action button at the top right of the screen.
- Select Beginning Balance.
- The account list with the beginning balance records for the current fiscal year will appear on the screen. This list includes Account Name, Balance and Post Date.
To create a new account for use with the current fiscal year, use the steps below:
- Use the top line beginning with the Account cell.
- Click the account cell and select the new account from the school list/district list of accounts.
- If the account does not exist you MUST contact the district funds coordinator for assistance.
- After entering the new account information, scroll to the right side of the screen and click the green save cell at the right end of the entry.
- The new beginning balance record will appear in the list of records in account number order.
- After creating the new balance record, you may print the account list using the instructions below.
- To close the Beginning Balance window, click the 'x' in the upper right corner of the window.
- To edit or change an account name after it has been saved, an employee must have prior approval with the finance department. Once an employee has approval then an administrator will need to follow these steps to grant access. System -> User Management Options - Must have a Category of Finance, with RW access, Post Transaction with RW access, and Action will have a drop down and select "Yes", then Save.
Print Options
- Print - This will allow the user to print the report.
- Click the printer icon at the top right. Another print servlet will appear.
- Click the print button at the top left to print the report. Close the original print servlet window.

