Check Register Report
This report will provide a list of checks that have been posted and/or printed for a specified date range. It will also provide a way to look up a check based on the Check number or the Account.
Menu Location
Funds > Lists > Check Register Report
Setup Options
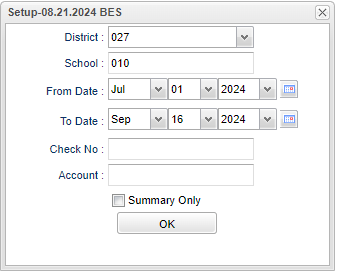
District - Default value is based on the user's security settings. It will be limited to the user's district only.
School - Default value is based on the user’s security settings. If the user is assigned to a school, the school default value will be their school site code.
From Date/To Date - On the setup box select the date range needed for the report.
Check No. - If you are looking for a specific check, enter the number in the Check No. field. It is recommended that you use a long date range when looking up a specific check.
Account - Enter an Account if you need to look up checks written from a specific Account.
Summary Only - Check this box for summary only.
OK - Click Ok to continue.
Main
Column Headers
Pay Date - Pay date of transaction (Date that appears on printed documents).
Ck No - Check number (based on the transaction type values will be the check number, ADJ, INT, DEP, or TRA).
Amount - Amount posted for transaction.
Vendor Name - Name of vendor.
Vendor Ref - Vendor's reference number.
PO - Transaction purchase order number.
Account - Account number.
Account Name - Name of account.
Comment - Transaction comments.
Post Date - Post date of transaction.
To find definitions of commonly used column headers, follow this link: Common Column Headers.
Bottom
Setup - Click to go back to the Setup box.
Print - This will allow the user to print the report.
Export -
Help - Click to view written instructions and/or videos.
Print Options
- Click the Print button at the bottom of the screen.
- Click the printer icon at the top right. Another print servlet will appear.
- Click the print button at the top left to print the report. Close the original print servlet window.

