Student Schedule Maintenance: Add Change Delete Classes
From EDgearWiki
Revision as of 12:54, 21 October 2020 by Egadmin (talk | contribs) (→Move Marking Period Grades - Replace One Course with Another Course at the Same Period)
These instructions will assist you in various operations on a student's schedule.
NOTE: It is highly recommended that you print a copy or take a screen shot of the student's original schedule BEFORE making changes.
Add a Course to a Student's Schedule
- The Schedule window will default to the schedule of the first student alphabetically.
- Click the Find button at the bottom of the screen to find the student whose schedule needs to be edited.
- The schedule window will default to the Current Schedule tab. Make changes using this set of schedule data.
- To add a course, click under the header (SEMESTER) and the Master Schedule will appear on the screen.
- To move quickly to the new course sort the Master Schedule based on either the course name, teacher name or period by clicking the column header.
- Click on the new course and the information will be entered into the semester(s) based on setup options. The program will display a warning that will notify the user when a section a student is being scheduled into is full.
- Continue adding new courses to the student's schedule as needed.
Move Marking Period Grades - Replace One Course with Another Course at the Same Period
- Click on the course you want to replace in the 'Semester' column. This will bring up the Master Schedule selection window.
- Using the appropriate sort/search functions, select the course that will replace the current course.
- Since the new course is at the same period as the previous course, the 'Entering/Altering Schedules' window pops up.
- Check/uncheck the desired Semester.
- Since the course is being replaced at the SAME period, the user is given the opportunity Move Marking Period Grades. See below:
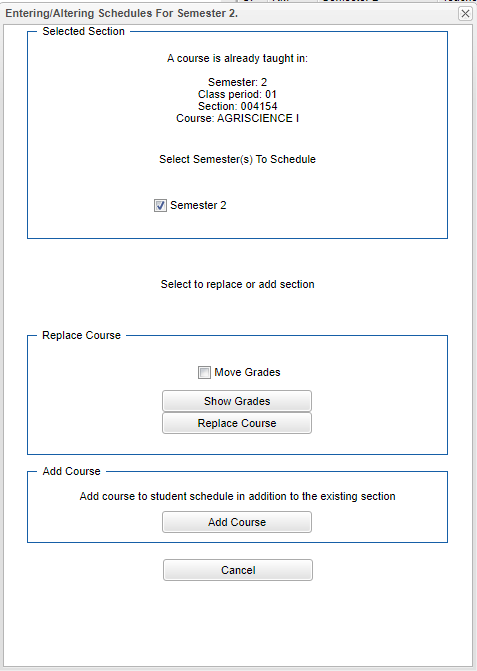
- Click on the 'Move Grades' button to move the Marking Period grade from the old course to the new course. You will get a warning popup box.
- Click the 'Yes' button to continue moving the Marking Period grade. You will get a confirmation Note popup.
- Click on the 'OK' button to continue.
- You will then get another 'Entering/Altering Schedules' replace the grade for the 2nd semester. Repeat the procedures above to move the 2nd semester Marking Period grades.

Delete a Single Course from a Student's Schedule
- Click the section number in the appropriate semester.
- A delete confirmation will appear on the screen.
- Respond Yes to delete or No to cancel the delete request.
- Repeat for each semester and for additional courses.
Delete a Single Course from a Student's Schedule History
- You will need security rights to delete from the schedule history.
- Click the section number in the appropriate semester.
- A delete confirmation will appear on the screen.
- Respond Yes to delete or No to cancel the delete request.
- Repeat for each semester and for additional courses.
Delete the All Classes from a Student's Schedule
- Select the Action button at the top right
- Select Delete Schedule
- Click Yes to delete all courses on the student's schedule.
Restore the Student's Original Schedule
- The original schedule can be recalled only if you have not 'left' this particular student's schedule screen.
- Click the Original Schedule tab at the bottom of the window to recall the schedule.
- The student's original schedule will appear on the screen.
- Print the original schedule for the student to use when correcting the current schedule.
- After deleting all schedule records either one at a time or the whole schedule, enter the new schedule on the current schedule screen.
- You will need to re-enter each course from the original schedule screen on the current schedule screen. Use the add a course steps above.
View/Add/Delete Unscheduled Requests
- Click the Unscheduled Requests tab at the bottom of the window.
- Any unscheduled requests will be displayed on the right side of the window. The left side of the window will display the courses available based on the Master Schedule Editor.
- To add more requests, click the check box to the left of the course(s) then click add request tab. To remove check marks, click the unsel button.
- To delete an unscheduled request, click the box to the left of the requests; a delete confirmation will appear on the screen.
Print the Student's Schedule
- Click the Print Current Schedule button.
- If the setup box has the print comments option set to Yes, a popup for this student's message will appear. #Type the message and click continue.
- Print - This will allow the user to print the report.