Report Card
From EDgearWiki
Jump to navigationJump to searchThe Report Card generator can generate two types of grade reports:
- Traditional Report Card
- Progress Report with grades only, no detailed assignments
Video How-to
How-to
Getting There:
On the left navigation pane of WebPams, click on the Grades button, then Lists, then Report Cards.
A screen with setup box options will be displayed. Explanations of the setup box options are explained below.
====Setup Directions: Student Selection==== (Left side of setup screen)
This area deals with student selection filters.
- Year and Grade: Set to desired Year, then set Grade level(s) of students in the report.
- Special Codes through Team: Set to further limit students in the report.
- As of Date: Date to determined enrolled students. Typically set for end of grading period if doing report cards.
- Display Date: Date displayed on report card. Typically set for official date of report cards going home.
- Sped: For Special Education students, set to desired selection.
- 504: For 504 students, set to desired selection.
- LEP: For Limited English Proficient students, set to desired selection.
- Hold Card: For students with a special code of "HRC Hold Report Card" in Student Master, set to desired selection.
- Order by: Set to desired order of printing. Most locations commonly choose “Homeroom”.
- Show Remote Scheduled: Click to include students who are enrolled at other sites, but take classes at this school location.
- Students: Click to select specific students in the groupings set above.

Setup Directions: Options (Upper right side of setup screen)
The top right side of the setup screen labeled "Options" deals with print details for the report.
- Type to Print: Select Report Card, Final Report Card, or Progress Report.
- Note: Selecting Final Report Card will add any Student Master SBLC code to the report, as well as a "Promoted" or "Retained" indicator on the report card.
- Order Courses By: Select either Class Period order or Course Name order.
- HS Grading Period / Elem Grading Period: Set to the grading period the report is being generated for.
- Show School Name: Select to show school name on report
- Show Grading Scale: Select to show grading scale on the report.
- Show Address Line: Select to show student address line
- Show Comments: Select to show Comments posted by teachers from Gradebook
- Show Homeroom Teacher: Select to show Homeroom teacher on report.
- Show Counselor: Select to show Counselor associated with student in Student Master.
- Show Advisor: Select to show Advisor associated with student in Student Master.
- Show Team: Select to show Team associated with student in Scheduling system.
- Show EOC Scores: Select to show EOC scores student earned this year. Note: Scores need to be imported into system by JPams District Coordinator first.
- Highlight Course Line: Simply puts a shaded green row on alternating rows to help readability.
- Show Class Period: Select to show class period of course.
- Show Active Courses Only: Select to show only grades from currently scheduled classes. Dropped classes are filtered out.
- Show F (non-numeric) on policy failure: With this option selected, the report card would not display the numeric value (e.g. 75C* or 75C#), but would display the alpha character of F (e.g. F* or F#).
- Top Margin Spacing: If a blank header space is desired to make room for a letterhead on stock paper, click and select the number of rows to move the report card information down on the page.
- SBLC Description: For Final Report Cards only – Will show Promoted or Retained information.
- PS Mail Return Address: If using a PS Mail envelope system, select either Central Office or School address to show on folded report card for mail out purposes.
- Show Guardian Signature: Select to place a line for Guardian Signature. In the box on the right, fill in the label for the line such as “Parent / Guardian”.
- Show Principal Signature: Select to place a line for Principal Signature: In the box on the right, fill in the label for the line such as “Principal”, “Acting Principal”, etc….
- Principal’s Message: Click to enter a message that will appear under the grades.
- Bottom Message: Click to enter a message that will appear in the lower portion of the report near the signature lines.

- The middle right setion labeled "Non Grades" deals with attendance and discipline options for the report.
- Display the below items: From / Thru: Set the date range to show attendance or discipline information.
- Skip Absence Codes: Select the desired attendance codes to skip when reporting attendance information.
- Absentee Detail, Absentee Course, Absentee Summary, Discipline: Select desired attendance or discipline option to show on report.
- Absentee Detail: Show attendance by day records for date range.
- Absentee Course: Show counts of absences by course for date range.
- Absentee Summary: Show attendance by day summary counts for date range.
- Discipline: Show discipline records for date range.

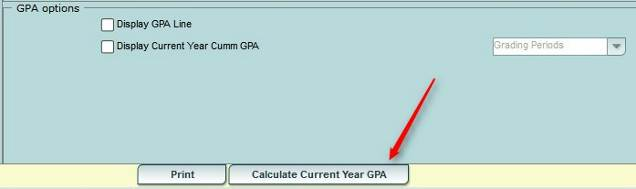
- GPA Options: Note: If displaying GPA information, be sure to do a GPA calculation beforehand. If none has been performed recently, click the Calculate Current Year GPA button.
- Click the Print button to begin the process of creating print previews of the report. When done, review, then print.