Student Demographic Fast Loader
This program will do the following:
- Allow a user to update the demographic information of the student all on one screen.
- Print a form for parents to review demographic information about a student, then return with any corrections.
- Print Short forms with student information and also blank short forms.
- Print multiple Leave Entry Packages.
Permission
Note: If profile SE (secretaries) has the below security, they will not be able to make changes.

Video How-to
Student Demographic Fast Loader video
Directions for Printing a Demographic Page to Send Home:
Menu Location

In the upper left navigation panel, select Student Master > Loaders > Student Demographic Fast Loader”.
Setup Options

Year - Defaults to the current year. A prior year may be accessed by clicking in the field and making the appropriate selection from the drop down list.
District - Default value is based on your security settings. You will be limited to your district only.
School - Default value is based on your security settings. If you are assigned to a school, the school default value will be your school site code. You will not be able to change this
value. If you are a supervisor or other district office employee with access to the Student Information System, you will be able to run programs for one school, a small group of schools, or all
schools in your district. Grade - Grade level of students whose records need to be edited or whose names are to be included on a report. Leave the field blank if all grade levels are to be included. Otherwise,
click in the field to the right of Grade(s) to select the desired grade level(s) to be included.
Gender - Gender of students whose records need to be edited or whose names are to be included on a report. Leave the field blank if both genders are to be included. Otherwise, click in
the field to the right of Gender to select the desired gender to be included.
Ethnic - Ethnicity of students whose records need to be edited or whose names are to be included on a report. Leave the field blank if all ethnics are to be included. Otherwise, click in
the field to the right of Ethnic to select the desired ethnic(s) to be included.
Program - Leave blank if all program codes are to be included into the report. Otherwise click in the field to the right of Program Codes to select the desired program code(s) to view.
Club - Extracurricular activities in which students may participate. Leave blank if all clubs are to be included into the report. Otherwise click in the field to the right of Clubs to
select the desired club(s) to view.
Team - This selection should only be used if your school is using Team Scheduling. Leave blank if all team names are to be included into the report. Otherwise click in the field to the
right of Teams to select the desired Teams(s) to view.
Special Codes - Special Codes must have been entered into the Student Master record for students. Leave blank if all special codes are to be included into the report. Otherwise click in
the field to the right of Special Codes to select the desired special code(s) to view.
Homeroom - The teacher who is assigned a group of students in addition to the regular classes that they teach. Leave blank if all homerooms are to be included into the report. Otherwise
click in the field to the right of Homeroom to select the desired homeroom(s) to view.
Student - This will generate a list of students to select from.
As of Date - This choice will list only those students who are actively enrolled as of the date selected in the date field.
Show SSN - Show the social security number on the report
Order To List - Allows for the list to be sorted in the desired way upon clicking OK.
Show Parent’s Security Code: Select to show the 5 digit code (PSN) needed for the Parent / Guardian to create a Student Progress Center Account.
Show JCOMM Permissions: Use only if the district uses the Edgear Call System. Select to show a place for the parent / guardian to indicate that a call is not to be placed to a given
phone number.
Show General Permissions: Deselect (no check) to show the Comments from Student Master at the bottom of the form. Select to show Permissions check boxes at the bottom of the form.
Show Alert Codes: Shows a student's alert code. To print Alert Codes on Demographic Form, you must check "Show Alert Codes" and "Show Comments".
Show Comments: This will show the student's master record comments on the Student Short Form. You may choose to "Show General Permission" or Show Comments" but not both.
Show Blank JCOMM Permissions. By selecting this option the printout will show the blank check boxes on the short for each selected student. This will give the parents/guardian the
mechanism to update these permissions.
Morning Bus - Morning bus number
Evening Bus - Evening bus number
OK - Click to continue
To find definitions for standard setup values, follow this link: Standard Setup Options.
Main

Column Headers
Check these boxes on the left to choose student(s)
SIDNO - Student's identification number
School - Site code of the school in which the student is enrolled
Student Name - Student's full name
Grade - Student's grade of enrollment
Ethnic - Student's race/ethnicity
Gender - Student's gender
Homeroom Teacher - Student's homeroom teacher
Programs - Leave blank if all program codes are to be included into the report. Otherwise click in the field to the right of Program Codes to select the desired program code(s) to view.
Clubs - Extracurricular activities in which students may participate. Leave blank if all clubs are to be included into the report. Otherwise click in the field to the right of Clubs to
select the desired club(s) to view.
Special Codes - Special Codes must have been entered into the Student Master record for students. Leave blank if all special codes are to be included into the report. Otherwise click in
the field to the right of Special Codes to select the desired special code(s) to view.
Shown below are typical Settings for Student Progress Center confirmation.
A listing of students with a select box will be displayed. Click in the select box of the desired students to create a form, or to select all students displayed, click the square in the upper
left. You will then notice that a check mark is placed to the left of the name of the student(s).
To print the forms, click the Print Short Form button on the lower right of the screen. A print preview will be displayed to review the report before printing. Note: If a large school,
it may take a minute or two to get the report.
Directions for Updating Student Demographics When the Form Is Returned:
Note: This is not the only way to update demographics. If the user is more comfortable updating demographics in the Student Master module, that is certainly a good option. The advantage here is that all of the demographic information is on one screen that roughly fits the form that was printed out.
- When the forms are returned, go to the Student Demographics Fast Loader as detailed earlier in steps 1 and 2 on the previous page.
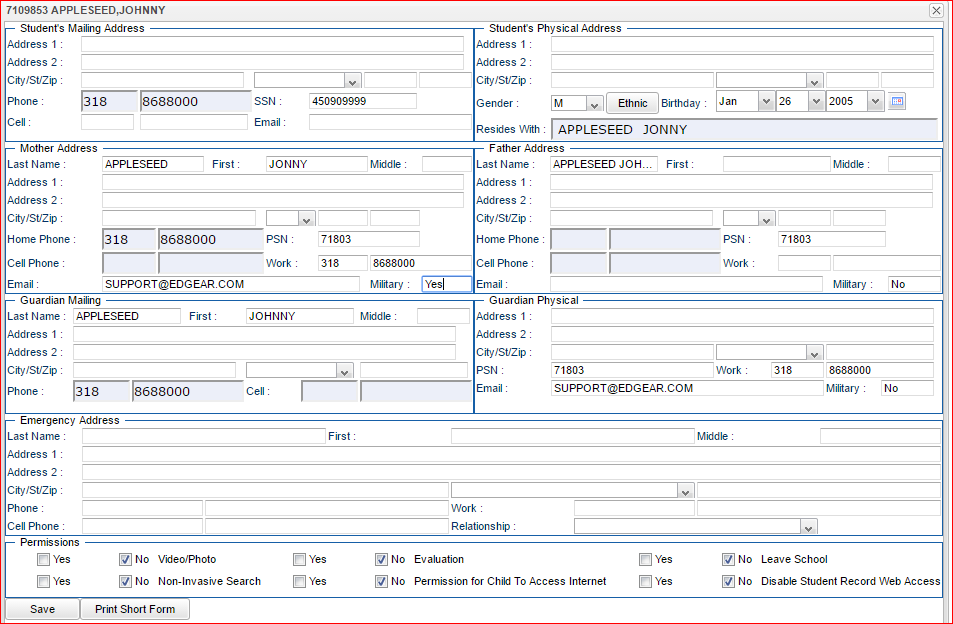
- At the student listing, click on a student’s name or ID number. Give it two or three seconds, then you will see a demographic screen that will appear as shown below. Generally, you will find that the fields match the layout of the printed demographic page.
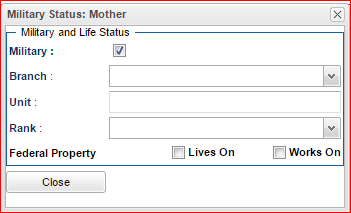
- Update the information on the screen by clicking on certain fields and then a pop window will allow you to edit information.
- For example: Click in the Military field and this box will pop up.
- To update the opt out for the items listed below click any of the phone number(s) fields for the Father, Mother, and/or Guardian. NOTE: No work numbers will be called; therefore, you will not get a popup for updating the opt out for any work number.
- Tardies (TARD)
- Attendance (ATND)
- Discipline (DISC)
- Grades (GRDS)
- Events (EVNT)
- To update the permissions found on the bottom of the sample above, click the permissions tab at the bottom of the student master.
- Important! Click the “Save” button located on the lower left to store the changes.
- Tip: If the user wishes to print an updated form of demographic information on the student, click the “Print Short Form” button located in the lower left.
- Click the yellow “x” in the upper right to close the screen. You will be returned to the student listing.
- To work on the next student, browse the listing to the desired student, click on the student name or ID, and repeat the steps above.


Directions for Printing Multiple Entry Leave Package:
- Once you click "OK" on the set up box, you will have a list of students. Check one, several or all students and then click on Print Entry/Leave Package.
- Click on the following link for further instructions on which reports, etc. that you will need.
Print Options
To find the print instructions, follow this link: Standard Print Options.