Category Editor
Overview
The Category Editor is used to create Category Groups that can be assigned to sections in the Master Schedule using the Category Loader. As an example, a district could create an Elementary ELA Group composed of three categories: Reading, Writing, and Spelling. This group could then be assigned to every ELA section for all the schools in the district using the Category Loader. In creating the group, the district could also determine if the individual teachers could change the default points or the color for the specific category.
This help section will guide the user in creating Category Groups.
Accessing the Category Editor
The Category Editor can be accessed via Grades -> Loaders -> Category Editor.
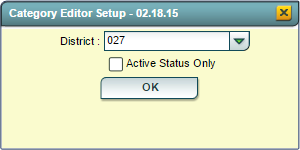
Category Editor Setup Box Options
District: This setting will default to the user's district.
- Active Status Only: If this item is checked, only Active Category Groups will be displayed. If left unchecked, then all Category Groups will be displayed.
- Click the OK button to bring up the Category Editor.
Category Editor Screen
The Category Editor Screen is divided into two panels
- The left panel is used to create/edit Category Groups and their associated attributes.
- The panel on the right is used to define the individual categories within a Category Group.
Category Group Edit Panel
- D: Clicking in this cell will delete the associated Category Group.
- Category Group Title: This is the title of the Category Group. Click on the Edit icon to create or make changes to the title.
- Points: If checked, the teacher will be able to change the default points possible for categories within the group. Otherwise, the default points possible cannot be changed.
- Color: If checked, the teacher will be able to change the color associated with the categories within the group. Otherwise, the color associated with the categories cannot be changed.
- Active: If checked, the Category Group is displayed in the Category Loader and can be applied to Master Schedule sections. Otherwise, the Category Group will not be displayed in the Category Loader.
- S: Clicking in this area will save a new Category Group or any changes to an existing Category Group.
Define Categories Panel
- D: Clicking in this cell will delete the associated Category.
- Category: Click this icon to create or change the name of the associated Category.
- Default Max: Enter the optional default points to be used as the Max Value for this category.
- Only Max: Forces the default max points to be used in the assignment editor. Teacher can not change assignment's points possible.
- Max Bonus: The maximum bonus points allowed for assignments using this category. Any bonus points the teacher assigns must be equal to or less than this number
- Floor: Any points posted, for assignments using this category, below this value will use the floor value.
- Weight: Enter the optional weight value for this category. (If used, the total weight values for a group is usually 100)
- Color: If used, select the color to be used for this category. (In the gradebook, the grades assigned to this category will have a background of the selected color)
- P1-P8 - This applies to this grading period.
- E1-E4 - This applies to this grading period.
- S: Save by clicking in this area will save a new Category or any changes to an existing Category.
Creating a Category Group
Two steps are required to create a Category Group
- Create and Save the Group Title
- Define and Save each of the categories within the Group
Steps to Create/Save a Category Group
In the left panel, use the first row to create a new Category Group by:
- Clicking on the Edit icon or click in the blank cell in the "Category Group Title" column.
- When the text box pops up, type in the Group Title for the new Category Group. (Make the title meaningful)
- Select the Points, Color, and Active check boxes as required for the new Category Group.
- Click the Save cell to save the new Group Category.
- (When the Save cell is clicked, the new Category Group will move down into the Group list in alphabetical order)
Steps to Define/Save a Category
In the right panel, use the first row to create a new Category by:
- Clicking in the blank cell in the "Category column".
- When the text box pops up, type in the name for the new Category. (Make the name meaningful)
- Enter the Default Max Value for the category if required.
- Enter the Weight value if required.
- Select the Color if required.
- Click the Save cell to save the new Category.
- (When the Save cell is clicked, the new Category will move down into the Catigory list in alphabetical order)
Examples of Category Groups
Last Updated: 2015-07-17


