IBC Editor
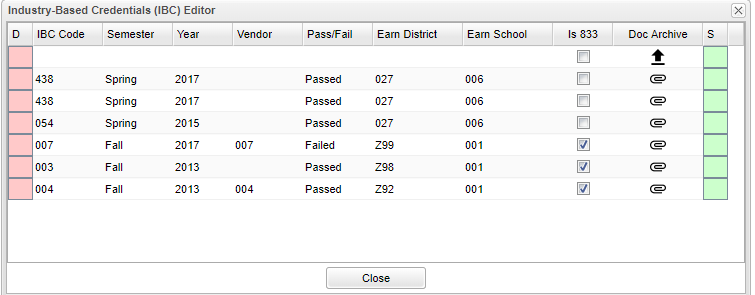
The student's IBCs are displayed here. If the user clicks on the blue IBC, the following chart will appear. The user can enter IBC information using the chart. This chart is also available on the Transcript Workstation Overview. The STS program will pull the 050 records from the information that is entered into this chart with no additional selections on that set up box.
Column Headers
D - Click to delete the row.
IBC Code - Use the search box to find the code for the IBC. Refer to the Code Matrix table posted on the LDOE Insight. Only one code can be entered per student with a "Passed/Failed" and the program will prevent the user from adding more than one.
Semester - The semester the IBC was earned.
Year - The beginning year of the school session when the IBC was earned.
Vendor - Use the search box to find the code for the Vendor which is the testing agency of the IBC. Vendor is not a required field.
Pass/Fail - Result of the IBC earned status.
Earn District - The Sponsor Code of the LEA where the student was enrolled when the IBC was earned.
Earn School - The School Code of the school where the student was enrolled when the IBC was earned.
Is 833 - Select if the IBC is an ACT 833 credential. Is 833 is not a required field.
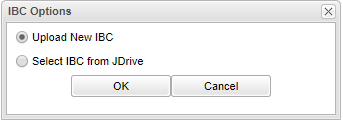
Doc Archive - Click to Upload New IBC, Select IBC from JDrive, View IBC or Remove IBC.
- If the district is a non Doc Archive district, then a message about this program will appear.
- If the district uses Doc Archive, and is adding a new IBC, then two choices will appear, Upload New IBC and Select IBC from JDrive. If the IBC is an existing IBC scanned in and is in the JDrive, then all four choices will appear.
- The option to "Remove IBC" only breaks the link between the 050 record and the image.
Save - Click to save the row.

