Difference between revisions of "Tardy Analysis"
| Line 86: | Line 86: | ||
'''Ok''' - Click to continue | '''Ok''' - Click to continue | ||
| − | |||
| − | |||
| − | |||
| − | |||
If you need instructions for setup values to be used, follow the link for '''<span style="background:yellow">[[Standard Setup Options]]</span>'''. | If you need instructions for setup values to be used, follow the link for '''<span style="background:yellow">[[Standard Setup Options]]</span>'''. | ||
| Line 97: | Line 93: | ||
you use this link and want to return to this set of instructions, click the back arrow at the top left of the screen. | you use this link and want to return to this set of instructions, click the back arrow at the top left of the screen. | ||
| − | ''' | + | '''Note''' - You may create a letter based on grade level groups (PreK-3, 4-8, and 9-12) if your policy makes such a distinction. Name them with the grade level as part of the name for ease of |
identification in the next steps. Or, you may create one letter to be used school wide. | identification in the next steps. Or, you may create one letter to be used school wide. | ||
| − | |||
| − | |||
| − | |||
To print this '''report''', follow this link: '''<span style="background:yellow">[[Standard Print Options]]</span>'''. | To print this '''report''', follow this link: '''<span style="background:yellow">[[Standard Print Options]]</span>'''. | ||
To print '''letters''' to parents: | To print '''letters''' to parents: | ||
| − | + | ||
| − | + | Click the number in the cell under '''Total'''. | |
| − | + | ||
| − | + | A list of students with their YTD (year-to-date) and PTD (period-to-date) count on the left side of the report. | |
| − | + | ||
| − | + | Click the '''Letters''' button. The letters printed will be based on the selection made in the setup box. | |
| + | |||
| + | Select the student(s) whose parents/guardians are to receive letters. | ||
| + | |||
| + | Click the '''letters''' button and a print preview will appear. | ||
| + | |||
| + | '''To get the print icon''' on this window, hover the mouse in the bottom right area of the preview. A grey rectangle will appear with several icons. Click the print icon at the right end of | ||
| + | |||
| + | this rectangle. Another print preview will appear; click the print button at the top left to print the report. Close the print preview. | ||
Revision as of 06:43, 27 April 2018
This report is used to create a count of Tardies (attendance code 14) and Late To School (code 19) for a given date range. It will also look at the time that school starts and compare the check in time of the student which is the state defined way of considering student tardy. A tardy by the state`s definition is anyone who enters or exits school early, not simply based on the codes. Some districts don`t use the codes of 19 or 24.
The report can be printed and/or emailed to persons on the school/district staff.
Letters MUST be created before any letters can be printed. Refer to the instructions below the Setup Box options on how to create the letters and how to print them.
Main
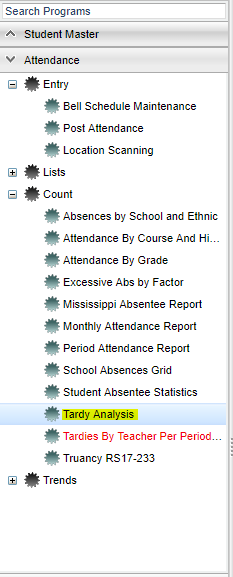
On the left navigation panel, select Attendance > Count > Tardy Analysis.
Setup Options
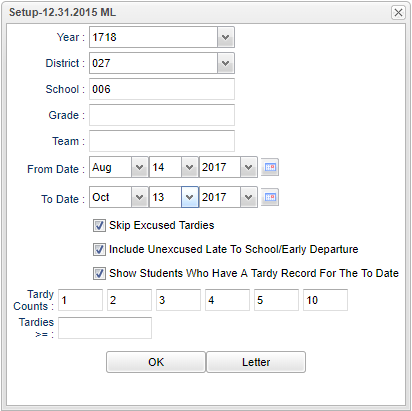
Year - Defaults to the current year. A prior year may be accessed by clicking in the field and making the appropriate selection from the drop down list.
District - Default value is based on your security settings. You will be limited to your district only.
School - Default value is based on your security settings. If you are assigned to a school, the school default value will be your school site code. You will not be able to change this
value. If you are a supervisor or other district office employee with access to the Student Information System, you will be able to run programs for one school, a small group of schools, or
all schools in your district.
Grade - Grade level of students whose records need to be edited or whose names are to be included on a report. Leave the field blank if all grade levels are to be included. Otherwise,
click in the field to the right of Grade(s) to select the desired grade level(s) to be included.
Team - This selection should only be used if your school is using Team Scheduling. Leave blank if all team names are to be included into the report. Otherwise click in the field to the
right of Teams to select the desired Teams(s) to view.
From Date and To Date - A set of dates that limits the selection of records for the report to a beginning date (from) and an ending date (to) range.
Skip Excused Tardies - Attendance code 14 Tardy can be marked as "excused" or "unexcused".
If checked, "excused" Tardy records will not be counted in the report.
If not checked, "excused" and "unexcused" records will be counted in the report.
Include Unexcused Late to School / Early Departure - Attendance code 19 `Late to School/Early Departure` is used when a student comes in late to school or checks outs early. It checks
the tardy based on State definition of a tardy (late to school/early leaver) and not just codes 19 or 14. NOTE: The Tardy Analysis Report is for the tardy to class not tardy to school. The
tardy to school is used for truancy purposes.
If checked, the Late to School code 19 records will be counted in the report.
If unchecked, the Late to School code 19 records will not be counted in the report.
Show Students Who Have a Tardy Record for the To Date - Select to limit the report to only students who have a Tardy record on the actual To Date chosen.
This is a helpful option if this report is run daily. By selecting this option, the report is limited to showing counts only for students who have a Tardy on the To Date.
Tardy Counts - for each box that you want to show on the report. The number that is entered in each of these squares will show up in the columns on the report. The numbers/counts that
appear there after clicking OK are NOT student counts but are Tardy counts. Upon clicking on the tardy count number, you will have a list of students with exactly that number of tardies that
you entered in the box. In the report, PTD (period to date) represents the count of tardies using the From Date and To Date. YTD (year to date) is the count of tardies
for the entire school year as determined by the sponsor site.
Tardies >= - This value would override the preset numbers in the above boxes. If you enter a number in this box, after clicking OK, you will get a number/count of tardies (NOT
student counts). Upon clicking on the tardy count number, you will have a list of students with tardies of at least that number entered or more (>=).
If you are printing letters then you must click the Letters button.
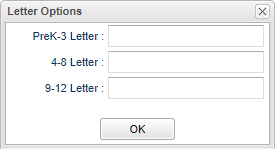
Letter Options - setup box will appear.
Select the letter(s) according to the policy for each grade range in the setup box.
PreK-3 Letter
4-8 Letter
9-12 Letter
If you want to create a letter based on grade level groups (PreK-3, 4-8, and 9-12) select them accordingly. Or, select the same letter for all three groups.
Ok - Click to continue
If you need instructions for setup values to be used, follow the link for Standard Setup Options.
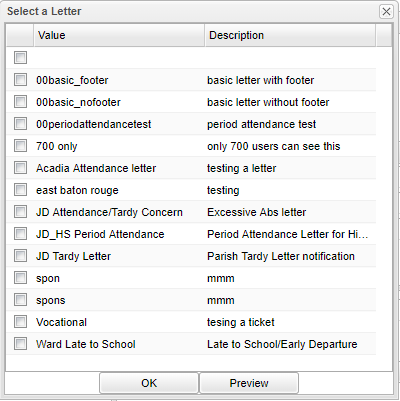
To print parent letters, they must exist before you can continue. If you need instructions on how to create the letters, use this link to view the instructions Letter Maintenance. If
you use this link and want to return to this set of instructions, click the back arrow at the top left of the screen.
Note - You may create a letter based on grade level groups (PreK-3, 4-8, and 9-12) if your policy makes such a distinction. Name them with the grade level as part of the name for ease of
identification in the next steps. Or, you may create one letter to be used school wide.
To print this report, follow this link: Standard Print Options.
To print letters to parents:
Click the number in the cell under Total.
A list of students with their YTD (year-to-date) and PTD (period-to-date) count on the left side of the report.
Click the Letters button. The letters printed will be based on the selection made in the setup box.
Select the student(s) whose parents/guardians are to receive letters.
Click the letters button and a print preview will appear.
To get the print icon on this window, hover the mouse in the bottom right area of the preview. A grey rectangle will appear with several icons. Click the print icon at the right end of
this rectangle. Another print preview will appear; click the print button at the top left to print the report. Close the print preview.
Email
- Click on the number count.
- Select the students
- Click the check box to the left of the student's name to select individual students.
- Check the check box a the top of the "Check box" column to either select or unselect all of the students.
- Click the Email button.
- Teacher Email - choose a teacher(s) to also send the email to.


